Saturday, 30 April 2016

Fabric shopping at Abakhans Hanley


On Friday I went fabric shopping with my Mum. Basically my mum and dad had kept back a portion of birthday money and a portion of Christmas money so I could go out and buy some fabrics. Anyone who regularly reads this blog might have gathered that I don't really spend a lot on fabric [like ever] Instead relying on my stash and up cycling things.

So here's how our day went!

8.10am - mum arrives on doorstep to pick me and Lil man up and take him to nursery.
8.30am - drop Lil man off at nursery and drive to hanley
9.10 -  arrive at abakhans, realise it doesn't open until 9.30am, pop to shops for supplies [juice and kitkats]
9.30am wait outside for doors to open! SHOP!
11.00 - mum exists shop for five minutes for fresh air and a quick drink (woman has no staying power)
12.30 - pay for goods, leave shop! Yeah I spent three hours in a fabric shop, you can stop judging me now!
12.31- me and mum scoff chunky kit kats like lions attacking a gazelle, then work out where to actually find lunch.


Anyway that was my shopping experience but I thought I'd do a little review of Abakhan fabrics in hanley.

Finding the store-

The first time I went I got majorly lost! but that was before the days of having maps on your phone. personally though I walk though M and S and then leave M and S through the exist by the food area, up the stairs [this is also where taxis do their pickups] and then walk straight down the street and on your right. As with most things once you've been you can find it again, and to be honest my four year old knows the way to the fabric shop so its not super hard.


Fabric Selection - 

Its very good, they have quilting cottons, wax cottons, bridal fabrics, lace , Jersey and everything in between!!! Some of the fabrics are on the roll and you can have as little as 10cm cut or theres big wire cages that are full of by the weight fabrics! Now if you pull a fabric out of the bin and you don't want it all they will cut it for you but they have to have at least a metre left. And if you want to check how much a cage fabric will cost then you can just pop it to the till and they will check for you!

I'd say they have a wider range of fabrics in store than online, [not that they don't have a huge selection online] but If you go in store and they don't have something that's online they can order it for you! 

Fabric Accessibility -

A lot of the fabric on bolts is easy to access although if you have difficulty with manoeuvring things or reaching then you might want to take a 'fabric slave' to help, failing that I'm sure if you holler at the staff they'll come and help!

The fabric in the cages is accessible but you might have to go burrowing! Trust me its worth reaching all the way to the bottom theres some real diamonds in there!


Price-

The price is what you'd expect for fabric, although I'd say some of the novelty print cottons are slightly cheaper than at other outlets! You can also find some absolute bargains in the wire cages, for example I found two pieces of wax cotton that were just over a metre long and they were under £4.00 each.

There's definitely a fabric for every budget, from the cheaper fabrics to the really pricey! the most expensive I saw was a beautiful and I mean BEAUTIFUL! sob your heart out, write it love letters, lace fabric with the most vivid blue roses embroidered on it. OMG its soooooooo beautiful! I think its the sort of fabric I might consider selling my soul [or whats left of it] for. But £25 per metre just wasn't something I felt comfortable spending. But OMG serious fabricgasm right there..........


Shop Layout-

The layouts pretty cracking really, I don't tend to visit the wool and pattern end because I'm pretty fabric minded, but the fabric and buttons and trimmings are all in one area which is very good. One thing I really love is that all the bolts are kept on the walls so the middle of the shop is easy to look across. Which is really good if your momma likes to wander off whilst saying "ooooh pretty"

Theres two cutting tables which is good because it means less time queueing, and theres three tills and I think you can get your fabrics weighed at each of these stations.


The Staff - 

I have never have any issues with the staff at abakhans in all of the years Ive shopped there [about 8/10 years?]

I didn't have trouble when I commandeered a lady for an hour and a half to help me pick fabrics for a costume I was making, and she helped me look over my sketches.

I didn't have trouble when my sister took measurements in for the fabric she wanted and she'd worked it out in cm square. Instead the lady cracked out the calculator and helped us work it out.

So yeah they are pretty cracking, and very knowledgeable, if you've got an issue or a question then they are some of the most knowledgeable staff I have ever met! [kudos to abakhan for hiring staff who know their stuff!]


And that's about everything I can think off! So here's a picture of me looking very happy at the tills! I'll go through what i actually brought after I've finished prewashing and ironing it!

Much Love

Frankie

xxx

P.s Although I sound like a massive kiss arse I promise this isn't a sponsored post, I just thought I should give credit where credits due! 

x


Friday, 29 April 2016

Finished Miette Cardigan!

It is done! I have finished! FINALLY! Its been a battle I've been waging since October! But I've finally finished knitting my miette cardigan!

So I started this cardigan back in october when I was lucky enough to receive a couple of hobbycraft gift vouchers for my birthday! Which I used to purchase this women's institute wool and a set of circular needles.


I already had my heart set on making the miette because I'd seen all of the awesome ones that Dolly Clackett has made! 


I've had to majorly lighten these pictures so you can see the details but its a really lovely cropped cardigan that is knitted top down and has some nice lace detailing! [which I screwed up in like seven places...woops] The pattern can be found here for FREE!   


I've got to say I'm really stupidly proud of myself! Number one this is my first hand knitted garment! i.e not a scarf or a hat, Secondly it doesn't look half bad! Of course I can see all the flaws, but seen as they are my mistakes I'm not surprised! And thirdly, I finished it! and at times trust me , I really didn't think I would. I actually grew to hate this project a bit, with its rows and its stupid circular needles and seemingly endless instructions! But I finished it! I'm still not sure where that last bit of motivation came from but it did! Although last night when I had to pick up 112 stitches for the neckband I did consider throwing in the towel!


So onto technical matters! 
- I used aran and its LUSH! In fact its currently on offer for 3 for 2 and I'm wondering If I should make three more! Yes that right I only used one ball of wool for this project. It was a massive ball and cost £10.00 but still! FYI if I do decide to take advantage of the discount I'm going for the Red , Teal and Grey shades! It really is lovely to knit with!

- you use circular needles, and knit top down. Which meant nothing to me in the beginning but was easier than I expected! The sleeves are knit in the round though and that did take some jiggling and cursing!

-I learnt new stitches! Just in general I stepped out of my comfort zone which is pretty big for me! Although I am wondering what one would look like knit in garter stitch!

- the buttons came from my stash, they are not revolutionary but they do the job!

-If I were to do it again I think id print the pattern off, the amount of time I spent waiting for my tablet to charge was unreal! And although I like the idea of being paperless it did mean I didn't knit on some of the occasions I could have!

-I knit a chest size 34 because of negative ease and stuff, and it fits so yay!


So what do I think?

I love the pattern, it well written and I'd say it perfect for an ambitious beginner who wants to move away from scarves! I love the look as well. Its a great sort of 1950's style which I like [In fact my mum mentioned that it would be good for the vintage revival that she attends but I might have told her to sod off and knit her own!] Its very snuggly, more so that I expected and I love the 3/4 length sleeves. I'm definitely looking forward to seeing how it looks with some of my dresses!

So what now? 

Well I have a big book of knitting patterns so I think I might try one of those, I'd like something stripy and with a hippy vibe. But I think I might have a short rest first. I might try for one hand knit item per year. That way I can splurge on wool and make sure its something I love. I really love how finishing this project has given me more confidence to try bigger and better knitted items! 

I do however still have some wool left! Which I'm going to use of something......

Any ideas?

Much Love 

Frankie

xxx


Thursday, 28 April 2016

Cheer Up Elephant

This is one of those really silly things I like to make every now and again. Basically I like to leave Rikki little gifts, sometimes it a bunch of sunflowers [he is my sunshine] , once a knitted bunny rabbit, a tray of jam tarts on the stairs, a bag of doughnuts! Basically if he's feeling low or poorly I think its my mission to perk him up! And if I feel low he does the same!

Anyway seen as he's had a pretty nasty cold I decided to quickly stitch him up a elephant to cheer him up!


I used the pattern from this book . The pattern is designed for wovens and made on a machine but I decided to use scraps of fleece and sew it by hand.


It took up a few hours whilst one poorly boy dragged himself to work and the other sat on the sofa feeling sorry for himself.


Construction wise its nothing ground breaking, although if I were to make it in a woven fabric I think I'd actually insert the ears rather than slip stitch them on as the pattern suggests.


He's very soft and cute and definitely cheered Rikki up! although he wasn't impressed with the name I gave him!! Snottersly! Yeah gross I know! I don't have a great track record with giving things names!

What do you do to cheer people up when they are sick?

Much Love

Frankie 

xxx 

Monday, 25 April 2016

A throw everything in it Duffel bag!

We love taking little man swimming, and after much trial and error we've found a place where the water is warm, it doesn't cot the earth and that has family changing rooms! Family changing rooms are a complete game changer as far as I'm concerned. Some of the pools we've been previously only had men's and women's and seen as the men's never seem to have a play pen, or well anything I always ended up trying to sort out the baby, then sort myself whilst making sure said baby didn't soak himself all over again!

Now I take lil man into the changing room and start to get him dried off, whilst Rikki has his shower [My hair is far too long for the piddly trickle that swimming pool showers offer so I have a bath when I get home] then once both the boys are ready they go and sit in the cafe and have a drink [£2.10 for a pint!] and I get all the time I want to get ready! [I think the beer helps with the waiting]

I've gotta say I love having the time to myself to dry off properly , apply moisturiser [The chlorine is a killer for my skin] do my hair and apply some make up so I don't look like a troll as we are leaving!

But that does mean I, in particular end up carrying a lot of stuff around!

Enter the duffel bag! 


Previously we've been using bags for life, but that only leaves you with one hang free, so I whipped this up using a certain remnant that I really love! And some scrap pieces of linen!


I top stitched all my straps and added a pocket to the front for chucking smaller bits like my phone and locker money in.


All in all it didn't take very long to sew up at all, In fact I'm thinking of making one for Rikki and one for lil man so we each have one for when we go and stay at families houses etc. I think it might be easier than our usual system of using bags for life and then watching everything spill out of said bag for life! 


I love the fabric combination on this though and the fact that its HUGE! I mean seriously pretty sure you could carry a child around in this! I didn't cut the fabric I used for the mainly body of the bag instead I just whipped out my maths gcse and worked out how big my circle needed to be based on the dimensions! 

I will do a full thing on working it out at some point but for now :

measure your main fabric width,

divide that measurement by 3.14 [pi] and then you have the diameter for your circle! [remember the diameter is from edge to edge of a circle.


I did button holes at the top to thread the straps through the channelling but I'm pretty sure I got one twisted.


And I used some D rings from an old handbag to give it more a store brought feel. Although I have miss judged slightly and made the straps too skinny for the rings!

I like my X top stitching though! Its pretty tidy!


I took these photos with a few towels stuffed in to give it more shape.


All in all I'm calling it a grand success.

In other news I'm still feeling icky, I'm not sure what's up apart from me getting the boys cold anyway I'm trying to combat it all by resting and eating right. In fact as we speak I've got my feet up and I'm watching star wars revenge of the sith. As much as I love the old movies the costumes in the first three are awesome! Particularly the queens! 

Anyway I'm off to rest and try and finish this blooming Miette cardigan!

Much Love

Frankie


Sunday, 24 April 2016

Spotty Bibs

I love that I now have an bunch of easy baby patterns that I can whip out when I need to create a couple of gifts! I used this self drafted pattern that can be found here.


I cut them out last night whilst cooking dinner and it couldn't have taken me longer than an hour to sew them up. And my machine was throwing a fit! I used scraps and offcuts that I had lying around so its a stash busting project as well!


I opted to put both sets of spots at the front and use other prints for the back. I was going to do press studs as the closure but I couldn't find any so I opted for buttons and loops.

I am lusting after one of these though! I think it would save me loads of time. 


The two spotty fabrics and the weird micro organism looking one are from my stash and I have no idea where they are from but the owls are from the Craft cotton company .


I had them for my birthday and they just seem to be never ending! I still have one fat quarter left and they have been used in baby blankets, cushions and loads of other bits!

It was actually quite nice to whip something up fairly quickly usually I make dresses and stay up far too late trying to finish them. So it was refreshing to be in bed at a reasonable hour. Although saying that I woke up feeling AWFUL this morning after a bad nights sleep, which is why I'm not showing you the other thing I made last night because this face is not ready for pictures! I'm also wicked bloated and that doesn't help! I refuse to leave the house today in case someone thinks I'm having a baby. [Its happened before and is the reason no longer eat curry! "awww when are you due?" I'm not but thank you for pointing out what spicy food does to my body I hope an anvil falls on your head]

So yeah that's it really I've added to my next baby gift set , I think I'll just finish it off with a taggy blanket and be done. And I've spent most of today lying on the sofa doing some hand stitching trying not to feel sorry for myself.

Much Love

Frankie

xxx

Saturday, 23 April 2016

Toile and Error

I love experimenting with patterns, mainly because I don't buy patterns very often [read at all] because I'd rather spend money on fabric. So I tend to give then a good chop and change every now and again!

This toile is yet another variation of my princess seam bodice from the great british sewing be book.


Alterations wise I added a inch and a half to the bottom of all the bodice pieces and raised the neckline. After years of showing huge amounts of flesh I've now realised that less is more in the sexy stakes!

Which mean the flesh is in the back [again I know it tend to do a lot of back bearing things but I think it might be my favourite part of my body. I'd rather expose my entire back than expose my midriff!]


The back is in a racer back style which I love. Simply put I copied my pattern pieces onto paper [I use this bodice so often that my pattern pieces are card so easy to draw around] And then scooped out the armhole until I had a racer back. Its not perfect but that what the toile was for!   


Although as you can clearly see this toile was a huge fail. I had wanted it to be a wearable toile but the pulling of the back bodice through the straps [Its a fully lined bodice] put too much strain on the seams and it frayed like a [insert naughty word here]. Which really hacked me off because it took an hour to turn them both through and I'd trimmed down most of the bulk.

Anyway it jacked up the whole of the neckline and whilst I considered finishing it with the skirt I'd cut out and stuff it would have been a waste of time and zip, because I just wouldn't have worn it! 

  I'm making mark two tonight and I'm hoping that same thing doesn't happen again, I'm going to use a dainty seam allowance and the fabric is a lot thinner so fingers crossed wont be a problem.


I'm pretty annoyed that I'm going to throw this one out through because my print placement was pretty nice and I'd eased the princess seams really well too [at least in my opinion] and I love the back!

At some point I'll do a series on altering your favourite bodice blocks in simple ways but for the moment I just don't seem to have any time! 

In other news I forced myself to do some more on my miette cardigan last night whilst the boys played video games and I'm hoping to get my first sleeve finished tonight.... hopefully. I don't hate it yet but I'm getting close. I am pleased I've stuck with it for so long though! I never thought I'd be the type to try and hand knit a cardigan!

To be honest my entire crafting games been off again this week and I'm blaming Mother Nature! Not helped by my grumpy son who likes to get up at half six and then be miserable for the whole day!

Much Love

Frankie

xxx


Wednesday, 20 April 2016

In God We Trust .... I hope this is legal!

In 2010 I went to New York with my college for a photography trip. From what I remember it was quite expensive but my parents were good enough to pay for me to go on the condition I worked on controlling my anxiety and panic attacks better.

And I'm happy to say I smashed it!

We were their for about 5/6 days and took in all the sights as well as soaking up the atmosphere, We went to the empire state building on valentines day, where I had the pleasure of watching an American couple break up [yeah on valentines day! what a bumface] we did ice skating at the rockerfeller centre and I did a power slide down one of the marble hallways of Trump towers!  


Yes I wore bright pink fluffy ear warmers, I'm not sure what was more fun receiving compliments from Americans or their delight to find that I was British!

"OMG do you know the Queen?"

"Yep me and Lizzie are home girls, BFFS, two peas in a quaint British pod"

Naturally I brought a lot of souvenirs but whereas my hoody, tshirt, novelty glasses and other bits of tat have all gone, the only things that remain are my New York booty shorts [ya know for when I'm feeling sassy] and this Quarter, which has been floating around my jewellery box for the past 6 years.


Until last night when I took the plunge and drilled a hole so I can wear it as a lucky talisman of how far I've come. And as a reminder that all bad things come to pass.

I drilled it using our little handheld drill and it took bloody ages, I put some sticky tape on the front but the drill still slipped so the eagle doesn't hang completely straight which is annoying but I'm not perfect so I don't see why this should be. the loop came from an old piece of jewellery and the chain did as well, the chains pretty short as well which I like and I'm enjoying wearing it layer up with other lucky talismans.

It did occur to me halfway through that damaging a countries currency might be a bit illegal, I'm pretty sure that damaging English money is like a personal diss on the queen or something?

So yeah there is a part of me that wondering if Donald Trump might be stood at my door at some point ranting and raving but I didn't do it as a disrespect of the american people just as a respect of myself, and my personal journey!

Anyway I definitely plan on going back to New York at some point In fact their has been discussion about doing some sort of american road trip with me Rikki and lil knitwit which could be cool!

Although we completely differ on where we want to go!!

Much Love

Frankie

xxx


Monday, 18 April 2016

Guitar Playing Bear

So today is a fun make, there is nothing serious about this at all!


Its a bear playing guitar, I'll just give you a minute to bask in the glory of that.


The pattern came from issue 25 of love sewing magazine, The pattern is actually for a panda but I didnt have any white or black felt so I just turned mine into a teddy bear and so it didn't become bland I made it a jazzy coloured guitar.

I omitted the flower headband because mine is a lil boy bear , and instead just gave him a axle rose style bandanna. I did give him the beads though, which was nice because I have a huge tub of beads that I hardly ever use! 


I especially like the strings detail, Although I miss-counted and only did five strings not six! So its not an entirely accurate guitar.


I think its really cute and it was a perfect sew for looking after a poorly boy on the sofa, not majorly poorly just tired and grumpy, we watched films and I sewed up this little fella. Who I'm naming.........


KEITH! After my brother in law, who plays guitar and has a certain teddybearness about him.


He has a tail which I completely forgot to photograph. and I added a tummy patch which the pattern doesn't call for. Stitching wise I did the whole thing by hand using a small running stitch. I also didn't use much stuffing although it takes more felt than you'd think!


All in all , its cute so WINNER! 

Much Love

Frankie 

xxx

Sunday, 17 April 2016

Two Shirts into One Shirt dress Refashion

I LOVE refashioning shirts! There are so many refashioning possibilities from one garment.
 I do find it hard to find nice shirts for refashioning though, I'm not a huge fan of trawling through the rails of my local charity shops [think less quality shirts and more tracksuits with juicy on the behind]
So instead I have to look to either Rikki who wears the same size shirt as me or my Dad [He doesn't wear the same size as me............]

Luckily for me my Dad was getting rid of a few shirts...... because I made him. And even luckier two of the shirts were exactly the same. FYI shopping with my dad is absolute hell so he must have REALLY liked these if he ended up with two!!! 
  

They are good quality shirts that require cuff links, made from cotton and have DEHAVILLAND written in the label which means nothing to me!


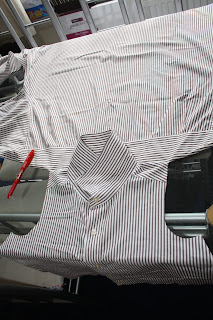
To start off I laid my shirt flat and got out my Lilou bodice pieces. Next I lay the pattern piece so the fold line went along the centre of the buttons on the button placket [I decided to use the button placket as my opening]. Then I transferred the pattern marking and flipped the pattern piece so I could do the same on the other side. If I were to do this again I would leave myself a bit more room for gaping, so I'd go from one side of the buttons instead!


Next I cut of the single layer of my shirt front and cut straight across the back yoke where to make a halter neck shape. 


Then I chucked it on my mannequin to check my theory worked. 


And then used what was left of the back to cut out my back bodice pieces [I omitted the seam allowance on the back centre seam and cut them on the fold.] 

The skirt was made by using the second shirt and simply cutting a straight line from the bottom of the arm to the bottom of the other arm. then simply I gathered this and added it to the bottom making sure to match up the button plackets and side seams.


I used the arms of the shirt to make bias binding, which I used on the arm holes and the back. And I don't want to excite you too much but I didn't even have to hem it! Just used the original shirt hem! 


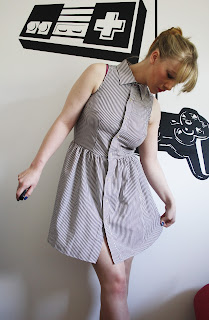
I've gotta say I really love how it looks! I could do with a bit more ease in the bodice but I am carrying a little bit of Easter width! Those pesky chocolate bunnies making me eat them.


I love the cut out back detail! It's so cute, I finished the edges of this with bias binding as well!


The pinstripes on this are making my eyes go west! It's kind of a white and darkish brown colour palette? Typical business man shirt sort of thing.


The bodice fits better open, in fact a slightly different bra might help? Jeez its hard being a lady so many things to think about!


I think I'm going to be wearing it with this belt a lot for a lil bit of waist definition. The belt is also thrifted from a skirt! 


All in all I really love it, I've been wanting a shirt dress for ages and I love the relaxed style of this, it's pretty short but I think I can get away with it [please excuse my pasty skin I don't tan]

It was so lucky that I had two of these shirts to make this with although it might look cute with two shirts in different colours and doing some colour blocking. It could also help with adding some length! 

In other news, Lil man is back at nursery and I'm not pleased because he was fine over the two weeks! Not so much as a sniffle and then one day back and he's coughing and spluttering! Who are these germ infested children! And why aren't they keeping them away from the healthy ones!!!

Anyway I guess that's just what happens when you get large groups of toddlers together, and on the plus side if he passes it on to Rikki then they have to go on bed rest and I'll have lots of time to sew!

Now I just need to decided what to make next, this was pretty spur of the moment!

Much Love

Frankie

xxx