Wednesday 31 August 2016

High Low Wrap Skirt!

When I started blogging I swore I would blog the good the bad and the ugly. And to be honest I'm still not 100% which category this falls into.


Okay so its another wrap skirt, I'm becoming a huge fan of the wrap skirt. Mainly because I find them so flattering. And the idea of this was to create a sexy sort of tulip silhouette, and to be honest I'm not quite sure if I've achieved that? I do look nipped in at the waist but I think maybe there's a bit too much gathering around the whole thing? And maybe that parts not overly flattering? 


Especially from the back the whole thing looks a bit meh? The fabric is the same artificial poly silky stuff that I used for this. On this picture you can see that I haven't even finished the ties ! I'm waiting to see what you guys think! [See I keep you lot in very high regard!!!] 

I drafted it myself straight onto the fabric because I like the sew dangerously! I didn't even measure I just free handed GASP! 


Okay so good things, I like that I can switch up where the split is, at thew moment I like it central or to one side [which always reminds me of Catherine zeta Jones?]

And I'm pretty proud of the hem I've done, its not a rolled hem but its pretty tiny and very neat!!

And I like that its a wrap skirt because well, I heart wrap skirts!!!!


The more I look at these pictures the more I realise I kind of love the front view but hate the side and back views? I guess its lucky I don't have a permanent view of my own derriere huh!


So what do you think?

Is it worth finishing or shall I just sack it off now?

Much Love 

Frankie 

xxx

Monday 29 August 2016

Altering Me Mades

Sometimes you make something and yo think "yes this is it I am the queen of sewing, all shall bow before me and feel the wrath of my unpicker!" and sometimes you think "okay so this isn't ground breaking but its not awful" and sometimes you think "This is fugly..."

And every now and again you make something, like it but still don't wear it. And being that I don't have a HUGE wardrobe, no seriously my wardrobe is the size if a postage stamp, that means I have to decided if I'm going to alter it or just bin it. 

And unlike ready to wear clothing its really quite hard to let go of things you've actually made yourself with your own hands. so remake it was!

I didn't make any major changes, quite simply this dress did have a pink lace waistband but the lace was too think and I felt like I had a massive expanse of stomach out. Plus pink lace isn't really my jam! anyway you can read the full post about the original dress here. 


So I switched out the pink lace waistband for a plain one that I cute of the extra length of the skirt. Which seams fairly simple until you realise it involves taking out a zip, and taking out two rows of top stitching as well as the seams themselves.

It did mean however that I could do my gathers more evenly and swap out the zip for something that matched a little better. Even if it is a chunky beast of a thing!


And now I love this dress again! One little change and suddenly I can't wait to put it on and wear it!

In other news, I am BUSY! I'm talking Christmas style busy but in August!!!!

So far since August we've had 4 birthdays, 1 meeting with a registrar, 1 child to prepare for school an Anniversary, A shed load of wedding stuff to sort out and my hen party to arrange! and in September we have 2 birthdays, my hen party, my second hen party, rikkis stag, a big birthday party, my wedding hair appointments, final things to liase with the venue................................. I wont bore you to death but lets just say we haven't had time to breathe!!!!

And would you believe I still have people I need to chase up about invitations? I mean really? How rude!!!!! 

So any moment I can find to sew has been a godsend for my mental health and balance!!! 

Esspecially seen as my lil squidge is growing up so fast!!! We actually went out yesterday and brought him three new pairs of shoes for school! one smart pair, one pair of pe trainers [which apparently had to be all white but omg have you tried to find all white trainers recently? for a four year old? who's probably going to wear them a grand total of ten times?] and one pair of new shoes for day to day use because his old ones were super scraggy and horrible!!! 

So yeah I know I'm going to have a huge cry when he goes to school next week and I'm just going to embrace it and sob away!!!!!!!

Much Love

Frankie

xxx 

Saturday 27 August 2016

How to have the Perfect Sewing Evening!!!!

So here's my guide to having the perfect evening of sewing!!!!

1. Get rid of children/Husband/Wife, preferably outside of the house otherwise you might find they need some sort of attention, needy little swines. If outside isn't an option put them upstairs, lock the doors, threaten them with death if they disturb you!

2. Put on some music/netflix, preferably something you've seen before so you don't get distracted but thinking "OMG what happened?" This step can also be used to drown out partners and children!!


3. Cut out your project before hand. This way you can jump straight into the sewing and not have to mess about with marking pattern information and trying to find a space to cut out!

4. Collect sewing snacks. Did you know that sewing whilst eating chocolate makes you sew straighter seams? and that the particularly expensive chocolates [your Belgium and your Thorntons] have an 80% chance of stopping your bobbin running out during a seam? However all of this stops if you share!


5. Collect a sewing beverage, teas nice but can be forgotten about leaving you with a cold brew [and having a perfect sewing evening is not about cold brews!] Wine works nicely however I'd skip any precision work after you've had your second glass!

6. Fill your bobbin. Hell if its a particularly big project fill two!! Just fill them it saves a lot of aggro later!!! 


7. Find the comfiest chair you have. I'm a massive fan of our computer chair because its padded and height adjustable. But if you only have hard chairs wack a couple of cushions on it so your bum doesn't go numb! Also remember the stand up and stretch every now and again, otherwise you'll be sore tomorrow! [seriously this sewing stuff is like a workout!!!]

8. Have everything in easy reach, nothing worse than trying to find your unpicker or some more pins!


9. Take the phone off the hook! I have a theory that people can hear when I'm sewing and they ring on purpose. I mean I love my family but I love sewing more. Take it off the hook and put your mobile on silent.

10. Wear Jammies, hell go naked [just make sure to shut the curtains] the less clothes you have on the easier it is to keep fitting your project!


11. Relax and Stitch away!!!!

Much Love 

Frankie

xxx


Tuesday 23 August 2016

Halter Neck top - Simplicity 1365 - #simplicitysewingchallenge

So I finished my first make for the #simplicitysewingchallenge a few days ago and to be honest I think I'm just about used to it.


I mean its a halter top, and its backless.....and its low cut........and well its really cropped! I mean seriously when I looked at the pattern artwork I had no idea that it would be this short! Not only can you see my belly button but you can also see about 3/4 inches of flesh above it as well.

In fact when I first tried it on I was wearing my pyjama bottoms [standard sewing attire] which where low slung and the sheer amount of flesh I was exposing nearly made me pee myself laughing! 

Luckily though I tried it with some high waisted jeans the next day and got a second opinion! My fella said and I quote "It's nice [at this point I turned around exposing my pretty much bare back] but I think it might be better for more sunny places? like on holiday?" I think hes worried I might catch a chill! Then I tried it on with this high waisted wrap skirt, and basically felt like the biggest sexpot ever!!! [In a good way!]   


So details! The fabric is a lovely light cotton with a yellow floral pattern that I think my Nan gave me! I have just enough for this top which makes me think that their might be a greater plan for all of us!


The pattern is Simplicity 1365 and its a 1970's vintage pattern. The pattern artwork is gorgeous and it have four views. but two of them have peplums, have I ever talked about my sheer hatred of peplums? no remind me and I'll get round to it!

Being a fan of the 70's in general I knew this was the pattern for me when I saw it as a option for the simplicity sewing challenge [you can read more about the rules here] that and the fact that I didn't like any of the other patterns!!!

I cut a size 12 in this. My measurements corresponded to a size fourteen but I measured the pattern pieces and decided that the less ease in something like this, the better. More ease means more risk of boob popping out situations! And I'd say the fit is pretty spot on!


The top is fully lined which is great especially seen as you have to go sans bra [I seem to be spending rather a lot of time sans bra at the moment!]And its also nice because it means there are no raw edges next to the skin.... which makes sense because of ahem...chaffing, which I'm guessing is more problematic sans bra.

And to say I;'m bra less I feel pretty darn secure, I'm not sure if its because of the double layer of fabric or the gathers that's sort of cup and lift the boob area all on their own! Although I'm not sure how well it would support for someone of a slightly larger bust? But I'm sure their are ways you could add things like interfacing and bra making bits to give more support! In fact I might add some light interfacing to the midriff front of my second version the stop the wrinkles you get when you tie it at the back. You can get rid of these wrinkles if you tie it looser but then I don't feel quite as secure!
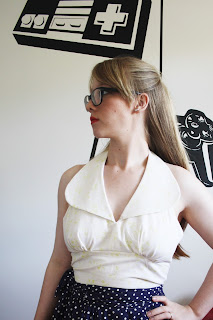

The collar, I mean THE COLLAR! Can you actually get more 70's? well probably but OMG I think I've found my soulmate! I thought it might be too big, In fact I even considered grading it down to be smaller but boy am I glad I kept it big! After all bigger is better! The collar is the only interfaced part of the garment and you definitely don't want to skip interfacing it!! I used a fairly thick interfacing so It would stay lovely and structured, and I used a sew in rather than an iron on interfacing so It wouldn't be ruined with those unsightly wrinkles you can sometimes get.

The only really time consuming part of the entire make was the grading and trimming and clipping of where the seams all meet at the bottom of the collar. I mean seriously it has a centre front seam, the lining centre front seam, the collar, the collar lining and the interfacing!!!!!! Its a lot to handle and I definitely recommend trimming as you go. otherwise you'll find yourself drowning in bulk!

Your also gonna want to pay attention to all the information about stay stitching and under stitching to make sure things don't stretch and gape! And IRON! I mean seriously the amount of pressing this thing requires is ridiculous but its all worth it in the end! 


All in all! I actually kind of love it! I mean its completely out of my comfort zone, I actually feel like I might have stumbled into the wardrobe of some awesome 70's disco chick or Marilyn Monroe [wrong era same vibes]. But Its awesome! I mean its a pretty sexy top and I think It's the kind of thing you need to confidence to be at a high for, but I think with the right bottom and shoes It makes for a pretty great outfit!!! In fact I'd go as far as to say I can;t wait to make my second version!!!! 

Much Love

Frankie

xxx

FYI- I dint pay for this pattern because they are sending them out free to those who are taking part! 


Monday 22 August 2016

Finished August Makes Vlog Post!!!

Here's just a quick link to my latest video post showing my finished august projects!

Its about 15 minutes long so make yourself a brew and ENJOY!!!


Much Love

Frankie

xxx

Sunday 21 August 2016

Pixel Mario Blanket

Okay so I'm pretty sure my new neighbours think I'm nuts. My old neighbours had got fairly used to me taking a quilt outside hanging it on the line, taking pictures and then taking it back in. These new neighbours however...... They curtain twitched. Yes the curtains actually twitched.


But anyway curtain twitching aside I managed to take the pictures! This is my finished backed, bound and quilted mario quilt!


After the quilt top sat basted for about two weeks I finally sat down and busted out all the quilting in one evening! Each colour section is quilted In a spiral in the corresponding colour. For example all of the red sections are quilted in red and all the blue are quilted in blue!


That meant I had to change my bobbin about 1 million times but I really think it worth it! I love how the quilting makes each section stand out! I even quilted the background with crosses so that Mario would really stand out.


The Binding is some embroidered white floral stuff that I was given, I think it looks kind of like computer code! And I added a coloured triangle to each of the corners because I might have screwed up on the binding a little bit and had to hack away at it. I'm blaming this on tiredness and lack of playing attention. But you know what they say, they are not mistakes, they are lessons! 


There's no batting in this quilt just the quilt top and then its backed with a fleecy blanket. It's currently my preferred method of finishing a quilt. It means you can layer the quilt on top of a duvet without actually sweating your bum off. Plus *whispers* its cheaper! I do want to do a few quilts with cotton backs and actual batting but for the moment the cheaper option is much better!!!! The "perfect quilts" will have to wait until I have a new house and I've redecorated and made a quilt for every room. Yes I have big plans for when I get to decorate my perfect house!!!!! 


And that's it really, I finished it really late at night so I could wrap it and have it waiting for Rikki when he finished work after a night shift. Like a little treat pressie!!!!!


So yeah we are both very happy with how it turned out and I almost can't wait until Rikki gets the flu so I can snuggle him up in it!!!

Well almost! that man is a baby when he's sick!

Much Love

Frankie

xxxx 


Friday 19 August 2016

Blue African Wax Print Cotton Dress

Its no secret that I'm a fan of an African wax print cotton. I mean seriously digging through the bargain pre cut bins at Abakhans is my happy place!


Anyway I think this piece was about a metre and a half and it had more of the awesome sparkles that Abakhan seem to be featuring in their wax cottons! Its another panelesque print so some careful planning was used when trying to work out how to cut out the bodice.


Anyway because I am the most boring person in the world I basically decided to make a copy of this dress. Yes I know I'm dull but its my favourite dress to wear at the moment and if it ain't broke don't fix it.

So its the same princess seam bodice and box pleat skirt [both from the second GBSB book] as before in fact the only thing I forgot to do was put the slit in the front of the bodice. But now I'm wondering if forgetting was actually a stroke of luck because my centre pattern down the front is actually pretty bang on.


The back is less bang on but the pattern wasn't printed on grain so it was a bit of a struggle. And the skirt isn't central either which is because I stupidly lined up the bottom of the skirt and not the top, like a muppet! Its not something that'll bother me too much but its annoying that I made mistakes because I was tired!


Yeah the back is super crumpled, I wore this dress all yesterday and didn't get around to taking pictures till the whole thing was a crumpled mess. So I decided to leave it, Get up early and iron the dress in the morning and take pictures today.......Who was I kidding? Get up early to iron? no you can have the crumpled version thank you very much.

 By the way I did an invisible zip which went in really nicely. And everything matched up on the waistband too [Insert smug face here]  


So yeah I grand success even if I did screw up on a few things. I love the colour and how the pattern placement turned out.

In other news....

Its less than a month this my birthday! YAY!

But today I feel pretty grouchy to be honest, I'm hoping its just a touch of PMS but all I want to do is sit and watch Disney in my jammies and maybe have a lil cry? however that's looking pretty unlikely seen as lil man is on super awful whingey form today. Yay...... I might try and do some yoga later and let go a bit, but I'm not sure if it will help, Ideally I'd eat a bar of cadburys whilst reading a sewing magazine but its raining and nothing depresses me more than a walk to the shops in the rain!

And so we don't end on a completely sucky note, I tried lil mans new school uniform on him yesterday and he looks ADORABLE!!! I mean I'm not saying my kids the cutest in the world but its going to be a pretty close race! [totally regretting calling him a whinge bag before, he's sitting good as gold doing a puzzle right now]

Much Love

Frankie

xxx


Wednesday 17 August 2016

Off the Shoulder Top

I've had off the shoulder tops on my radar for a while now and in the spirit of trying to make as many clothes for Vegas as I can before I go I ended up cracking on out in about two hours! And that includes me having to work on my maths skills. Which suck by the way..... 


At some point I'll do a proper tutorial but for anybody who wants to bumble one out themselves I basically took my bra measurement and and cut two rectangles that were brasize x 21 inches and then four sleeves that were 9inch x 11inch.  

The fabric was from my grandmothers stash and was also used for this top here! Its actually covered in little flowers which is really cute!


So yeah I will do a proper tutorial at some point in the future but it will have to wait until after the summer holidays are over because OMG do I have no time to myself! Seriously I've gone from the quite cozy, having 4 mornings a week to myself to do as I wish and now I have NO TIME! I mean I love it because I get to spend large amounts of time with my little boy but I am missing being able to sew and blog at my own pace.


Anyway!Its quite blousy at the bottom because of the amount of the fabric. I prefer it tucked in but I can see how it might be nice to wear it untucked if you've had a bloaty beers and pizza kind of night! Oh if your some kind of pregnant! or post pregnant! Because lets face it the only people who "bounce back" are those that have personal trainers on speed dial!


Its held up with elastic, which trust me you are going to want to make sure is tight. I mean its what is holding your top up and as you might have realised this is a strapless so you are either going for a strapless bra or your gonna have to let the tatas hang free. The first time I wore this I went for the strapless bra but unluckly for me it got eaten in the washing machine so now I have no strapless bra! [that will teach me to wash my intimates on a regular cycle!!!!!!!!


The beauty of this top is that you can also wear it with the sleeves up!  

Anyway I LOVE IT! I basically feel like an extra from the godfather part two! Every time I wear this outfit I feel like I need to be stomping grapes in the Italian sun! And then drinking some pre stomped grapes in the Italian sun!!!

Much Love

Frankie

xxx


Saturday 13 August 2016

Gingham Dress with Faux Button Placket

Okay So this project started out because I found this dress on pinterest and was like "ME WANT!"


I think what appealed to me was the fact its just a very lovely day dress which I'm discovering is my style! So I took a few notes on what I liked:

the use of a larger check
the gathered skirt
button front 


I knew the Lilou dress would be a perfect base to make this dress around. I did debate whether or not be make a working button front or a faux one but I opted for a faux one in the end, mainly because its easier! 


I did pattern match to the best of my ability, the checks run through the side seam.......


and across the back! I'm feeling like a bit of a pattern matching champion to be honest!!! [sorry for the wrinkles in the back, I'd been wearing the dress all day when I took the pictures!] 


Here's a close up of the front button placket. I basically cut two strips on the bias sewed them together turned them through and then top stitched them to the centre front! The buttons are from my stash. I only had four of these and I think they look pretty vintage! I used blue thread to stitch them on to add a bit of contrast.


The skirt is a simple gathered one, which I just cut across the width of the fabric. I matched across the side seams of the skirt too, and did French seams!!!!


The bodice is fully lined, which is a bit unusual for a summer dress but I'd rather be a touch warm than have to dealing with seeing facings and seams all over the place!!!


The fabric came from abakhan in Hanley and is a one inch poly cotton  I used the navy colourway but I'm thinking I now also need versions in red, royal blue and maybe the pink? or would that make me look like a giant Barbie? its only £3.85 per metre and I think I brought 2 metres so really £8 for a dress isn't too bad is it? and I've got some left so I probably could have squeezed it from a metre and a half?

So here's the two ways I plan on styling it!


So here I'm channelling my inner country girl! this ones great for wandering around and feeling comfortable!

dress - handmade
Plimsolls - I think Primark? but similar here [I've had mine for years, these had just been through the wash!]


This one is something that I'd wear to the cinema or on a date night. 

Dress - Handmade
shoes - not a clue but they are like a red peep toe wedge!
bag - refashioned! you can read about it here 

So yeah all in all this project was a GRAND success! I love the look of the dress and I can't wait to make more versions! Ooooh I wonder how it would look in a smaller check?

Much Love 

Frankie

xxx 


Thursday 11 August 2016

Things I made In High School Part 3

This is the final instalment of my what I made in high school series, and you know what I'm actually a bit proud of this one!

It took a lot of work and it needed to be made at a time when I was rather poorly so it still feels like quite an achievement.


So the project, I decided to make a costume for the queen of the faeries Titania from a midsummer nights dream. Luckily we were able to set our own briefs and at the time I really wanted to work in costume design so I thought this might be good for my portfolio. I've still got all the research and sketches I did for this in the loft somewhere [I'll try and dig them out!] 


Anyway the overall concept was that she had fallen asleep in a forest and had woken up and she is very much part of the forest so pieces of it had woven their way into her dress. Hence all the leaves!


I started with a new look pattern, but I'm not sure which? It was a very simple pattern for an aline dress with small bust pleats and no other closures. I took the pattern and re drafted it to make it a wrap front. I then made that up in one layer of the very fine cotton muslin I was working with. Then I pleated the remainder of my cotton onto "shell". I made my pleats uneven in an effort to keep things organic. I also didn't even off the hem at the end, If my memory serves me correctly this was because I had a theory that the stage lights shining through the various layers of the fine cotton would make her almost glow!

The idea of making it a wrap dress was do It wouldn't have to be too heavily altered should to lead actress change, you just simply wrap it around the body, tie it off and shuffle until it looks right [And yeah it looks nice on everyone, from what I remember at least half the class tried it on]


Each one of the leaves is hand embellished and completely individual, and then I tacked them to the ribbon "vines" on the dress! [I actually made a lot of these leaves in bed when I was poorly, your not suppose to but the teacher said I could because otherwise I wouldn't have finished.] the leaves are made from a mixture of green fabrics that my mum and dad brought for me from hobbycraft, I honestly dread to think about how much money went into this dress!


To be honest I'm still so proud of this! to say I made it when I would have been about 14/15? I'm amazed that I put so much thought into it and that I wasn't scared to tackle things like redrafting a pattern.


And that's it! I must have made more things but obviously they didn't deserve saving! Apart from my banging alevel project that was done in art textiles and was based around the life of women during world war two! That was kept to put on display and then went missing....................swines. It even had a christening gown I'd made from an old shirt.

Much Love

Frankie

xxx