Showing posts with label review. Show all posts

Wednesday, 17 April 2019

Korbond Scissor Review

As you guys know I love a good pair of scissors! So when Korbond asked me if I'd like to try one of their pairs I jumped at the chance. 

Right so. They cut good.

I've tried them on thick fabrics and thin one and they slice through them every time. I've been using them solidly since February and they still seem as sharp as ever. Which I think is something to do with the serrated blades????


The blades are stainless steel so they are nice and sturdy and they don't seem to be getting loose? 

Does that make sense? You know how sometimes scissors get loose at the screw and them when you pick them up they just sort of flop open? Well it happens to me ALL THE DAMMED TIME with scissors. Probably because I over use them!!!! 

But so far these ones aren't flopping open at all.


 The other thing I really like is that the handles are lined with rubber. 

I find sometimes that if I'm doing a lot of cutting I can get a sore bit around my thumb. Like a blister, but so far these haven't given me blisters and I have been furiously cutting out pieces for baby quilts! Especially seen as pretty much everyone I know is pregnant at the minute!!!! 

Their 9inches long so their not exactly tailors shears but they are long enough for any dressmaking I do and I like that they don't feel too big and clunky in my hand.


So all in all I'd say these are a pretty banging pair of scissors and even better you can get them really easily its a simple as popping to your local Tesco [or you can find them by clicking on the link if you like a little sofa shopping]!!!! Which is very handy for when your partner/parents/child uses them for cutting paper and ruins them and you have to dash out for a new pair!!!  

Much Love

Frankie

xxx

Disclaimer - Whilst Korbond gave me these scissors to review for free all thoughts and opinions are my own.  


Saturday, 6 January 2018

#Makenine2017 Review

It doesn't seem five minutes ago that I was planning what I wanted to make in 2017. and these where the patterns that made it onto my make nine list! 

So lets see what I actually got around to making!


[from left to right]

Simple sew kimono dress. Yep I made another one of these this year [as yet unblogged] and I have plans for more! 

Jackie 0 jacket. Yep I made this and even filmed a cheeky video about the process! 

Prima Wrap skirt - I've got a denim one of these and a tartan one. I know I made the tartan one this year but I'm not sure if the denim one was the year before? 

Remake Flamingo dress. I decided to skip this one. Just because I couldn't really find a fabric I loved for it. 

Vogue 8974 -Yep I made this pattern twice. One was successful and the other sucked! 

GBSB wrap dress. I now have another two of these in my wardrobe! A red velvet version and a as yet unblogged black velvet version.

Halter neck top dress. I didn't get round to this. Whilst I like the idea in my head I'm not sure it would get a lot of wear? Which makes it a bit of a pointless make. 

Prima Raglan top. Yep I made a few of these [some blogged some not] and I want to make some more this year. Just as soon as I find some awesome cotton prints!

Simple sew Lily dress. Yet again this is one that I didn't make because I couldn't find the right fabric. I want something brocadey but not too thick? Any ideas?

And that's it! I guess now I just have to get all of my patterns out and work out what I'm going to make next year! GULP!

Much Love

Frankie 

xxx  

Sunday, 1 October 2017

Vendula London Sewing Shop Handbag


Birthdays are the best! I mean boo to getting older but YAY for presents [I realise as an adult I;m suppose to be like "oh yeah I don't need presents, its just another day..." But no......]

This was my birthday present from my Mum and Dad! I'd actually mentioned wanting one a few weeks ago on here but I had no idea they were taking notes! [ I'D ALSO LIKE A PONY!]


Anyway I thought it might be nice to do a lil blog post looking at the bag after which I would naturally pop it back into its protective outer bag because well I don't want to ruin it now do I !? 

So the front closes with a twisty catch thing, I have no idea what this is called but it stops it popping open and your phone falling out , which yes has happened to me before. 


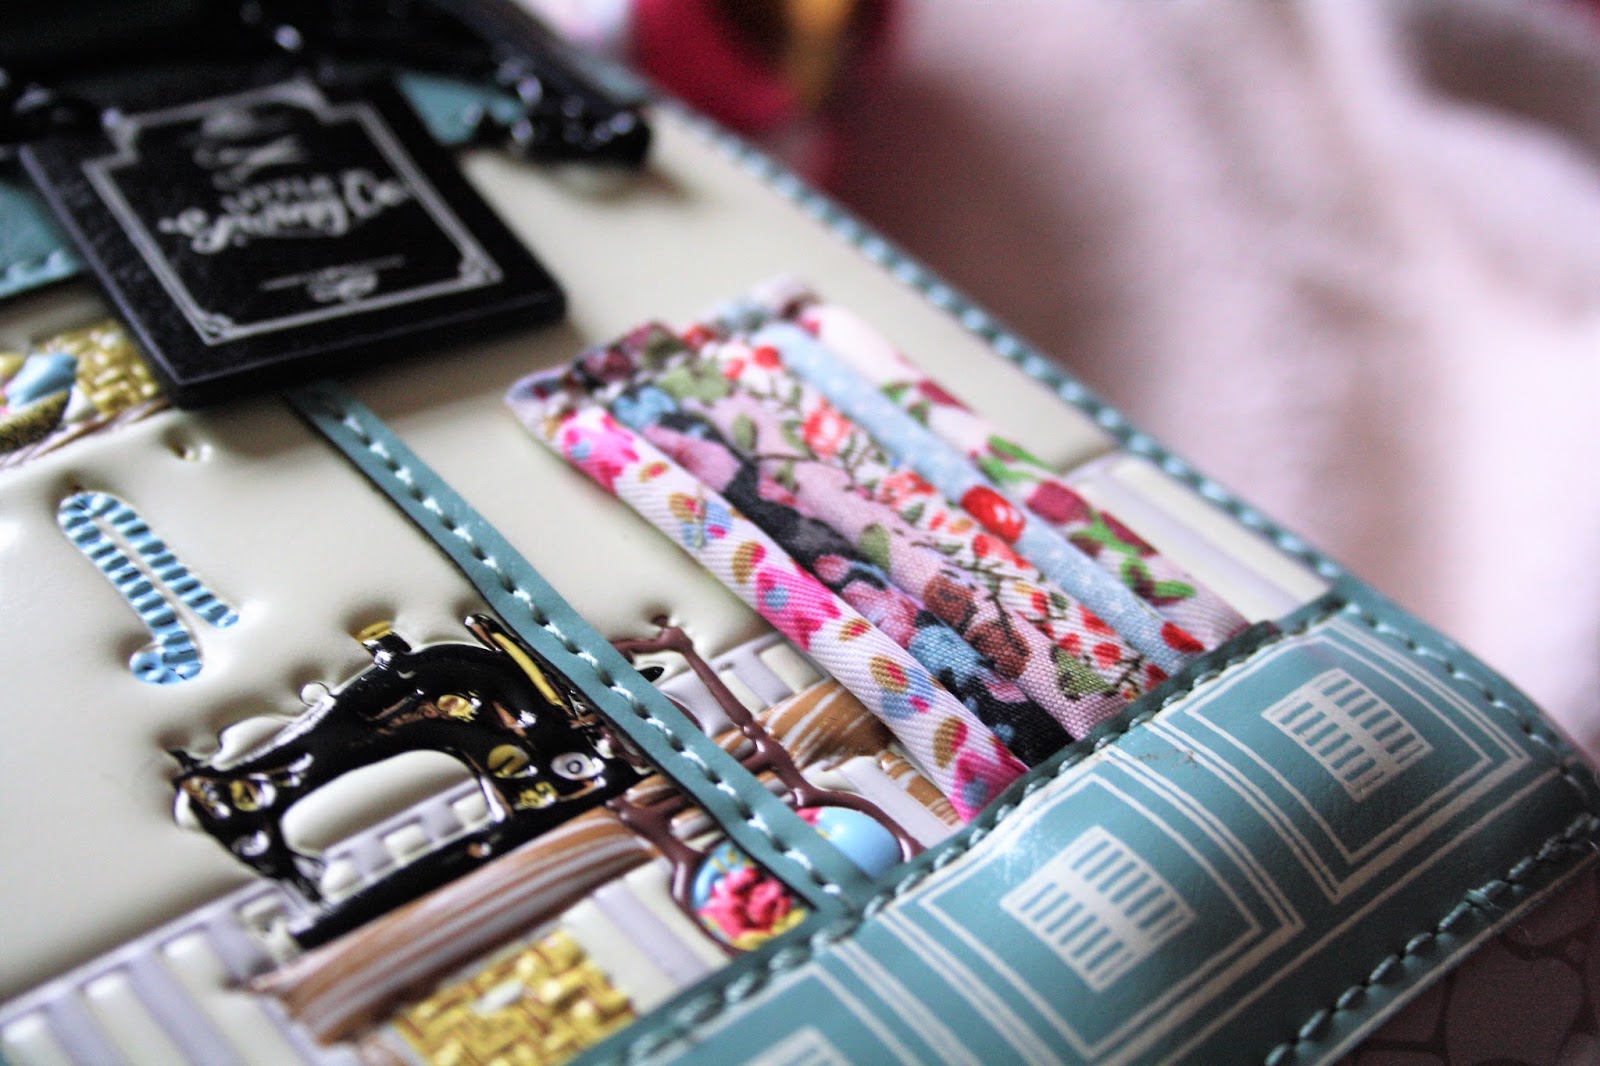
This is the box bag which is the second largest size they do and pretty much perfect for day to day use. Its got a zip pocket on the back and a zip pocket on the inside. Funny story, for years I thought the inside pocket on a handbag was officially called the tampon pocket because that's what my mum called it........ Bit embarrassing when I realised other people keep other things in it. The inside is also lined with a cute london print!


The bag is made from faux leather and some of the details on the front are sewn on by hand. The details on this bag are crazy guys, there's a sewing machine, a shop front sign that swings, rolls of fabric which are made from ACTUAL fabric and a little mannequin! 


I mean guys as far as handbags go this is pretty freaking adorable! I could look at it all day and still find something new! 


The back has a bicycle and a cat on because lets face it you can never have too much twee! 


It comes with a shoulder strap but I'd say you could use it as a clutch bad as well as the strap detaches. 


But I would definitely recommend taking a look at the whole website! I'm now lusting after the music shop bag, the diner and the bookshop as well as the whole of the cinema line!

Much Love

Frankie 

xxx


Monday, 21 August 2017

My Minerva Crafts Lucky Dip Bag Review!

Just in case you missed it I recently reviewed minerva crafts lucky dip bags for their blog and you can read it here! 


The fabric came in my lucky dip bag and the pattern is my dress hack of the Cami top from the 3rd GBSB book! 

Much Love

Frankie 

x

Disclaimer - whilst the lucky bag was provided for free all thoughts and opinions are my own!

Monday, 10 July 2017

The Blitz Dress - Sew La Di Da Vintage - Review

When I was at the CHSI stitches show I was lucky enough to talk to the lovely Caroline from sew la di da vintage! Mainly we discussed sewing, dolls, vintage and her beautifully curly hair! And afterwards she was kind enough to let me take a pattern home to try! And was very patient whilst I spent a good 20 Min's deciding which one! 


In the end I went for the Blitz dress because its got the easy summer dress style I'm attracted to at the moment! There's something very timeless about a dress in this style and the pattern hacking options are pretty limitless! Its also worth pointing out that all of the sew la di da vintage patterns are drafted and printed in the UK! 


The pattern comes in a large cardboard envelope, which is very sturdy! Its slightly larger than a standard pattern packet so you can definitely fit your pattern back into it afterwards! The pattern itself is printed on paper rather than tissue paper so its nice and sturdy to use and will hold up to lots of wear and tear! The best part though is that the sizes are printed in colour! Which makes it an absolute breeze to cut out! Instead of playing guess which line is my size you just follow your colour!!!   


The pattern measurements are also based on RTW sizing so you can cut whatever size you'd buy in the shops! But seen as shops can vary quite a bit amongst themselves then it is always worth measuring yourself! [It is quite nice though to have your measurements correspond with a size that's familiar, rather than one that's 3 sizes bigger than you thought you were]

I cut out a size 10 because I was bang on for those measurements! Honestly it was almost as though it was made for me! The pattern is sized from a size 6-18 which is a pretty big spectrum.


Now there isn't any recommended fabrics on the envelope or inside the booklet that comes with it. I guess that's because you can make this dress in just about any woven fabric but I know a lot of newbie sewers do like to have a fabric guide to help with shopping. Especially if your buying the 3m of fabric this dress requires!

 FYI I went for a floaty viscose form abakhans, but I think you could make it in any type of fabric that has some drape [The skirt sits a lot nicer if there's some weight and drape to the fabric!] 

 It also doesn't mention needing a zip on the pattern envelope and there no back view to show you were a zip would go, it does however say you need a zip in the instruction booklet and on the website.


The instructions come in a little booklet which is far nicer than having sheets of instructions. Its got several cutting layouts and black and white photographs to correspond with each instruction. The photographs themselves are very clear and for once every single notch in the pattern matched up! This is something that hardly ever happens for me but the notches in this pattern were really well placed.

 One thing to mention though is that the dart for the bodice lining isn't marked like a traditional dart. Instead its marked by two notches and a dot and you have to join it up yourself [its definitely worth drawing this straight onto your pattern when you've worked out where it goes]. This got pretty confusing for me because there two other notches just by the dart notches! 

The other issue was the the collar piece with the pattern doesn't appear to be the same shape as the one in the instructions. Its not a problem as the new collar piece fits, its just worth mentioning in case anyone else has a "omg have I cut this out wrong?" moment!  


The pattern calls for an invisible zip but I decided to do a lapped zip because it seemed more true to the vintage style of the pattern. Plus I didn't have a invisible zip that long! 


The pattern has some great features like darted sleeves [although naughty Frankie just pleated hers instead of darting them so there'd be more of a poof at the top!], a collar and centre split [but if you want to wear it with the collar not done up then you need to line the bodice in the same fabric as you use for the main body of the dress, I used a different one and now a flash of pink peaks through when the collar is open]. The bodice bust has gathers instead of darts and is lined! 

All in all its a really nice pattern. I love that its vintage but not too vintage. Its a pretty easy sew but I think you would need to have a few dresses under your belt before you make it otherwise you might get flummoxed by the instructions, They are not hand holdy in the same way as other indie patterns can be [for example it doesn't tell you when to press your seams etc, much like the big four patterns] , so I'd say its more suitable for experienced beginners or beginners who have access to an experienced sewer! 

It does make a beautiful dress though and now I might have to treat myself to the other patterns in the range or maybe one of their fabulous doll kits! 

If you get this pattern let me know how you get one!!

Much Love

Frankie 

x

Saturday, 8 July 2017

£1 Make Your Own Dream Catcher from The Works - Review

Whenever I see cheap craft kits I'm immediately sceptical. I mean how on earth do you make a craft kit for £1? I get that companies buy the bits in bulk to save money but that is some serious bulk!

Anyways this craft kit was from "the works" which is pretty much one of the best shops in the world! Not only do they sell books, but they have stationary, art supplies, craft stuff and countless other things I didn't know I needed until I walked in!


So £1 for a dream catcher seemed like a bargain.


Everything came contained within the kit, the hoop is made of metal so its pretty solid and there were a good amount of feathers in fact I didn't use them all! The only thing in the kit I didn't like was the bull head pendant that was meant to go on the middle strand. The bull just looked a bit mean so I swapped it for a mother of pearl effect pendant from my stash!


Here's the finished product, the only real issue I had was that there wasn't enough suede ribbon to completely cover the metal hoop without having gaps so I had to underline mine with some gold ribbon from my stash.


Th feathers were pretty fiddly to attach but I think if you dipped the ends in pva glue they would be easier to work with. Even the weaving was pretty easy, there are not a lot of instructions but I think its enough for a 10 year old and up to get on with. The weaving was actually very therapeutic but I was a bit gutted that my bead placement wasn't great!   


So yeah one finished dream catcher all for the princely sum of £1! I'd definitely recommend these as a summer holiday craft project if you have bored teenagers/tweenagers in the house! [anything to stop them whinging eh?] 

In other news:

Lil man got star of the week at football! #proudmummy

And I had a cracking record score in our local charity shop! Number one they actually had some decent records in like "Fleetwood Mac!" Instead of just the 300 copies of the sound of music and kamal! But as I was giving them a clean when I got them home a 45 fell out of one of the album sleeves! Well initially I was furious because OMG IT MIGHT HAVE SCRATCHED THE EAGLES AND HOW WILL I LISTEN TO TEQUILA SUNRISE! [my dad always taught me that you store records separately in their appropriate sleeves and that you put them away properly after each use!] Anyways I put it on the side to give it a quick clean , cleans the b side without really paying attention flipped it over and well lo and behold its only a copy of the bohemian rhapsody single by queen! I did a complete double take and ran squealing to my record player to see how it played.

Beautifully. it plays beautifully. Like its spent its whole life in some sort of record spa! 

Much Love 

Frankie 

xxx


Tuesday, 13 June 2017

Gleener Ultimate Fuzzball Remover - Review

I hate throwing clothes away, especially when its one of my favourite items. Which is why when I went to the CHSI Stitches show in Birmingham I was really impressed when I met the people from Gleener! And even chirpier when they offered me one of their fuzzball removers to review! Personally I think they just took pity on me because the cardigan I was wearing had a LOT of fuzzballs and lint and pilling! 

So basically the fuzzball remover helps you remove the fuzz from your knitwear [Although me and my mum tried it on her leggings and it worked their as well!]


The fuzz ball remover is double ended. The first end allows you to clip on and off various heads depending on the type of knit you are working with, for example for delicate knits you use the least rough head. Although Gleener recommend that you start with the smoothest head and work your way up so as not to damage your knits! And to make sure you do a test somewhere that's not visible, I.e the inside or in the armpit. 

The second end is a padded lint brush that picks up any lint or fuzz balls you may have missed.


These are the three heads that come with the de-fuzzer, the top is for delicate knits and is what we used on my mums leggings, the middle is for medium knits, I used this on a few of Lil mans baby blankets before I put them into storage. And the bottom one is is the heavy duty one! I've been using this on some of Hubby's older jumpers and its the head I used for this test! 


In the interest of fair testing I used it on my awfully old and bobbly cardigan. Its also my absolute favourite and I have yet to find a cardigan I love as much! 

Its best done on a flat surface so I opted for my ironing board, I also put a towel down to stop things slipping around. Basically you drag the de fuzzer along the fabric effectively scraping your bobbles away! T-hen you go over the same patch with the de linter end! My only issue with it was that the button to switch the heads is right where my finger wants to rest when I'm using it so the heads kept popping off!

 It takes a little while to do a good job the first time but since then I've just been doing it every time it comes out of the wash and it only takes five minutes to do a top me up!


This is the amount of fuzz and lint off one sleeve *hangs head in shame!* 


And here's the finished sleeve all lovely and smooth and nice looking!!! 

Now when I showed Hubby how it worked his first question was "why wouldn't you just buy a new jumper?" so if you tend to replace your clothes often then its probably not for you however if you like to take care of your clothes or buy expensive clothes then this will be right up your street! I used it a LOT during our year of no spending leading up to our wedding and it saved a lot of our clothes. I used it on everything, t shirts, jumpers, cardigans, blankets lil mans clothes! It really did save us a fortune! It was also a hit with lots of my hand knit jumpers which had taken quite the battering after going through the washer and dryer. 

 So I would give this a huge thumbs up! Its definitely been used a lot in our house! 

If you'd like your own you can find them here  

And here's a cheeky lil 15% discount code for ya! 

KNITWITS

And it works on amazon too

Much Love

Frankie 

xxx


Disclaimer - whilst I was given this product for free all thoughts and opinions are my own!

Tuesday, 18 April 2017

Threadcount 1607 Shirtdress Review - Vlog

Its been so long since my latest video but here's my review of the threadcount 1607 shirtdress that came free with love sewing magazine! 


Hope you enjoy it!!!

Much Love

Frankie 

xxx

Thursday, 16 March 2017

Prym Ergonomics Knitting Needles

The future of knitting is here! I'm not even joking that's the tag line for Prym's new ergonomic knitting needles. Now I first heard about these needles at the CHSI show in Birmingham and being stubborn I saw them and was like "Yeah well that's not going to take off at all *scoffs*" and then the lady gave me a pair to try on the stand and I firmly had to eat my words!

Fast forward to a week after the show and the lovely people at Prym said they'd send me a pair to try! What they actually sent me was a HUGE box full of knitting and crochet goodies that made me cry [just a little bit, okay more than a bit but it was just so nice of them! If you check out my Instagram you'll see what I mean , and if you don't have Instagram you'll have to wait until I blog the knitting roll I've made to store them all in!] 


Naturally I wanted to give them a thorough test drive so I got every single scrap of wool I had in a blue/black/grey/white/green/purple colour way and cast on a diagonal garter stitch blanket using size 5.00mm needles in the 40cm length! 

And luckily for me they came the week the new Nintendo Switch came out so I had a lot of time to knit whilst the boys enjoyed their new toy.


So.........

LIKES!

The hook tip - Basically normal knitting needles have a tapered end but these have a little nubbin on the end. [they call it a Hook Tip]. Now this is actually there to stop your stitches coming off the needle as you knit and to make it easier to hook them. But I also found that it stopped me getting an ache in my finger as I pushed the needle down [the way I knit means I used one of my fingers to push the needle down as I make a stitch.....Yeah I know my Nan thinks its weird too!] 

The clip ends - This is a complete "HOW DID I NOT THINK OF THAT!" moment for me. I mean the ends clip to the needles so you don't loose your stitches! It seems so obviously! And they really do keep them clipped in! In the interest of testing I gave my five year old the needles with some stitches cast on and asked him to try and get the stitches off and he couldn't, he did however work out how to unclip them but they should be safe with anything under the age of 3!!

The triangle shape - It fits really nicely in the hand. 

Lightweight - Okay so since the Nintendo switch came out I've basically been abandoned by the two men in my life for the last week. That means a lot of knitting. In fact I clocked myself doing an hour of straight knitting one day, no breaks, no stopping and more importantly no arm ache. Its a miracle people!  


DISLIKES

Okay so there are less of these but there are still a few things that niggle me a lil!

The colour - Okay so they are a nice clean modern looking white colour, but I kind of wish they came in fun colours too? I think they might appeal to kids a bit better that way, for example my first pair of knitting needles were pink.

The thinness - Okay so this was something that really bothered me in the beginning. The smaller sizes of needles feel a bit floppy. Now when I first saw them I was like ew I do not like that. But after knitting with them it doesn't really bother me. So its not really a complaint is it? More a warning to persevere because it grows on you!

The ends - whilst I like the hook tips I wish the whole end was a bit smoother. They seem to be made from a slightly difference type of plastic to whats on the end of the new ergonomic crochet hooks. And the crochet hooks seem to be a lot smoother. It doesn't effect the way they knit but if you try the crochet hook as well then you can definitely see/feel the difference. 


So yeah that's it! my review of the new Prym ergonomic knitting needles and if yo want to see me un-boxing them and my initial thoughts then there's a little video!


And that's a really attractive still of my face!

Also if you want to get your mitts on your very own pair you can buy them from Minerva Crafts!  And hopefully my blanket will be finished soon and ready to show you!

Much Love 

Frankie

xx

Disclaimer - whilst Prym sent me the box of goodies for free all knitty love is my own!

Thursday, 28 July 2016

Twycross Zoo Review

I know its a bit different from what I usually post but I love a good review so here we go!

On lil mans day off from nursery last week we decided to go out to the ZOO! Now lets just let it be known I love the zoo, I love animals and I love spending days out all together!

I did not love that we picked such a ruddy hot day to go out! It was scorching!!!!!


We actually opted for Twycross Zoo over Chester zoo because its far less spread out, and it has less animals! If it had just been me and Rikki I would have forced him to go to Chester zoo. But seen as there were three of us going and one only had small legs we decided that the smaller zoo was the better option.

As always the zoo was clean and tidy, although many of the animals weren't doing much because of the heat. I mean seriously when the the kangaroos are lazying around you know its hot!

The penguins however didn't disappoint! They are one of my favourite animals to see!

There's plenty of places to get food and drink although we took a picnic! We did have a drink in the cafe later though, mainly so we could cool off! 


Now here's the most important thing! What we wore! I put both the boys in cotton shirts and shorts! [actually Marcus is wearing swim shorts so he could go in the water play area to cool off if he wanted. As it goes he just wanted an ice cream] 

I wore my Me made Wrap skirt, which I can highly recommend, I was nice and cool and I could loosen it off when I felt too hot, or had too much food!

The top is an old one that I'm going to bin, I thought it looked okay in the morning but then I saw all the pictures and was like eurgh! I look like a troll! it also blends into my skin on some pictures! But it does mean I've added sewing some cool cotton tops onto my to-do list! 


Anyway here's my top tips for visiting the Zoo! [especially when its hot!]

- Take a picnic, whilst its nice to eat out it can get expensive and when its hot we found it easier to snack throughout the day instead of eating one big mean! and take a picnic blanket! We nearly ended up on the grass so we could sit in the shade, I took this one that I made,

- wear comfy shoes! I always forget how much walking is involved at the zoo! In fact we did so much that me and lil man both fell asleep in the car!

-Plan your meals! we ate breakfast at home, packed a picnic for lunch and stopped off for tea on the way home. This worked far better than me cooking at home when I was tired from a big day out.

- dress comfy but stylish, If i had a penny for every photo I have of me wearing a horrible outfit just because its comfy I'd be a rich women. I know it sounds vain but if you want to put your pictures up on the wall your going to want to make sure you look awesome!

- Take lots of pictures! not just of animals but of kids looking at animals! Lil man spent a good ten minutes watching the penguins!

- Wear sun cream, I was the only one who got burnt, on my back, which was the bit rikki was in charge of!!!!!

Much Love

Frankie!

P.s hope you don't mind that I did a slightly different type of post!!!!


Saturday, 9 July 2016

Coco Dress In Roanne Jersey from Sew Essential!

Recently the good folks at Sew Essential were good enough to get in touch with me and see if I'd like to do a lil review of their website and fabrics! And well Momma didn't raise no fool so I pretty much tripped over myself to say yes!

I must have spent a good hour pursuing their website and that was without looking at their wool! I did however spend a good 15 minutes trying to convince Rikki that £529.00 for this Janome machine is in fact completely reasonable, and yes I do want one, I promise I'll be good! 

Anyway after much deliberating I chose the Coco Dress pattern by Tilly and the Buttons. It's a pattern I've been wanting for a while but haven't gotten around to getting.


And being that this was my first foray into this sort of proper jersey sewing , Lucy was kind enough to recommend me some fabric [this is a huge thing for me, if a shop owner can't give me a personal recommendation I'm not interested because chances are they don't know about their stock or care about their customer!]. 

Anyway she recommended some Roanne jersey that they carry, which comes in some of the most beautiful rich colours I have ever seen. The Roanne jersey is a "medium weight viscose nylon elastane jersey" which I'll roughly translate for you as: a lovely drapey fabric, with good weight, that's softer than a babies bum. I opted for the Amethyst colour with Kingfisher [teal] pockets. Sensible but with a pop of colour! I'm eyeing up a black and red version next!


The Pattern

The pattern comes printed on thick paper, in an expandable envelope so you can fit your traced pattern pieces in as well. The pattern is only printed on one side so technically you could cut it......but! the paper its printed on is such lovely quality that I'm not sure you'd want to. Plus with the simplest version only having three pattern pieces it's not exactly a beast to trace.

Its a simple shape with an aline skirt, and no darts. I cut a size four, but I think I could have gone down a size as I took this version in about 1 inch on each side.  


The Fabric

Naturally I gave it a prewash and I'm pleased to report that their was no colour running, no bobbling and no shrinkage. In fact it came out of the washer pretty much as it went in. And it didn't need ironing! Can we hear a hallelujah ? 

It didn't shift too much during cutting but I made sure to line up the fabric correctly and put lots of pins in. And I cut it out on the floor because you should never cut jersey fabric if its hanging off a table because it stretches and you can end up with pieces that are too short. That's basically a top tip guys!


Construction

I pretty much stuck to the instructions provided with the pattern, I used a zig zag stitch and my walking foot. Mainly because the walking foot helps with the feed of the fabric. To be honest though my walking foot was already on my machine because I use it for EVERYTHING! Velvet, leather, quilting, shifty fabrics and now jersey!  

The instructions are very clear and explain everything from stay stitching to stabilising the shoulders clearly.

I finished my seams with a second row of stitching to keep things neat but this jersey doesn't fray so that was more for peace of mind rather than necessity. [Nobody wants to find a popped seam when they are out at Asda] 


I used a Ballpoint needle for my main seams and a Twin needle for all my top stitching on the neckline, arms, hem and pockets! The twin needle isn't necessary but it gives a really professional finish , just like you'd get in the shops! 


I've been wearing this belted because well I'm not bloated at the moment? Yeah my wardrobe very often depends on how bloated my stomach is [gluten I'm looking at you] Luckily I was not feeling the bloat and could define my waist without people asking how far gone I am! 


Here's the top stitching detail on the pocket.


And how the top stitching looks on the inside and on the outside of the hem! By the way if your machine doesn't have two thread spools for your twin needle you can just just pop one of your spools into a glass or mug! or you can get super crafty and tape a chopstick to the side of your machine as a crude second spool holder [Plus it justifies all those chopsticks you have in the drawer from your Chinese takeaway.]


So do I think it was a success?

Yes the fit isn't quite what I would have liked but I think it will still work belted and its nice and practical for the school run.

I'm really pleased with the twin top stitching and with how the fabric behaved during sewing!

I'm also chuffed to bits with the pockets! Which I eyeballed! Measuring is for wusses!

To say I made this in an evening, from 7.00pm till 9.30pm I'm really pleased! and that evening included tracing, cutting, having my tea, and fielding two phone calls! 

I'm also in love with how it feels on is basically secret pyjamas! 

So yes I'm now a fully converted member of the Coco club! and I can't wait to make my next one!!!  

Much Love

Frankie

xx

Disclaimer: Although Sew Essential sent me the pattern and fabric for free all the love and opinions are my own! I would never provide reviews for products I would not use or do not like, as a teacher once told me I am honest to a fault!


Saturday, 30 April 2016

Fabric shopping at Abakhans Hanley


On Friday I went fabric shopping with my Mum. Basically my mum and dad had kept back a portion of birthday money and a portion of Christmas money so I could go out and buy some fabrics. Anyone who regularly reads this blog might have gathered that I don't really spend a lot on fabric [like ever] Instead relying on my stash and up cycling things.

So here's how our day went!

8.10am - mum arrives on doorstep to pick me and Lil man up and take him to nursery.
8.30am - drop Lil man off at nursery and drive to hanley
9.10 -  arrive at abakhans, realise it doesn't open until 9.30am, pop to shops for supplies [juice and kitkats]
9.30am wait outside for doors to open! SHOP!
11.00 - mum exists shop for five minutes for fresh air and a quick drink (woman has no staying power)
12.30 - pay for goods, leave shop! Yeah I spent three hours in a fabric shop, you can stop judging me now!
12.31- me and mum scoff chunky kit kats like lions attacking a gazelle, then work out where to actually find lunch.


Anyway that was my shopping experience but I thought I'd do a little review of Abakhan fabrics in hanley.

Finding the store-

The first time I went I got majorly lost! but that was before the days of having maps on your phone. personally though I walk though M and S and then leave M and S through the exist by the food area, up the stairs [this is also where taxis do their pickups] and then walk straight down the street and on your right. As with most things once you've been you can find it again, and to be honest my four year old knows the way to the fabric shop so its not super hard.


Fabric Selection - 

Its very good, they have quilting cottons, wax cottons, bridal fabrics, lace , Jersey and everything in between!!! Some of the fabrics are on the roll and you can have as little as 10cm cut or theres big wire cages that are full of by the weight fabrics! Now if you pull a fabric out of the bin and you don't want it all they will cut it for you but they have to have at least a metre left. And if you want to check how much a cage fabric will cost then you can just pop it to the till and they will check for you!

I'd say they have a wider range of fabrics in store than online, [not that they don't have a huge selection online] but If you go in store and they don't have something that's online they can order it for you! 

Fabric Accessibility -

A lot of the fabric on bolts is easy to access although if you have difficulty with manoeuvring things or reaching then you might want to take a 'fabric slave' to help, failing that I'm sure if you holler at the staff they'll come and help!

The fabric in the cages is accessible but you might have to go burrowing! Trust me its worth reaching all the way to the bottom theres some real diamonds in there!


Price-

The price is what you'd expect for fabric, although I'd say some of the novelty print cottons are slightly cheaper than at other outlets! You can also find some absolute bargains in the wire cages, for example I found two pieces of wax cotton that were just over a metre long and they were under £4.00 each.

There's definitely a fabric for every budget, from the cheaper fabrics to the really pricey! the most expensive I saw was a beautiful and I mean BEAUTIFUL! sob your heart out, write it love letters, lace fabric with the most vivid blue roses embroidered on it. OMG its soooooooo beautiful! I think its the sort of fabric I might consider selling my soul [or whats left of it] for. But £25 per metre just wasn't something I felt comfortable spending. But OMG serious fabricgasm right there..........


Shop Layout-

The layouts pretty cracking really, I don't tend to visit the wool and pattern end because I'm pretty fabric minded, but the fabric and buttons and trimmings are all in one area which is very good. One thing I really love is that all the bolts are kept on the walls so the middle of the shop is easy to look across. Which is really good if your momma likes to wander off whilst saying "ooooh pretty"

Theres two cutting tables which is good because it means less time queueing, and theres three tills and I think you can get your fabrics weighed at each of these stations.


The Staff - 

I have never have any issues with the staff at abakhans in all of the years Ive shopped there [about 8/10 years?]

I didn't have trouble when I commandeered a lady for an hour and a half to help me pick fabrics for a costume I was making, and she helped me look over my sketches.

I didn't have trouble when my sister took measurements in for the fabric she wanted and she'd worked it out in cm square. Instead the lady cracked out the calculator and helped us work it out.

So yeah they are pretty cracking, and very knowledgeable, if you've got an issue or a question then they are some of the most knowledgeable staff I have ever met! [kudos to abakhan for hiring staff who know their stuff!]


And that's about everything I can think off! So here's a picture of me looking very happy at the tills! I'll go through what i actually brought after I've finished prewashing and ironing it!

Much Love

Frankie

xxx

P.s Although I sound like a massive kiss arse I promise this isn't a sponsored post, I just thought I should give credit where credits due! 

x