Thursday, 31 March 2016

Vintage Style Party Dress!

Okay So its not just a dress, but that's certainly a big part of it so lets break it down!

Shoes : Schuh AGES ago, one of my favourite pairs and still fabulous! £45 , but we are talking at least 6/7 years old.

Belt : Primark, like £4? Hardly worn or used, I just brought it cos its pwetty!


Underskirt: Handmade! My version of a 1950's style petticoat. I cut three full circle skirts {based on my measurements} from the organza and stitched them all together side by side, then added a waistband and threaded elastic through. Its very comfortable and gives a good amount of volume, Its not a traditional petticoat but its nice and the organza is a lot softer than some of the nettings that are used. And it falls really nicely! The organza is an awesome wine colour and was given to me by a lady from my mums belly dance class, I think there was about 3 maybe 4 metres? Instead of hemming it I finished the edge with a straight stitch and then pinked the edge.


The dress! Handmade! The bodice is from the second GBSB book and I have also used it here, here, here, here, here and here {I have got my moneys worth from that book!}. The bodice is a princess seam bodice so I skipped the pattern matching and the adjustments were easy, not that I did any because they were transferred to the paper copy ages ago!. The skirt is a full circle skirt based on my measurements, by accident the skirt for the dress is shorter than the petticoat which I think looks pretty cool. 


The fabric came from my lovely pen friend, I think she has the same fabric in the blue colour way! Its sort of a floaty type of fabric it presses nicely and it feels silky? I'm crap at this name the fabric game aren't I! I tend to just go by eye its why I don't shop on-line very often!


I just did a central zip and its a lil jacked up, its not so bad that it needs ripping out but its not good in any sense. At the time of doing the zip I'd just tried on the dress and was not a happy bunny. Basically I'd forgotten that the bodice is sat super high like almost an empire waist and that I usually add a waistband. Anyway an empire waist was not the look I wanted whatsoever. So I threw a wobbler and decided to settle for finished rather than perfect. As it goes I'm wearing it with a waspie style belt so it doesn't really matter!

Other than that I think the fit of the bodice is pretty bang on, well at least in my humble opinion.


I top stitched the arm holes and the neck line and I fully lined the bodice. The GBSB book doesn't call for lining so I just used my noggin and cut out some lining fabric [from stash] and used the same method as for the Lilou bodice from Love at First Stitch.


I did quite a lot of hand finishing as well, I made a loop and button closure at the top of the zip and I hemmed the skirt by hand. The hand sewing of the hem took ages, I mean ages! There's a lot of fabric in a circle skirt and those curves are tricky!! I got a nice finish in the end though because I managed to keep my stitches pretty small and a good iron hides a multitude of sins! 


Here's a few things I would have done differently:
- Lengthen the bodice by about two inches so its less of an empire line and more waisted.
- Finish the edge of the petticoat with a rolled hem, I really need to woman up and learn how to do this.
- Attach elastic to petticoat by stitching it on rather than using the channel method.
- Maybe make a belt from the same organza that I used for the petticoat so it matches, I did have one planned but I'm fairly lazy and remembered that I had the butterfly one.
- Lower the neckline by bout half an inch maybe an inch.


All in all I'm pretty pleased with this. Its VERY vintage looking though and I don't usually go for the whole looking completely vintage thing but I think for a party or special occasion it might be nice! I wore it for about and hour after taking these pictures, I'm sure the neighbours think I'm very classy eating soup in a party dress! That or they think I've finally lost it.


Naturally it also works without the petticoat and belt, I think this is where the issues with the waistline show themselves.  


From this angle I actually risk looking a bit preggers, Actually the high waistline might work if you are...ya know...up the spout. [I love all the different terms for pregnancy but that might be my favourite, closely followed by "harbouring a parasite"]


The length is good here though and I guess I can still wear it with the belt if I want, or I can go without if I'm going on public transport and want to guarantee myself a seat.


I still think the print is awesome whichever way the dress is styled, I think its because its a very loud print and with an awesome colour palette. It works nicely in a vintage context and as a little modern dress too. I guess what they say is true what goes around in fashion comes around.


All in all a grand success! Now I just need a fancy occasion the wear it too!

So if someone could throw a party that would be awesome!?

Much Love

Frankie

xxx

Wednesday, 30 March 2016

Reviewing what I've made the good the bad and the ugly.....

Looking back at what I've made I think I'm a lot more comfortable in my sewing skin now and I know what I like and what suits me.

So here's the low down on what's ended up in the bin! (In this post I've just covered what been binned I have a few items that I've never really worn but to be honest I've never really had an occasion to wear them.)

WARNING: picture heavy post .


I thought this turned out pretty cute but it turned out the fabric was really warm and sweaty so it got ditched.


There were so many flaws with this I just had to let it go!


It was short it was elasticated it was a bust! I'm not sure why I have such a proud look on my face in this picture I should have been ashamed! 


I loved this dress , but it had a nasty argument with a bottle of bleach, RIP comfy dress.


I loved this aswell! But countless washing and small hands playing with the buttons meant it retired last week! RIP Eiffel tower, Big A , rocket ship jumper.


The fit on these wasn't awful but the fabric choice was!


This is currently in the refashion pile! [note to self, I am not a catholic schoolgirl]


this print would have been better suited to pjs , I am not a pale flower kind of girl.


Bad fit, which is a shame because I really loved the bodice fabric. Although some of the left over scraps of this are in my hexy quilt and I think there's some in my god daughters quilt too.


Again this is in the refashion pile, I'm thinking I might pull off the sleeves and add a gathered skirt?


As I said when I made it I felt like a potato, and I just couldn't get that idea out of my head.

But Its not all doom and gloom! Here's some of things that have been a roaring success! Literally they are washed and back on my body within days!


Its just SOOOOOO flattering! and it goes with pretty much everything! Although I do worry that it might not work for summer because of the fabric.


This is just the best summer dress in the whole world! And now it has happy memories because I wore it too my best friends baby shower! 


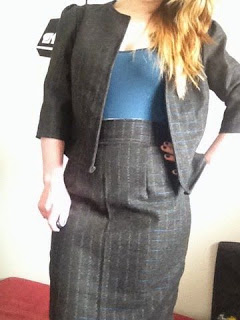
I wear the skirt all the time but I've only worn the jacket like once? Still a success though! 


Wearing this today, Its still cute and I still love the Anne Marie Horner print! 


Its a big black cardigan what's not to love! 


Due to gaining a lil bit of weight this actually fits better now! Every cloud eh? 

So yeah I always think its worth taking a look back at what you've made in the past so you make the right decisions in the future! And so you can get a better idea of what styles really suit you!

Much Love

Frankie 

xxx


Tuesday, 29 March 2016

Do I have to prewash fabric?

Prewashing fabric is not something I was aware off before I started reading sewing blogs, but now it's the first thing I tell new sewers, remember to prewash your fabric.

But why do we prewash fabric? Well there's two main reasons
1. Sometimes fabric shrinks. Prewashing it means you've pre shrunk the fabric which in turn means your fitted dress will still fit perfectly after the first, second and third wash.

2. Sometimes it's not quite colour fast. Pre washing can get rid of excess dye that might still be sat on the fabric!


In my defence I thought I had prewashed this, but it turns out I had prewashed my other dark red piece of fabric. Awww well you live and learn hopefully some stain remover will sort it out!

Other reasons to prewash fabric:
- It can help to indicate how much your fabric will fray each time it goes through the wash. And therefore how much finishing you need to do on the seams.
- prewashing can show you how wrinkled your fabric will be after each wash and therefore if your going to iron it every time.
- If your using second hand or vintage fabric a good wash can help to remove weird smells and stains (Incidently if you think your vintage fabric has moth balls pop it in a carrier bag and put it in the freezer for a few days and then wash, the cold kills the moths and their eggs.
- ironing after prewashing can alert you to fabric flaws , and holes in the fabric (this is useful for vintage fabric) and faded areas. 

So how do you prewash fabric?

( DISCLAIMER : this is how I prewash all of my fabrics however I DO NOT use expensive fabrics and I don't have time to faff about with washing, if you are using a expensive or sentimental fabric I suggest you get your washing advice from a dry cleaner) 

Right so I personally do it in this order (for day to day wear fabrics)

Buy fabric
Chuck fabric in washing machine using the same amount of powder and comfort as I do for a normal load. Wash at the same temperature as I would for a normal load. (30° for colours  40° for whites ) 

Basically treat the fabric exactly as I will when the garment is sewn up. I find this way stops any nasty surprises! 

Then I chuck it in the tumble dryer on the standard setting and iron according to how I iron most things (I do turn my iron down for some fabrics so its worth testing on a scrap)

The only exception is when I buy coat fabric this I wash according to the fabric and advice I find on line and dry in the same manner. Naturally I don't wash coats every week so they tend to be more luxury items as far as washing goes and I tend to hand wash quite a few of them so they stay nice! 

Much love 

Frankie 

Xxx

Friday, 25 March 2016

Colour Block Shirt

I'm still not sure about this shirt, as I cut it out I loved it, then I started sewing and I hated it, then it started coming together and I loved it, then I did the buttonholes and I hated it , then I put it on my mannequin finished and I loved it again! And this morning when I put it on I hated it again! And then I saw these pictures and maybe I like it? I'm not sure.


After looking on line I'd seen a few colour blocked shirts that I liked, and then I found some off white cotton [its slightly thicker than cotton but its super snuggley so I'm not sure what it is] and some wine coloured cotton that looked pretty cool together.


I used the same burda pattern that I used for my I shot Bambi shirt, but I think I prefer my bambi shirt, maybe because the crazy print hides a lot of flaws. Speaking of flaws I'll just list them here:

- The button holes are jacked up especially the top one which I ended up finishing by hand.
- The button band is off and the stitching is fairly crappy.
- The cuffs are not brilliant. 
- There's irregular stitching all over the place, apparently my machine did not like going through more than two layers of the thicker white stuff.

I'm not apologising for these issues though because a) its still better than my first one and b) I made a fricking shirt, so yeah. 


Things I like:

- The stripe of red at the back in the pleat looks awesome! I'm super pleased with how that turned out.
- I love the contrast yoke and the pockets, It took a lot of measuring to get those pockets even but it was worth the effort.
- The top stitching on the collar. I worked really hard to make sure it was even and looked neat.
- The hem, just in general its neat and looks bad-ass, I shortened it slightly as my Bambi shirt is a touch too long and I think my hem curve was really successful. I used bias tape to do the hem because I just think its the neatest way of doing curved hems.
- I think my button choice is pretty cool, I like all the colours together.


So yeah I think I like it ? It looks pretty modern and I think it will fit in quite nicely with the wardrobe, I like that its got a smart and casual vibe at the same time and I can see it being good for the school run.


BUT! I still don't love it as much as my Bambi shirt, but that could have just been because it had ya know deer on it!


I like it open too, I think the biggest issue is that its not ground breaking but its a good wardrobe staple. Also guess who cut her fringe back it! This is what happens when I catch sight of myself in a mirror and realise I hate my hair! I also hate going to the hairdressers so its pretty cool that I managed to do it at home! 

Much Love

Frankie

xxx

Wednesday, 23 March 2016

Threadcount Suede Pencil Skirt

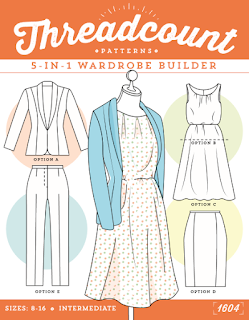
I made this last night, because I'm rapid at sewing and stuff! The pattern came from an issue of love sewing magazine, Its threadcount 1604 and the skirt is part of a five in one wardrobe builder. The skirt is the first project I've made from it.


Originally I was like meh pencil skirt, I already have a pencil skirt pattern that I love so it seemed a bit obsolete, that was until I looked and saw that it had no darts and was just made up of panels with curved tops which is pretty cool!


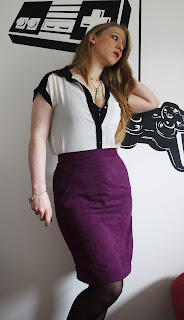
Its a lil wrinkled here because I'd been wearing it all so so forgive me! I cut a size 12, my hip measurement came out as a 98cm and the size 12 finished measurement is 100cm so I thought it would be fitted enough but hopefully still comfy. As it goes it fits like a glove!


The back split looks wonky here but it isn't, I top-stitched up the edge of each seam to really bring out the panels.  


The fabric came from one of my mums friends, I think it was here curtains they seemed pretty new though.


The instructions were pretty clear but I kind off went my own way when it came to the waistband, I read the instructions but they didn't make sense to me so being tired I just winged it and I think it looks okay, its got a zip in and then a button on the waistband.


Its got a pretty deep hem, mainly I think because my legs are disproportionate to my body. Ie I have a long body and stumpy lil legs......like a hobbit.


All in all I love it, the colours great and the fit is excellent even if I do look like I've been poured in!


I thought it would go with lots of stuff in my wardrobe but it turns out its a hard one to pair stuff with, because the skirt is a loud colour I feel like it needs a more muted top but I don't want to look like a secretary, any ideas?


Here's a close up of the top stitching! I used a slightly pink thread to make it stand out!

I'm pleased to announce this a success!!!

Much Love

Frankie 

xxx

Tuesday, 22 March 2016

New threads!

Do you want to know a secret? When I first starting blogging about sewing and properly sewing again I think I owned about five reels of thread. Mainly I used black and white becuase they were the cheapest and I didn't and still don't have a fortune to spend on my hobby!

After a while I gathered a few more colours and I was lucky enough that my pen friend sent me a few spools and that my aunty got me a thread and bobbin kit for Christmas.

But recently I got really lucky!


I've been given all of these threads! Should keep me going for a while shouldn't it! 

They are all different sizes and colours and I think most of them are polycotton (I know some sewing purests wouldn't dream of using polycotton thread but I ain't no snob, as long as it runs through my machine Im happy!)

For those of you wondering how you get a large spool to stay on your machine I don't I sit it in a mug next to my machine and it works like a dream! 

In other news I've also been given some fabric which I'm currently washing and hallelujah I finished my shirt, last night I did the collar hem and button holes soni plan on photographing that at some point. Hopefully I can get my groove back soon , I think I might start with some easier sewing projects so i don't have to think too much! 

Much love 

Frankie 

Xx


Saturday, 19 March 2016

Finishing Projects - Hexy Quilt

Its been a few days since I've last posted, mainly because I haven't really done anything due to a complete lack of motivation. I'm not sure what my funk is but I'm hoping to get out of it soon, I'm wondering if its because I've churned out some pretty big projects recently and my mind just needs a rest. There's been more sorting out going on though which has brought several unfinished projects to my attention including my hexy quilt! Which according to instagram I started 48 weeks ago!


Which I have decided to finish and I'm scrapping the quilt idea. I love the idea of having a hexy quilt, but we are hoping to move in the future and I plan on having a quilt in every room but I want them to match the decor and I'm not sure this will work. So instead I'm going to turn it into a large floor cushion. Something i can stow away in a cupboard but bring out when I need an extra seat or want to build a blanket fort or do some reading in the garden.


So I've decided this will be my last full row, and then I'm going to do a row of white cut down Hexies to give me straight edges. I think It'll be nice to have something finished again and I can see it being very useful.  

I've also been doing a bit of knitting, I've started on the sleeve of my miette cardigan and I'm struggling with how my circular needle I have, everything seems a lil stretched. I'm hoping I can bust out the two sleeves very soon because I think the cardigan will be awesome for the summer.

I also started this lil pair of booties, 


But they look a bit small at the moment so I'm going to rip it back and start again on bigger needles.


They are going to be grey and white striped, which I'm hoping will look super chic!


Much Love

Frankie

xxx