Tuesday, 29 November 2016

Finished Baby Blanket - Blue Ombre

I love it when everything comes together. So often with quilting you can over analyse every step. I spent ages choosing the fabric, then I spent ages choose what pattern to do, then when it was finally sewn up I spent ages procrastinating quilting it.


Typically I use a regular fleece blanket to act as backing and batting for my baby quilts but this time I used a thin fleecy poly knit. The same one that I used for my softest coco! 


for the front I cut pieces of fabric into stripes and then placed them in a tonal order from cream to dark blue. Then I pieced them together in a spiral. Its a really quick way to make a blanket and I think its super cute looking.


All of the fabrics came from my stash and I was very careful to choose ones that would be suitable for a boy or a girl. I know its predominately blue but and my sister says some girls like blue and some of the prints have flowers on which girlies it up a little bit. 


This was also my first time doing decent mitred corners on the binding of this one. Which makes me feel a bit smug because it means my skills are improving! Yay for learning new things! 

Oh and by the way I spiral quilted it because that's my go to quilting technique! I really should learn something new!

Frankie

xxx

Saturday, 26 November 2016

Hobbycraft wooden advent calendar Review.

Its beginning to look a lot like Christmas. Haha no it isn't its still November! Although if you make your own Christmas presents chances are you've been playing Elf for about the past 6 months.
Anyway I LOVE advent calender's! But not just the regular chocolate ones! I like the EXCITING ones! And last year we treated Lil Man to a lego advent calendar because that is basically the most exciting calendar you can buy! FYI don't buy it its absolute rubbish. Seriously it was the most disappointing thing I have ever seen. It was basically pointless.

 So this year I decided to be prepared and buy a solid advent calendar that we could use every year [Actually I wasn't being prepared the original plan was to put the contents of the lego advent calendar into a solid advent calendar with some sweets and stuff........then we realised that opening doors to that would be soul destroying] 

So instead I think we are going to go hunting for some stuff to put in it! which may or may not include lego!

anyway so this is how it turned up from hobbycraft. brown MDF. If you have a rustic Christmas you would probably leave it like this?


So I painted the white parts first, I used two coats of emulsion and two coats of white acrylic paint. I had some serious trouble trying to get even coverage on this thing. 


Next I painted the insides of the doors green which two coats of acrylic. I was going to paint the insides of all the compartments but its just so fiddly I gave it. we're going to use it for 25 days a year I can live without perfectly finished insides.


Next I painted the red parts with red gloss, this part probably took the longest because oh look super fiddly again! I think I did two coats of this and it does give a nice shine!


I free handed all the numbers on the doors using sharpie and scattered them about at random. Or at least I hope they are random.


Okay so the nitty gritty! Its a pretty good kit. Its very fiddly so i wish there was a way to take the doors off or to build it form flat pack or something. 

I like the simple house design it really does leave the door open for lots of imaginative decorating opportunity! like gingerbread house, sparkles, Santa! I kept ours with our red and white colour scheme though as we like to have a very tradition Christmas! 

In fact I think it would be super cute to just give these to your kids to decorate and then they have their own personal one!

Things I'd do differently:

If it was less fiddly id have loved to decorate the inside of each compartment with pretty paper or scrap paper so when the door opens its all beautiful and bright.

I'd have sprayed the whole thing white to begin with [or if hobbbycraft could just made a white version that would be awesome!] about half was through painting I had an "it would have been so much easier to spray paint this" moment. and then maybe I could have finished the insides of those pesky compartments!

I'm still debating a bit of glitter but part of me thinks we have a lot of glitter on our mantle piece at Christmas anyway and I don't want it to be too much.

I am going to add something to the bottom red square wheres there no door though, I'm just not sure what yet, I think I'll raid the Christmas box when we decorate and see if anything jumps out at me! 

So yeah I'm pleased I just wish the whole process had been less painful!!!

Frankie

x

Thursday, 24 November 2016

A Solid Zero Out Of Ten

So as you may of read in my last post my Grandad pasted away on Saturday,
then I got myself a cold sore
then a cut on my finger got infected 
then I cut up my new bank card instead of my expired one
and then I got a fever and ONE swollen tonsil [Yes just the one!]
and we were nearly late for school one day because my alarm didn't go off.

In fact if I were to rate this week I'd give it a solid zero out of ten. 

But this morning I've woken up and I'm ready to get my self together again. So we got ready for school [on time] and had a fairly pleasant walk there and back because it wasn't too freezing this morning and now I'm sat with my morning brew and then I'm going to blitz my house and then I'm going to gift wrap of the the little gifts I've made for my new niece or nephew who will be arriving in December!   


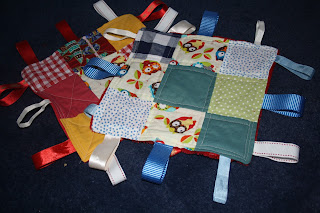
This is one of them, I have no idea when I made these but I vaguely remember cutting them out whilst little man played cars and then sewing them up that night? Its juts my regular taggy blanket.


I made on in blue and one in red, there's a another baby due next year so it made sense to bust two out at the same time. ones backed in fleece and ones backed in a minky type of fleece.


I quilted one in diagonal quilting to look like little x's and the other is straight line quilted kind of like tartan? they couldn't have took longer than an hour but I think they are pretty cute.


As usual the ribbon tags are just scraps from my stash. 


So yeah I'm pretty pleased with these and I think they'll make a great addition to the little gift baskets I'm going to make up.

Right so I'm going to have my brew, finish watching westworld and then I'm going to finally get my house back in order!

Frankie

xxx


Monday, 21 November 2016

Sad News

Okay so I had some pretty jolly Christmas/gift giving posts ready to be written but things sort of took a downturn with me feeling a bit miserable towards the end of last week and then on Saturday morning my Grandad died.  Which to be quite frank thoroughly sucks. 


Anyway as it goes Rikki was working nights that night and he's just started a new job so him staying home wasn't an option so I just sat and finished projects really.  


This was the first one I finished its another English paper pieced floor cushion but this one is for Rikkis Nan, She really liked mine and thought it might be nice to have something for the kids to sit on at her house. 


Its made the same way as the other but this one has the added bonus of being filled with fabric scraps. Yerp I took all my scrap fabric and then cut them into little tiny pieces and rammed them into a cushion, Actually the mindless cutting was pretty good for keeping my head sort of busy? And making sure I didn't think to much.


I did however end up with a blister on my finger from the continuous cutting....which I'm pretty sure is infected now and looks pretty gross.

Much Love

Frankie

xxx

Wednesday, 16 November 2016

Make It , Own It , Love It by Matt Chapple - Book Review

Recently I was lucky enough to win a copy of Matt Chapples debut book, Make it , Own It, Love It on an english girl at homes youtube channel. 

And after I had read it myself I thought it might be nice to do a little review.


So obviously the book is about dressmaking. Its got clear chapter and the whole tone is very simple and no nonsense, everything is explained very clearly and Matt does a good job of explaining various techniques and tools.


There are some beautiful illustration in the front which gives a bit of an idea of some of the projects in the book.


The photography is ON POINT! Seriously whoever took the pictures for this book deserves a turner prize. They are clear you can see everything but at the same time they are just soooooooo beautiful! I would genuinely have these as prints in my own home!


There's a huge chunk on altering existing clothes to shorten them or make them fit better. I think this is a really nice touch as it eases beginner sewers into things [however it was a bit wasted on me] But one thing I really do like is that he covers three different types of hem, most beginners books only do a double fold hem and Matt covers a blind hem and a rolled hem as well which is really lovely.


The one thing that really gutted me is that the dress below isnt a pattern or a download, its just used as an example for putting in bust darts.....sobs.


Now down to the knitty gritty, the projects!


Some like this skirt and the Sunday sweater are patternless projects so Matt talks you through how to draft them yourself using your own measurements. I love this kind of project because its nice to make something that made just for your measurements! Plus that Sunday sweater looks amazing!


It also includes instructions for sewing the collette sorbetto [which is a free online pattern] and for the dress below which can be downloaded for a website that takes your measurements and creates the pattern based on that. [you do have to pay for this pattern but its nice to know there are websites out there that create patterns that fit your measurements.]


I also really liked the parts about making clothes last longer and polishing shoes!


So here's my final round up!

Good Points:
Photography
clear and concise
Sunday Sweatshirt
The section that talks about types of fabric

Less Good Points:
No paper patterns included
I could imagine it would be outgrown fairly quickly.

So would I recommend it?

So I probably wouldn't recommend it to someone who wanted to seriously start sewing, however I have already recommended it to one mum at school who enjoys knitting and said she wanted to do some simple sewing and too another mum who was asking about clothing alterations and easy ways to make kids costumes and make kids clothes last longer.

In fact I'd say this is a brilliant book to give to anyone who's setting up a home, Its got a lot of advice on fixing clothes and hemming trousers and shining shoes which is stuff I get asked about all the time!

It sounds like I hate it but I did enjoy reading it! I just think its more suited to casual sewers rather than us more hardcore bunch!

Anyway if you wish to purchase a copy you can find it here [Fyi if you want to save some pennies you could buy the kindle version! you don't need a hard copy for the project!]

and you can find Matts Blog here!

If you do buy it let me know what you think!!!

Much Love

Frankie 


Monday, 14 November 2016

Threadcount 1607 Shirtdress

There is something very satisfying about making shirts, In fact as much as I love a quick and dirty project I love a slow project as well and shirts are an awesome slow project, lots of top stitching, lots of ironing and lots of construction!

Anyway this time the shirt pattern I went for is for a shirt dress, its Threadcount 1607 and it came free with Love Sewing Magazine  whilst I love sewing magazines I only buy them when I really like the pattern otherwise I'dd just end up with loads of patterns that I'll never use. Anyway I was really really drawn to this shirt dress because of how simple it is. I immediately started thinking about how well it would work for both summer and winter!  


Anyways I actually cut this out about two months ago so I could sew it up and wear it on our honey moon then I promptly forgot about it in the panic of OMG I'M GETTING MARRIED and only found it when I was trying to reorganise my house.


Here's how it turned out. I used a white cotton that's covered in little tiny dots from the craft cotton company I can't find it on the website now though. The cotton did behave beautifully and I sewed the whole thing up in about two days.


I have honestly never been so proud of something I've made, I mean seriously everything just slotted into place perfectly. I did meet a few snags though,

I forgot to add interfacing to the collar stand so it was all kinds of floppy and gross [that sounds ruder than I thought it would] But I had an absolute genius moment and stitched some gross grain ribbon to the inside to stiffen it up [also sounds filthy! I wonder if these innuendos are in anyway related to the fact I'm watching magic mike right now!]


It sorted the problem right out and I'm so pleased I manged to bypass my own stupidity. 


Now the button holes went in beautifully including the one of the collar stand which is usually a beast! But I had another idiot moment and lost one of my buttons, now I did have 12 buttons and I'd already done 10 button holes on the front placket and 1 per cuff and then.............I lost one. I spent a good half hour crawling on my floor trying to find it but sadly no luck which left me with 12 button holes and 11 buttons!


Its a good job I think feature buttons are cute right? And its an even better job that I like the sleeves rolled up better as well!


Now pattern wise its pretty cool, I cut as size 12 and everything fits pretty well apart from the collar which looks a bit big even when its done up. And I must have taken I good 5/6 inches off the length? It was a massive chunk either way and now I can't decide if it was drafted for super tall people, OR if I'm super short OR If I'm just a bit trampy and like wearing my dresses too short?


Construction wise I inserted the sleeves in flat and did the side seams and shoulders on my over locker the rest is done on my regular machine. Including all the top stitching.


All in all I really like it, its a very simple shirt, It doesn't even have a yoke, actually I kind of wish it did have a yoke just to fancy it up a bit? I loves a good yoke , I think it makes for a better fit. Speaking of fit its pretty good apart from the collar issue but its is just an aline shape so it looks much better belted! Its got no other darts or shaping.


And the instructions are pretty clear and I did follow them pretty religiously for most of it, Until I reached the home stretch and then I just made it up. 

Now my last disaster was by far the worst! I put it on the day after I made it and low and behold I got pasta sauce on it and then as I was blotting the pasta sauce I also noticed I;d managed to get some gloss paint on it!
I don't think I'm really describing how frustrating it was to stain something I;d just finished so here's the little rant I had in transcript [Note: I have changed all of the swear words to various fruits and vegetables for those of you who are of a more delicate disposition, those of you who aren't can have fun deciding what words you would have used] 

Frankie: Oh for broccolis sake
Rikki: What?
Frankie; I've got pasta carroting sauce on my new Banana shirt and its going to leave a Apple stain!
Rikki; Oh
Frankie: Oh mother Potato
Rikki; what now?
Frankie; Its got kiwiing cauliflowering gloss paint on it as well, that's never going to swedeing come out! Its ruined! Its pomegranated! I can't believe I did all that beaning top stitching and now I've pearing ruined it!
Rikki: If it helps I didn't like it anyway..........
Frankie; Well your just a lettucing idiot then aren't you?
Frankie:MUSHROOM!

So yeah as you can imagine I was chuffed to bits...... 

Anyway the pasta sauce stains have come out and the gloss pone has faded a lot and I have high hopes that maybe it might fade over time?

Any ideas on how to get rid of it?

Much Love

Frankie


Saturday, 12 November 2016

Hobbycraft Haul

You may have noticed that I dont actually do many Haul posts and well that's because I don't really buy much stuff throughout the year. Instead I tend to rely on kind family and friends who are getting rid of fabric #GIVEMEYOURCURTAINS!

And birthday and Christmas money and vouchers! Luckily for me I got two hobbycraft vouchers for my birthday and I finally found time to email Hobbycraft and get them combined [fun fact, you can only use one gift card at a time on the Hobbycraft website however if you message them on Facebook they will combine them and send you a new gift card with the full amount] and spend them!

So without further ado here's what I got!


So I got three balls of wool on the three for two offer that they were running and they were £1 each but because of the offer I only paid £2. These are destined to be baby booties and hats.


I picked up a pack of hobbycraft pins for £1 and a magnetic pincushion for £5. this pincushion is a game changer I literally just throw pins at it and I love how neat and tidy it looks!


My first ever set of Washi tapes! These ones are Christmas themed and came as a three pack for £1. 


Some red paint, this was meant to be for my wooden advent calendar, but I ended up using gloss because it covered better. £1


paint brushes, because you can never have enough paint brushes!  £2


I got a pack of assorted sewing machine needles because I always stock up at Hobbycraft, they were £2.50 and I picked up a magnetic seam guide in an effort to make my seams neater. This wasn't the one pictured on the website which miffed me off a bit but I mentioned it to Hobbycraft and they said hemline have changed the design and they have updated the website and for any inconvenience they are sending me a gift card. But anyway the seam guide was £2.50 and I ABSOLUTELY LOVE IT! I love the accuracy it gives me particularly with going around corners. 


A set of measuring spoons, £1. These seamed like an absolute steal! one side is spoons and one sides is cups. They sit inside each other and have a little magnet so they stay together in the drawer.


And this was my big spend, this cost £12 and is a wooden advent calendar. I've been wanting a wooden calendar for a while now and I think this one is going to look super cute sat on our fireplace! Ive already started painting and my only quibble is that it takes loads of layers of paint to get a decent finish and that its super fiddly to do. I think I might have liked it better if It had already been sprayed white so you had a plain base to start with!


and it might have saved me some curse words! FYI if you do buy one of these use acrylic paint! it gives the best finish!

And that's it! 

Hopefully I get some Christmas spends so I can go fabric shopping and do a fabric shopping haul!!!


Much Love 

Frankie 

xxx


Thursday, 10 November 2016

Aztec and Black Long Sleeve Top - Operation Stay Toasty

 Project lets try not to freeze my backside off on the school run is going quite well, Im not in possession on three long sleeve tops, 2 handmade and 1 rtw. The school run is still as cold and this morning I had the added bonus of rain! But one of the Grandad's was nice enough to drive me home so I didn't get completely soaked!


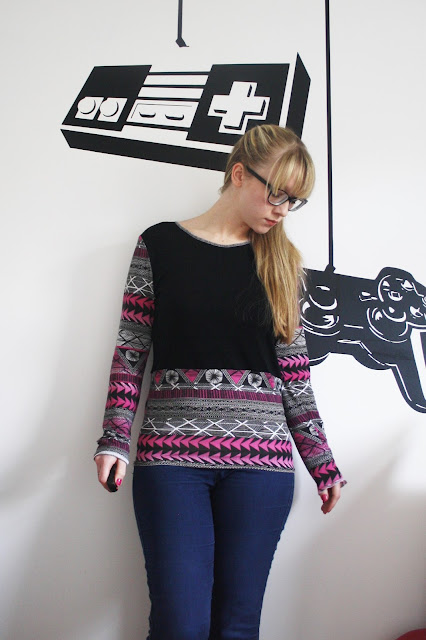
Anyway onto this top! I used the same threadcount cardigan as last time and just cut the front and back on the fold. I used an old aztec print dress and the skirt part of an old dress for the top so its recycled! The only issue I had was I didn't have quite enough fabric for the full length of the body. And keeping it as a crop top would have defeated the point of operation stay toasty! So I added the bottom of the dress on the make it a bit longer.


The fits pretty similar but there is some bunching around the seam where I had to add the extension. I do kind of like the look of the black and the print colour blocking that's happening.


It was a pretty simple sew, It took about an hour to cut it out and sew it up on the overlocker. I just overlocked all the edges again to make it a super speedy make.

In other news, I am super super tired, which I'm blaming on the stupid weather. Its making lil man grumpy as well, yesterday he whinged the whole way home because he was cold :(

I've been getting lots of sewing done and I think I've finally restored the balance between cleaning and sewing after or honeymoon and wedding!

And I've had a couple of very good post days!

Frankie

xxx