Saturday, 31 March 2018

Saftey Pin Sweatshirt

I've had a fairly crappy day. In fact I'd say today was the grand finale of several crappy days all strung together.

I'll start with the sewing first because that's what your all here for but if you want to find out why I was sat in my kitchen crying at 1.30pm today then be sure to read on afterwards. 


But sewing first eh? 

I made this jumper from this sweatshirting fabric from sewalicious. I recieved the fabric free as a thank you for writing sewalcious a blog post on sewing the trends!


Its a gorgeous fabric, its soft and snuggly and I thought the safety pins fit nicely with my love for sewing. I must use hundreds of these every time I baste a quilt. 


Like with my unicorn sweatshirt I used an old prima pattern that I had. I actually sized this pattern up for making big cosy jumpers so this size is the 16. 

I decided to size up to make sure their wasn't too must strain on the jumpers stretchiness and make it bag out of shape. I used to have some great band hoodies but the constant strain across my boobs meant that they became quite misshapen in that area. 


I sewed the majority up on my over locker and only did the top stitching on my regular machine. 

I also used little binding clips from holding the seams together instead of pins. I've had a few close calls with nearly sewing over pins on my over locker [Knits just hide pins so bloody well!] and whilst I can fix my sewing machine myself I wouldn't know where to start with my over locker. 

Anyway because these clips are bigger and brighter your less likely to accidentally sew over them. 


Its also easier to clip the seams together rather than pin on thicker seams like the neck band and the cuffs. 

Print wise I didn't think it was directional but now I look at it most of my safety pins are the wrong way up. Although saying that is their a right way up to a safety pin? 


I love big snuggly jumpers like this and wear them all the time. This one saw quite a few mornings on the school run and it fits under my coat nicely. I'm hoping it will do just as well when we start camping again in the summer. 


Its basically like wearing a secret pair of pjs! 


For some reason the bottom cuff is really sticky out? I'm wondering if it needs a good iron? Or maybe I just cut it a bit big because it wasn't an actual pattern piece.


All in all I really love it. I think its a cute jumper and its really nice to wear something handmade with my collection of jeans! Although I have seen a lot of fashion bloggers wearing jumpers like this tucked in to gathered skirts and they look pretty cool so I might give that whirl one day! 

So onto my day.

Basically at the start of the month out washing machine decided to break, so we ordered a new one to delivered the next week [closest date they had].
 Then they cancelled delivery because of the snow [actually all the snow had gone the day they were meant to deliver but hey ho] and rescheduled for a week after that. 
Then on that delivery date the freezer we had ordered came but no washer!!!! By this point we'd had no washer for 2 weeks and lil man had decided to get sick. 
So I got on the phone and it turned out it was out of stock and they organised to deliver a week later. 

Which was today.

Now the washer arrived but even though I had carefully measured the gap and compared it to previous washers we'd had the man couldn't push it all the way back. First he blamed the lino, then he blamed the pipes [which is odd because Rikki and his best mate struggled to get a washer in their last year and they managed] then he knocked something and water started leaking onto the floor. Then he tried washing up liquid to get it in and took the cupboard door off. 

And long story short somehow they bamboozled me and ended up leaving it as it was even though I'd said either they put it in properly or they took it back. I know it sounds wussy but this is the first time I've had a delivery like this and having men in the house when I'm by myself made me feel really uncomfortable. [The previous two deliveries had been scheduled for when Rikki was home but we needed to washer ASAP after three weeks without]

Anyway the long and short is I ended up with a cupboard door off its hinges, a washer that sticks out three inches and water and washing up liquid all over the floor [They had used washing up liquid to try and slide it in.]

I hadn't noticed the washing up liquid/water mess that they'd left and slipped on it.

And that folks is how I ended up sat on the floor crying....... Its getting sorted now but it was a fairly emotional day to say the least!!! 

And I'm never ordering white goods again!!!

Much Love Frankie 


Monday, 26 March 2018

A Little Cable Hat - Prym Yoga Needle

I'm really getting back into my knitting. Which is bizarre because, hello summers on its way????

But no, apparently the infrequent bursts of sunshine just make me want to sit and knit! 


Last year I told you all about my love for the Prym Ergonomic needle and well they've only gone and done it again! 

Meet the Prym Yoga! 


I was lucky enough to be given a sample of these to try at the recent CHSI stitches show at the Prym stand. 

Now the idea of the Yoga needle is that it does just about everything. Which means it saves valuable space in your knitting bag that you can use for snacks and stuff. 

Its called the Yoga because well its "bendy" like people who do yoga! [Side thought: Have you seen there's such a thing as doga? its yoga but with your dog!!! anyway I digress]


Primarily I've been using it as a cable needle. Oh yeah I upped my knitting game and learnt how to do cables just so I could test this out.

But you can also use it as a stitch holder, auxiliary marker [I have no idea what that is but it says it on the box], a stitch marker or a double pointed needle [Its flexible so its very useful in small pieces of knitting where you might want to bend it out of the way.] 


The ends are the same as the regular prym ergonomic needles they have the smooth plastic and the hook at the end. I've been using the ergonomic needles religiously and now I hate using standard needles, "where is my hook tip? Why are my stitches falling off?"

But these have the added bonus with the middle being bendy. Which means you can form it into all sorts of shapes. For example your favourite type of cable needle. 


Speaking of cables, here's what I made whilst I was trying them out. As you know I'm a firm believer in giving things a good try so I made a hat.

I actually made it for me but it looks horrible on me. I'm not sure why but it does and Lil man has 
currently lost 2 hats at school so this got rammed on his head one snowy morning when he was hat-less and lo and behold it looks pretty cute on him.

It was pretty risky of me to let him take it to school though as I hadn't taken any blog pictures at that point.


You can see the cables better in these photos. There are four on the hat and I really liked how malleable the yoga needle was when I was trying to knit them. And also how light it was in compassion to metal cable needles. I  knit a few rows with my metal cable needle and I found that the weight dragged the stitches down a bit. Not a huge amount but enough so that using a metal cable needle might have messed up my tension.


All in all I really really liked them. In fact the only issue I had was that everybody else in the house seemed to want to play with them too!!! 


Every time either the big or little man walked past my knitting they couldn't resist picking it up and bending it! 


They have never show such a interest in my crafting before!!! 


And then I found myself doing it as I was reading the pattern. Without even thinking about it! So I think we can add "thinking device" to its list of uses too!!! 

If you fancy giving them a try you can find them here! 


Much Love 

Frankie 

xxx


Tuesday, 20 March 2018

A Failed GBSB Asymmetric Skirt

When I started writing about my sewing journey I told myself I'd share everything, the good the bad and the ugly.

I made this decision because I was sick of seeing people crank out perfection every week without talking about their struggles. 

Well cards on the table..... this skirt made me cry. Not cute cry either, hysterical, sobbing, snot on face crying. [Part might have been PMS but the skirt started it.]


Right so the pictures don't really show it clearly but this is meant to be the asymmetric skirt from the 3rd GBSB book. When they made it on the show it was described as being a very tricky make but I thought I'd give it a whirl. But what I ended up with was a lumpy bumpy mess.

Its supposed to look like this. 

Image result for gbsb asymmetrical skirt

Ya know lovely and swooshy and fabulous.


But instead mine was a hot mess. Now the reason I began to cry was because I felt like a bit of a failure, I'd read the instructions, I'd done everything to the best of my ability and I'd still messed it up! And because I'd actually applied for this series of the sewing bee and had an interview and everything, which meant that chances are I wouldn't have been able to do it then either. 

And that folks is what made me cry. [that and PMS] 

So I ate more chocolate than necessary and watched a few episode of project runway and decided to have my own make it work moment because god knows I did not want to have to throw the beautiful boiled wool away!


Luckily I'd stitched the back seam so I just had to unpick the top from the bottom. The I decided to get rid of the wavy edge part by levelling the whole thing off. I did that by measuring from the waistband down and marking it and from the bottom up on the lower section.


Next I pinned the bottom half to the top half , pleating the fabric to make it fit. Originally they were pinned as inverted box pleats but I found myself liking the wrong side better so I repinned them the right way around.


Fabric wise I used this boiled wool from abakhan's and whilst it was beautiful it was tricky to get the seams to lie flat. I used a lot of heat and ended up cobbling together a clapper from some stray bits of wood in our shed.


Then I did some top stitching and popped in a Zip.


Then I spent about another half an hour battling the seams into submission. I even ended up cutting the darts open to make them sit flatter. I also used a tailors ham and sleeve roll to help with the pressing. 


And voila! A catastrophe made into something nicer. As gutted as I was to fail I actually like this skirt and I think it suits my wardrobe. Plus its lovely and swishy!

Now I am hoping to revisit the GBSB pattern at some point but for the moment I'm just going to take pleasure in this skirt. 

And try and get some more wear out of it before summer gets here! If it ever arrives! 

In other news! 

I have a poorly baby boy! Hes in bed recuperating and hopefully he'll start to feel better soon! It breaks my heart when hes ill.

And I've uploaded a new video to my you tube channel!


Hope you enjoy 

Much Love

Frankie 

xxx

Sunday, 18 March 2018

Guitar Crop Top

I love a crop top. Mainly because they are so versatile for layering under jumpers and vest tops, but also because of how little fabric they take. 

This fabric was a gift from @quiltygal on instagram. She posted a picture of the fabric and I mentioned how awesome I thought it was and she was kind enough to send it to me. 


It was only a small amount so I thought I might have to be put into a quilting project of some sort. Which I was gutted about, because this fabric needed to be on my body! 

Then I remembered that the Corset top from the 3rd GBSB book takes hardly any fabric. 


I promise the strap isn't sewn in twisted it would just appear that I struggle to dress myself. Originally I wanted the front to lace up with ribbon and eyelets because I thought that would mesh nicely with the guitar theme of the fabric. 

BUT

The eyelet puncher thing I brought from home and bargains for a measly £2 something was absolute and utter rubbish. I mean seriously if your looking for a cheap eyelet tool don't buy that one because you'll only end up binning it in a fit of rage. Instead get a decent one like this one by Prym.

Luckily I'd had the brains to test how to use the bloody thing on a piece of scrap fabric first so I didn't wreck the constructed top. I was pretty gutted though because I had my heart set on a lace up version and now it just closes with standard press studs. 


The fits pretty good but I really ought to tweak the pattern so its a bit longer as it will make it a bit more wearable. Its fully lined with some scrap cotton. I did realise afterwards that If I'd been a bit neater sewing on the press studs then the top would be reversible. 

I didn't try and pattern match because I didn't have enough fabric. Plus matching little tiny guitars is not my jam! Instead I just tried to position the pattern pieces so as many guitars were whole as possible. I think I did an okay job, you can definitely see that its a pattern of guitars at least. 

All in all I really like it. I've been wearing it a lot under some big loose vest tops that I have and it makes sure that the "girls" are covered up quite nicely.

In other news! 

More snow! Yay or well not? I'm actually ready for spring now and I'd like to start wearing my summer dresses please.

Pretty please???

Much Love 

Frankie 

xxx


Thursday, 15 March 2018

Unicorn Sweatshirt! Fabric by Adam Ross

Its no secret that I LOVE unicorns!! I have mugs and scarves and teddies [Fun Fact: When we first got together Rikki won me a Unicorn on hook a duck at the local fair and I still have it. ]


So when Adam Ross asked me if I'd in doing a fabric review on their website I was like YES! And then when I saw that they had unicorns I did a little happy dance because UNICORNS!!!!! 


The fabric itself is a sweatshirt type fabric in a medium weight. It comes in this charcoal grey with pale pink unicorns and white with pink unicorns. FYI the unicorns are glittery!! 

One thing I really like about the website is that underneath the pictures of the fabric it has a list of fabric properties, a list of sewing suggestions and then a list of suggestions of things to make. I've not seen that sort of level of detail on a fabric website before and I'd imagine it would be really useful to someone who doesn't have a lot of experience with sewing or who might want some ideas of what to make with a fabric they love. 


The fabric is £12.49 a metre which is what I sort of expect to pay for a quality sweatshirt material. But I do like that the fabric is sold by the metre very often now fabrics are sold by the half metre and I always end up getting confused and ordering too little. 


I used a prima pattern to make mine but it's very similar to the linden pattern by grainline studios. I added some piping to the shoulder seams to break up the print a bit but stupidly used a fabric that's a bit too thick so my over locker was struggling. I managed to get it through but knew I'd never be able to pipe the cuffs or collar so I skipped them. I did wonder if it might look a bit weird just having the shoulders piped but my mum said it looks okay. 

Construction wise apart from using my over locker I also used my sharpest pins and made sure to double check the pattern pieces were all lying the right way around before I cut it out. I definitely didn't want any upside down unicorns!!!! 


On the above picture you can sort of see the glitter on the unicorns, which is still there after all the washes its had [about 4/5]. 

I actually made the jumper when we had all the snow because I was starting to run out of warm clothes to wear! And now its my go to snuggle jumper. I just makes me smile so much every time I reach to put it on. The inside is very soft as well so its nice to sit and relax in. 

All in all I really love this jumper. I feel like I'm reaching a point where I'm filling gaps in my wardrobe and I was in need of a cosy jumper. I'm also impressed with how well the fabric has been holding up to the constant washing and wearing, which makes me think, maybe I need one in white as well?????

In other news apparently we are going to get more snow this weekend and you know what they say snow day means sew day! 

Much Love 

Frankie 

xxx

Disclaimer, Adam Ross sent me this fabric for free but all thoughts and views are my own x

Friday, 9 March 2018

Dungaree Dress - Free Pattern

It's no secret that dungaree dresses are super popular now in both the sewing world and the fashion world. 

I personally am on the fence about the whole dungarees thing, on the one hand its easy to throw on and wear but on the other hand it kind of makes me feel like an over grown child, plus peeing in trouser dungarees is not the one! But I still wanted to make myself some.

Now as you know I'm a bit of a spendthrift when it comes to sewing! I blame it on being on a pretty tight budget for two years whilst we payed for our wedding. Plus I always think I'd rather spend my money on fabric! 

So whilst there is a very popular dungaree dress pattern out there [Which I've heard very good things about BTW] I didn't want to spend my pennies on it. Especially seen as dungarees are such a simple silhouette that I could probably draft one myself. 

As it goes I didn't have too! Whilst perusing Pinterest I found a link to Pootle and Makes blog and saw she'd made some dungarees from a free pattern by Sew Now Mag! [the templates are available here]  


Naturally as soon as I wanted to print the dammed pattern my printer decided to throw a hissy fit and generally faff around. That thing hates me, yesterday it printed something two hours after I wanted it too......I was sat alone watching American crime story so I think you can imagine how much I jumped when the printer started up!


Because I only printed the templates and didn't have a copy of the magazine, that meant I didn't have the instructions. Which isn't a huge deal because its fairly simple construction wise but it did mean I have to message pootle and make to get her views on how the sizing is. In the end I went for a size 12. The fit is okay but I think I would like a bit more ease in the hip area.


The pattern originally had patch pockets to put on the front of your hips but I didn't like those so I went traditional and drafted this front patch pocket. I also added in a centre and back seam because I wanted the traditional look. Thinking about it I didn't add in any seam allowance for these so that might be why I need more ease in the hips!

I was going to do flat felled seams but I couldn't work out how to do it and get it central and I knew if the seam was off centre it would give me some serious twitchy eye. so In the end I sewed the seam normally and then stitched up either side of the seam line. I'm not sure what this technique is called but I want to say "french stitching"? although I could be wrong. As a bonus this way also secures the seam allowances down.  

I didn't have any dungaree clips so I just used buttons from my stash! [The buttons were also recycled from an old coat]

There is a deep front and back facing that lines the top portion of the dress and leaves a really clean finish. For the facing I use a cotton that I got from a carboot. Its not a print I love so its nice to use it up on a facing.


I did a lot of white top stitching on this to bring out the white flecks in the fabric. Speaking of the fabric I have zero idea what it is, I brought it at a car boot on a whim [I think there is like 3m of it and I paid 50p?] Anyway I though it was a cotton but its a bit harder? Which makes me think its upholstery fabric? The other thing that makes me think its upholstery fabric is that you can't set fire to it, so I think its one of those fire resistant ones.

But I think it looks a bit like denim and as a bonus if i do end up on fire it'll go out very quickly. Every cloud eh?

All in all I do like it and I think its a great pattern especially seen as its free!!!! 

And I'm hoping that it will transition from winter to summer just by changing what top I wear under it. 

Speaking of summer I CANNOT wait to wear all of my summer dresses again!! I'm buzzing! Although it does make me wonder if I should start packing up half of my wardrobe and changing it over? 

Does anyone else change over their wardrobe? How do you like it and where do you store the out of season clothes?

Much Love 

Frankie 

xxx 

Tuesday, 6 March 2018

No scrap Left Behind - Velvet Cropped Peak Tshirt by Wendy Ward

One of my New years resolution's for this year was to wear more of the clothes I want to wear. For example crop tops. 

Typically I don;t wear them too much by themselves because I'm worried I look too pasty and untoned [and whilst I do have the time on my hands to get "toned" I'd just rather sit and eat some cake to be honest]


 Anyways I made a crop top! Although if I'd have had enough fabric I probably would have made a longer version. 

This velvet is what was left from my Valentines dress last year. I'd been pondering what do do with it for a while. It wasn't a big enough piece to throw out but it wasn't really good for mush else. 

I originally brought it from abakhan and I think it was £8.40 and I got a wrap dress and this top out of it. 


Then I was given Wendy Wards new book sewing with knitted fabrics by minerva crafts, and I realised I could probably squeeze a Peak Tshirt out of the material I had left. [FYI I highly recommend this book even if you aren't new to sewing knits it has some great information in it and some lovely projects]

This is the cropped length with the short sleeves but there are at least ten variations that you can make! 


The only thing I didn't do was add the neck band. My fabric simply didn't have enough stretch so instead I over locked the edge and turned it over twice and then hemmed it with a zig zag stitch.

Zig Zag is fast becoming my favourite way to hem knits, it seems whenever I get my twin needle out I spend about four hours faffing around with tension and trying to stop the threads snapping.


[I am hardcore breathing in on this photo to the point where I'm surprised I'm not blue in the face!]

The main construction was done on my overlocker so it was a really quick make, In fact I have a few more of these planned but with jazzy sleeves and stuff just to make sure I definitely use up every last piece of stash fabric!


All in all I actually really ended up loving this project which surprised me because I wasn't best keen on my valentines dress! [In fact I've only worn it twice since I made it!]

In other news:

From 4 O'clock to 9.30 we've had no water. Yep a burst pipe left us with one brew in the kettle and half a bottle of juice for lil man. Naturally he tanked that in five minutes from being home from school so a HUGE shout out to our awesome neighbours who gave him a bottle of water because he was thirsty at bedtime and naturally we couldn't leave the house. 

We are so lucky to live next to such awesome people! 

Luckily the water is back on now we just have the fun job of running all the taps so we don't have dirty water and air in the system.

Much Love 

Frankie 


Saturday, 3 March 2018

Sewing Box Makeover


This is what my sewing box used to look like. It was very kindly given to me by my friend when she was having a clear out before she moved. 

Now from what I can remember she'd had it for some years and I've had it since may last year and it was starting to look at little worse for wear. 

One of the main issues was that one of the hinges on the top section was broken and some of the screws had come out and gotten lost.

So I went to Rikki batting my eyelashes and he agreed to fix it. And then he suggested that we just pull the whole thing apart and re paint it because some of the paintwork was chipped and fading. 


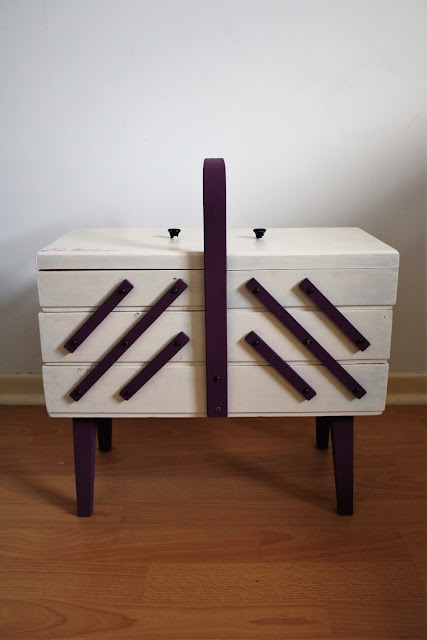
And that's how my swing box ended up looking like this. 

First of all I had to empty the dammed thing which led to another "why do you have so many pairs of scissors?" discussion. FYI I want at least one more pair but I want really really good ones this time not cheapo ones!

Our agreement was he would pull it all apart and glue the bits that needed gluing, then I would sand it and paint it, and then he would put it back together and fix the hinge and stuff. 

I genuinely thought I had the easy part........I was wrong.

THE BLOODY THING TOOK ABOUT 5 HOURS TO SAND! 

Honestly my right arm is like pop eyes now and I worked muscles I never knew I had! luckily we have this weird sander tool thing where you stick the sand paper on the bottom. I can't find our exact one but this one is similar and I'd definitely recommend it for this sort of job. I did think about using our electric sander but its quite big and bulky and I didn't want to damage the box beyond repair. 


After the sanding I gave everything a good wipe to get the dust off and started painting whilst it was disassembled. The white paint is some silk emulsion that we had lying around and the purple is a tester pot that Rikki popped out the get whilst he was getting a new hinge [he actually colour matched it too our living room perfectly!] It took four coats of white to get it looking nice and three of the purple.  


I painted the bottom of the box and the lid purple as well because I thought it might help me find stray pins. I left the sides bear because some of them contain makers marks which I thought was a nice touch.


The handle was especially fiddly to paint because I had to have it half propped up. The little wooden extendy bits [I have no idea what I'm talking about can you tell!!!!] Because they are only about 1cm wide I ended up with most of the paint on my fingers. 


Some of the purple paint came off on the white paint the first few times we opened it but its stopped now so now I really need to touch them up. 


I also added my signature to the front in sharpie but its not very neat so I'd like to cover it in a little metal or wooden sign instead. 

And then we put the whole thing back together again! 

I've got to say I love it! Its surprising how far some elbow grease and a bit of paint can go. And its so nice to breathe life back into something. Especially seen as I've become quite attached to it! I just wish it was a bit lighter so I could take it with me when I do demonstrations! 

Speaking of which.......


This was me today! Yep I braved the cold and went to Abakhans Hanley to demonstrate the things you can do with EPP hexagons! 

Whilst I love the sewing part the best part is chatting to people! 

I met a couple who had been married for 62 years [yes they were adorable, they met at the cinema]

A lady who's daughter owns a pub in Staffordshire that has quilts on the wall and that I am definitely going to visit! I mean booze and quilts? Does it get better?

I also met a young girl who had started sewing. She was only 9 but had made a quilt, clothes for her dolls and is about to try and make something for herself [I believe she said a skirt] She left me completely in awe and she has a lot of talent so I hope she sticks with it!!! Especially in a world where so many schools are being forced to cut back on textiles and other hand crafts.

My next one is on how to make an embroidered cushion and its on the 21st of April!

Much Love

Frankie!

xxx