Monday, 3 July 2017

Dutch Label Shop Review

When I was younger I wanted to be a fashion designer I mean like really wanted to be one! I kept files of fabric sample and cut up my clothes and spent hours imagining what my very own clothes labels would look like. [fun fact: lil Frankie was going to call her clothing line "franks funky fashion" Which makes me do some serious cringing!]

So when the Dutch Label Shop got in touch and asked me if I'd like to try some of their labels I was like "YES PLEASE!!!!!" 


Okay so the dutch label shop creates custom labels for anybody! Companies can use them and so can home seamstresses and with a minimum order of 30 labels for £16 its really affordable!  

I opted to try their basic woven labels but you can also do logo labels where you can upload your own logo/image and have that printed on a label.


The process of creating the order is really simple, you write what text you'd like on your label, choose a font, they have a really wide selection , and then if you wish you can add a little image and get this! They have a whole tab of images dedicated to sewing!

Now to make sure this was a thorough review I decided to try and two different types of label:

The first label:
-white background [ they have 19 colours to choose from]
-black writing [23 writing colours]
-scissor image
-sew in label
- 100 labels for £34.00 -

The second label:
- pink background
-black writing
- button image [I chose this so I could see how a image with finer lines would look]
-iron in label
- 100 labels for £41.00 -
  
I didn't opt to have the additional layer of white thread used [which is meant to make sure your colours really stand out] and I don't see any issues with the fonts standing out on my label. 


Text wise I kept it really simple by just using my name and blogname. and I love how they look the finish is so professional and I;m actually thinking that I might get a few with Lil mans name on to sew into all of his school clothes!  

They took about 10 days to arrive and came neatly packed into plastic bags, which my husband promptly opened all over the dining room table because he "wanted to look at them" LABELS EVERYWHERE! My only quibble was that their were no instructions on how to use the iron in ones, which resulted in my first attempt being a lil jacked up! But then Lo and Behold a few days later the instructions arrived in my inbox! I guess I should have held my horses but it would be a nice touch if the instructions came with the labels. What I should have done was used their live chat service and asked! I did actually use the chat service whilst I was ordering and it was brilliant, I must have asked a question at 9ish at night and someone got back to me with 20 mins! 

And if anyone's curious you attach the iron ones like this:

position label on fabric, cover with baking paper, use cotton setting on iron [no steam], iron baking sheet for about 15-20 seconds moving iron slowly, wait two minutes and remove baking paper.


So all in all I LOVE them! The quality is amazing and I love being able to show people who made my clothes, ME!!! And I now have 200 labels to sew into my me mades!

And if you want to sew your own labels into your own clothes then I have a cheeky little discount code for you! 

knitwitsowls15     

Will give you 15% off your order for 30 days from the date this blog post went up! Which means if you ordered 100 of the sew in labels you would save £5.10! But remember the bigger the order the bigger the discount! [ I'm not an enabler I'm a helper I promise!] 

Much Love 

and let me know if you get yourself some labels!

Frankie

xxx

disclaimer : whilst the dutch label shop provided me with a gift code so I could purchase some labels all views and opinions are my own and I have not been given any other monetary payment.

Saturday, 1 July 2017

8 crafting things I need in my life right now!

Okay so its that time again where I write a list of awesome sewing/knitting stuff and you leave your laptop out so your husband/wife/partner/family member can by you stuff! Or you could just buy it for yourselves and cut out the middle man!


Okay so £26 is pretty steep for pattern weights BUT they are shaped like donuts! And well yeah that's all I got I love donuts!!!!! You get 12 in this set but she does smaller sets as well and everything is made by hand. And DONUTS people DONUTS!


I have a 10 year old rucksack that is covered in patches and I mean covered! Its my favourite fits everything travels everywhere bag and I NEED this patch for it!!!! 


Have I ever mentioned how much I LOVE receiving post? Well can you imagine anything better than receiving a box full of sewing stuff every month? No? Me neither [unless Tom Hardy starts delivering them wearing nothing but a smile!] This box arrives every month with a selection of sewing goody's including a stack of fat quarters and a length of fabric! I drool every time I see these on Instagram and Its top of my wish list! 

Its a handbag shaped like a sewing shop!!!!!! I've seen a few of these on instagram and I think they do two bigger sizes but I can't find them on the website *sobs*. For me this version is a bit small but that's because I like to carry a lot of rubbish around!  


I love pin badges, I was one of those kids whose blazer was covered with pins at school, like actually covered! [I'm pretty sure nothing gives teachers more joy than asking a teenager to remove 50+ pins from their blazer because it doesn't fit the schools dress code!] This one from colette has a seam ripper on it and makes sewing seem kinda badass!!!


Okay so its 80 quid which is pretty steep for something you have to knit yourself! But just think after its finished a blanket that chunky has got to reduce your heating bill by half at least! I mean really if your don't get this and make it your killing the environment..... The environment needs you to snuggle up under this blanket and eat biscuits.......Save the world , knit this blanket! [Its also comes in like a zillion colours!]


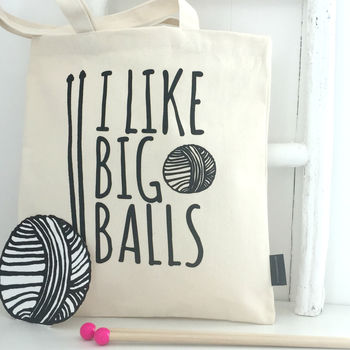
I love a bit of blue! And this bag stating my love for big balls is just perfect! In fact I actually had a conversation with a lady at the CHSI stitches show about how much more big balls are compared to little balls! We were talking about wool of course!


Lets just take a moment to appreciate how awesome this bracelet is! I mean come on its a ruler you wear on your wrist and it actually looks nice! The measurements are accurate so you can actually use it and it come in a cute storage tin! *swoons!*

And yeah that's just a selection of things that have caught my eye recently! [btw I'm not affiliated with any of these people it is just stuff I like]

Much Love 

Frankie 

x


Thursday, 29 June 2017

Vintage Linen Slouch Top

The weather is awful today, I've got some lovely fabrics set aside to make some summer dresses but this rain is sapping all of the joy out of me. On the plus side I'm sat in my double trouble jumper watching project runway and I've got a whole packet of chocolate digestives at my disposal....so I guess its not all bad. 


I made this a few weeks ago whilst we were having that hot spell and I was sick of wearing clothes that clung and stuck to me, all I really wanted to do was wonder around naked but sadly that's not appropriate for the school run!


It all started with this embroidered linen pillowcase that came from my Aunty Shelias house. It had a small bit of embroidery on each side [It looks like it may have been done by hand?] but sadly the rest of it was badly damaged so I decided to use the embroidery as a feature on a garment and use a different fabric for the rest of it.


So the embroidery was used for the sleeves and the main body of the top was just made of a light cotton. The weights of the embroidered fabric and the main fabric are slightly different but you can't notice it when I have it on. I also added a piece of lace in a band around the top because the front felt too plain. The lace came from a craft market and is fairly thick. I just attached it using a straight stitch on the top edge, the bottom edge hangs free.  


The pattern for the top is by prima magazine, its just a very basic boxy top with a boxy sleeve. In fact the sleeve is so boxy the sleeve head is practically flat! I've never had an easier time of setting in a sleeve. It does mean that it sits rather low though, you can't really see on the pictures because the white on white photography isn't exactly brilliant for showing details. But the shoulder head reaches the top part of my arm and then the sleeve starts. This kind of goes against all of my fitting knowledge but it looks okay right? So maybe its meant to be like that! 

The prima pattern is really simple, no darts no tucks no pleats just two sleeves a front and a back! I cut a size 14 but I think I may size down next time? 


To add a bit more colour I did the hems using a coloured thread, it just ties the colour of the embroidery to the rest of the top, 

All in all I like it. When I finished it I absolutely hated it, it was just lying on the table all big and shapeless but then I tried it on with my jeans and with a few skirts and I decided that maybe its actually sort of cute in a kind of french way. I'm looking forward to the weather warming up so I can wear it again. And I love that it uses some of my Aunty Shelias stuff and that I managed to cute around the damaged fabric [although there is still a small stain on the top of one of the sleeves, but I live with a small boy so stains are part of my life at the moment!!] 

Much Love 

Frankie 

x


Tuesday, 27 June 2017

Granny Square Chic

You ever get a thought into your head and just can;t let it go? Well today I was thinking about crochet granny squares and how easy it would be to make an item of clothing out of them? You see I find crochet more relaxing than knitting probably because of the monotony.  

Anyway a quick browse on pinterest showed me that whilst you can make a garment out of granny squares sometimes you just shouldn't [70's crochet trends I;m looking at you!]....and then much to my surprise some cute things started turning up! [I do apologise to the lack of links to the original images, Pinterest is such a messed up rabbit hole now days, half the things that come up on a search aren't related to what you searched for and half the things that are don't link back to the original content!] 


Like this isn't hideous, in fact with longer sleeves and a pair of jeans it might actually be cute!! I think this is by anthropologie but I can;t find it on their website!


This I like less but its actually moschino! Its an actual designer brand! In fact a quick google informed me that their 2017 resort collection contained lots of crochet!


The above is also moschino, not exactly my cup of tea but I'm sure there is a very rich woman somewhere who loves it! 


This is a skirt but I think its kind cute, closer inspection showed me it might be a dress but that the skirt is box pleated! [this may be a picture of marina and the diamonds!]

These were my favourite two images!


This image actually linked back to a pair of $200 sunglasses...... But from what I can tell this jumper is made up of 5 round crochet squares with a boxy cropped shape and short sleeves.


And this one which is made of one large granny square and then sleeves are added on!

I think I like the first idea better? which kind of leaves me in the place where I'm trying to work out how to make one!

Oops!

Much Love 

Frankie

xxx 


Saturday, 24 June 2017

Gingham Circle Skirt

I feel like to be a proper British person I need to start this post off by mentioning the weather.... I mean haven't we just had it all?! The blazing sun followed by pouring rain! High humidity and then this morning it was actually chilly!

Anyways I made this skirt a lil while ago but I've gotten out of the habit of posting regularly, what can I say after a day of trying not to melt I'm pretty beat!


The fabric came from my Aunty Shelia and Uncle Gordons house, my mum and some other family members went to clear it out recently and they were kind enough to set aside a lot of their vintage linens for me. This was a table cloth, my mum said they must have found at least 15 whilst clearing out so as you can imagine they were all in pretty good condition, This had one small stain that came out during pre washing. The fabric appears to be some sort of cotton/linen type stuff?


Its a pretty cool gingham design and their was just enough to make a simple circle skirt. For  the waistband I used fabric from my stash and I decided to have a button front rather than a zip in the back. Mainly because I'm running out of skirt zips and couldn't be bother to go out. 


I reinforced the front placket with hemming tape, this just meant I had something a bit more stable to put the buttons onto! The waistband however was too thick to put a buttonhole into so that closes with a press stud instead. 


I am wondering if its bit short? Like I feel like I'm young enough to still be wearing short skirts but I;m also a mum so I bend down a lot???? 

But yeah all in all I love it! It does make me a bit sad to look at it though because it came from their house and its one of their things? I did feel a bit bad about cutting up one of her table cloths especially considering what good care she took of her things but I actually think she would have been quite tickled at the thought of me making a skirt from it.

In other news! 

This week ended up completely jacked up! We had a lovely visit from Rikkis Nan and Grandad on the Tuesday and then on the Wednesday lo and behold Rikki wakes up feeling rotten [we suspect tonsillitis] which put paid to our weekend plans! The idea was providing we had nice weather we would go camping and if we didn't I'd take the train to the new Abakhan store that was opening and have a day to myself and hopefully spend enough money to snag myself a goody bag! oh and try and get myself a signed copy of Jenny Taylors new book!! As it goes Rikki being ill meant we couldn't do either!!! Not a happy bunny! Actually that's an understatement, the combination of missing out on fun things, a ill husband and a miserable child left me in what I can only describe as a foul mood. I did apologise after all its not Rikkis fault he's ill [it is his fault hes a baby about it....].  

And the freezer broke! Rikki left it open one night and then It didn't work properly for 4 days so now we've had to throw away a metric tonne of food and restock! All whilst crossing our fingers that it doesn't break again! 

BUT all is currently well, I've just had a bath and a KFC and now I'm watching Clint Eastwood in escape from Alcatraz so all is well!

Much Love

Frankie

xxx


Wednesday, 21 June 2017

The Half Finished Jacket - Part 2

Okay so here's part two on my half finished coat project! You can read part one here: or you can read the short recap below!

Okay so I was given the pieces for a coat by an old friend, she had already cut it all out and basted in the interfacing, I finished said coat according to instructions including hemming etc, then realised I am NOT living in the 80's, so I took the whole thing apart to alter it again! 


The image above is how it looked the last time you saw it!

and below is the finished and altered jacket!


So I think we can quite safely say the fit is a lot better right? Its still got the big and slouchy vibe to it but The general fit is just better!


First of all I tried it on and worked out where the shoulder head needed to be on me. I marked this by standing in front of my mirror and using tailors chalk. 

So then I unpicked the entire thing, with wine, lots of wine. Because well if your going to sit and unpick an entire jacket you've just finished you are going to NEED wine!! Well actually I just unpicked the lining and then took out the sleeves and unpicked the side seams the neckline and the collar as well as the shoulder seams stayed intact!

I even unpicked the pockets and took them off [I was sure to mark a line where the top of the pocket needed to go though!] 

Then I measured how much I needed to take of the side seams and shoulder seams. A whopping 6.5cm which is slightly bigger than your average digestive biscuit. Luckily as the shoulders were drafted quite flat [I guess to accommodate the shoulder pads , which I also removed..... and burned] taking in the side seams just meant laying my pattern pieces back over the fabric pieces and re cutting the shoulder and side seam line as well as the armhole. That description probably isn't very clear which is why I took a picture of it one my phone, which Lil man then deleted whilst taking selfies........   If you want to see a really awful picture of what I was planning to do check out my instagram! [thanks by the way to all the guys who commented on my idea telling me whether or not they thought it would work!]


I did this for the fronts and back as well as for the lining, then I positioned the pockets centrally and sewed the whole thing back up! [I had to remove the pockets because they were placed within the 6.5cm I was getting rid off] 


I even did my fancy hem stitching again! Happily due to me re-sewing the sleeves I was able to set them in flat this time which I think is a better way of doing it! Plus I didn't scratch all my arms like last time!


All in all I think its a much better fit and I am glad to be rid of those darn shoulder pads!

Gosh this has been a pretty heavy post hasn't it? I'm actually surprised that I worked out how to alter a jacket and that I managed to do it and that my theory panned out! I guess that means my sewing skills are starting to improve? 

Yay I have a new winter coat! Although it still doesn't have buttons! And a huge thanks to Sue who gave me the coat to work with , thank you so much of thinking off me!!

Much Love

Frankie

xxx


Monday, 19 June 2017

Denim Shift Dress - butterick 3596

If I had to describe this make in one word it would be "Utilitarian". Which typically isn't my style, in fact at this moment in time I'm not 100% what my style is? I tend to change every day? Sometimes its punk, sometimes goth sometimes 1950's housewife. But apparently when I made this I was feeling utilitarian.


So I started with this butterick 3596 pattern that I got from a vintage far I went to with my mum and dad. My mum brought it for me for the princely sum of 50p. its a bust size 36inch which is my bust size! [Just realised that putting my bust measurement on the Internet might not be the smartest thing I've ever done as it may attract some weirdos to my blog..... Hey guys we talk about sewing here, your going to be disappointed] 

I like the pattern and I love the ladies on the front they just seem to ooze class! The pieces were already cut out [this is typical of vintage patterns as they only came in one size.] So one day when Rikki was suffering from a nasty migraine and Lil man was quite happily playing I decided to quickly cut it out ready to sew in the evening.  


I cut it out of some denim I had left over from making this skirt, its from the craft cotton company and is by far one of the best denims I have ever worked with. It washes beautifully and the colour doesn't run at all! 

I went for both the collar and sleeve version! How awesome is that collar? and how bloody twee! In fact the sheer tweeness of the collar is the reason I left the hem and sleeves un-hemmed, hopefully the raw edges will take one of the tweeness away and give it a more cool vibe? Lucky the denim doesn't fray much especially seen as I added a line of stitching around the hems so it couldn't fray past that part. 


The main dress is just two pattern pieces a front and a back. The front has bust darts and both the front and the back have 'french?' darts? basically they are really long darts that go from under bust to hip.

The collar is made up of two pieces the front and the back and sets in really well, the raw edges are all hidden away by a neck facing. 


I added back pockets to make it a bit more interesting [sorry you can;t really see them on this picture but feel free to zoom in on my bum]. 

And I used a big chunky metal zip to finish it off. I LOVE using metal zips they are by far the most reliable! Plus ya know shiny and stuff! 


Fit wise I feel like the whole dress is a bit off? I like the fit on the bust but I think the side seams may need to be taken in around the waist a bit? [thoughts please?] And I kind of the think the proportion of the sleeve is a bit off? I'm wondering if a inch or two off the sleeve might look a bit nicer and younger? 

I might try those alterations and see how it looks? I'm also toying with the idea of taking off the collar? Some people can really put off the peter pan collar look but I think being a bit more busty it just looks a bit silly? and maybe I might like the dress better without it? 

All in all I think this pattern has potential? I have some drapey viscose so I might make a collarless version and try it belted? I can't belt this version because the denim is too stiff. 

I did really enjoy working with a vintage pattern though!

Much Love

Frankie

xxx