Showing posts with label goodwood revival. Show all posts

Thursday, 16 May 2019

Vintage Style Planes Shirt for Dad - McCalls M7206

Every now and again I make things for other people. 

Yes I really am that kind. You do have to meet a special criteria though. 

1. You have to provide the fabric [and I get to keep the leftovers]
2. I have to REALLY love you!


My dad wanted a vintage style shirt for the goodwod revival. He's seen someone wearing one at goodwood and looked online for something similar and found that they retail for about 50$ and would have to be shipped over from america! 

Naturally that seemed a bit excessive for a cotton shirt so he went to abakhans and picked up a sewing pattern and this cool vintage planes fabric and asked me to whip him one up.


The pattern was McCalls m7206 which is a mens bowling style shirt. 

Image result for mccalls m7206
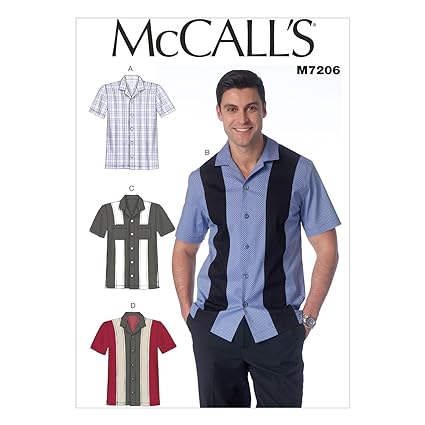
 The front of the shirt is panelled which wasn't going to work with the fabric because you'd end up with most of the planes cut in half. So I hacked at the pattern with my scissors and taped the three panels together to make one shirt front. Luckily mens shirts don't have to have room for boobs so it went together pretty easily with minimal swearing. 

In fact the swearing only started when it came to cutting out. My Dad had been very specific that he wanted as many whole plans on the shirt as possible. Which meant I cut everything out in one layer and did a lot of moving things around trying to get as many planes as possible. There is a whole plane on each shirt sleeve, lots on the back and a few on the front. I even cut the collar in such a way that no matter if its up or down the planes are facing the right way!

 [top tip - if your going to cut things in a single layer to make sure you make the most of your print be sure to flip your pattern pieces so you don't end up with two left sleeves etc.]


I'm particularly pleased with the view from the back and the large plane that is basically central. 

Construction wise I wish I'd ditched off the instructions because they were AWFUL! Either its the pattern or its me but anyway I ended up having to do some creative thinking to keep everything neat and tidy. For example the back collar neckline is bias bound which does actually leave a nice finish. 

Also its really hard to see but I love that some of the writing is on the edge of the collar [each of the planes has its name underneath] 


Dad even chose the buttons himself and I'm pleased to report that every single buttonhole went in perfectly first time! 

So all in all I think it turned out pretty banging and my dad was dead pleased! I love his goofy grin in the last photo! And I think he may be on the hunt for more vintage inspired prints so I can make him a few more!!! 

Unluckily there wasn't enough fabric left over for me to make anything substantial for myself! [all that dammed fussy cutting!!!!]

So instead I'm going to use the scraps to make me and mum some hair accessories. 

In other news!!!! 

I've sewn up a few bits for myself and been working on baby quilts!

I've been climbing again!!! And I'm happy to report that my climbing shoes were incredibly comfortable!!! 


And my brother snapped this photo of me which I LOVE. Okay so I'm not far off the floor [this is the bouldering room so you don't go up that high] But 
1. I made my chalk bag it has penguins on it
 2. LOOK HOW STRONG I LOOK!!!! 

Anyway I absolutely loved climbing again and had big plans to go again this week but I was far too sore!!!! So hopefully I'm going to go next week! 

Much Love Frankie 

xxx


Tuesday, 19 September 2017

The Goodwood Dress

 I am knackered. The few days leading up to my birthday and the few days after just seem to have been choker block. We've had visits from friends, we've visited family, we had a wedding, we had my birthday, first days back at school and lots of other exciting things. This all teamed with Rikki having some time off work hasn't left a lot of time for blogging. That said it has been lovely having him off and having someone to chat too all day. Anyway we are just about recovering from our very busy week and I'm pretty sure I'm getting a cold! 

But your not here to hear about my cold now are you? Nope you guys want the dresses!


Please excuse these photos they were taken on my mums iphone! 

Okay so 2 years ago I said I;d make my mum a vintage style dress as a mothers day present....... And well I only just got around to it!

Basically it ended up being a bigger job than I thought it would be because :

1- my mum is not a typical size or shape, For example her bust is much larger than her waist by some amount. This meant that find a pattern was a bit of pain in the bum.

2- My mum is a VERY exacting client. She knew what she liked and what she didn't like. And being my Mum she believes that I have super powers and that nothing was beyond my sewing knowledge.

Here's a list of what my mum wanted in the dress-

-It should be a vintage style suitable to wear for the goodwood revival
- That vintage style should be from the 1950's with inspiration drawing from the post war new look style.
-It should have sleeves
-It should incorporate lace
-It should have a full skirt
- It should have the type of neckline that would best display her bust
- It should fit well
-It should be comfortable for wearing all day
- It should have things to keep her bra straps in place.


Now being that I have never made a fitted dress for anyone other than me I knew the pattern stages were going to be key. [I really wish I had documented the process a bit better with pictures or video]

We started with a paper pattern by Prima. I only used the bodice pattern pieces because we had already decided that a circle skirt would be the most flattering. Using this paper pattern I made our first adjustments directly to the pattern:

- Lowered the neckline
- Drafted a sleeve

Next I made up a toile of the bodice from this I :

-changed the waist darts in the front and back bodice to gathers [this was more flattering for her shape]
- lowered neckline again [her insistence not mine]
- Created a fold down detail in the back of the bodice. 

Next I transferred these changes to the paper pattern and we made a toile of the full dress including a full circle skirt and adding a waistband. [Luckily my mum had decided to use her old curtains to make the dress in true make do and mend fashion. So I was able to use the lining for the toile and know exactly how much material I would need.] I was so glad I made the toile because it allowed me to iron out the last few kinks meaning I could just sit and stitch up the dress without fitting etc. The changes were:

-shorten sleeves by a good 5 inches
-take the back of the dress in by two inches
-take 3 inches off the length of the skirt


After that was done my mum dropped the main material off and know that I only had one evening to make the full dress I sat and sewed my socked off! 

I started cutting out at 5.00pm and finished sewing at about 12.30pm at night. 

So the DETAILS! 

The bodice is fully lined in the same fabric as the main body of the dress, this was essential because of the fold over detail at the back of the bodice. The entire bodice lining was stitched by hand apart from at the neckline. Including around the sleeve heads, I am so chuffed with the finish of this dress its absolutely immaculate. 

The dress closes with an invisible zip, and above the zip is a small hook and eye that just jives some added security to the top of the dress. 


Speaking of security the weight of the circle skirt is supported by the waist stay. I made the waist stay using a piece of gross grain ribbon and a large hook and eye. Its attached to the waistband of the skirt through the lining layer and the main layer [you can't see the stitches because I did them really neatly and the lace hides it really well!] The function of this waist stay was to make sure the weight of the dress didn't pull on my Mums shoulders, she suffers from fibromyalgia and having something pulling on her neck would make her very uncomfortable, the waist stay mean the weight sits on her waist and is more comfortable.


All of the lace was cut and applied by hand [apart from the one of the waistband with was stitched into the seams] I nearly screamed cutting the lace, its the type of thing that could quite easily drive you to madness! In fact the more savvy of you will notice that the lace on the front neckline isn't the same. Apparently when you sew late at night your mind stops working at 100%.

As it goes I don't actually mind the mismatched lace I think it adds an extra layer of interest to the dress! 


The skirt was hemmed via machine using bias tape. I would have loved to have hand stitched it , but as I said I was on a tight deadline so It just wasn't possible especially after hand sewing all the lace.

The inside even has some small ribbon and press stud bra strap holders so nothing peeps out and spoils the dress!

All in all I'm really proud of it and the absolute highlight was taking it round to show my mums neighbour Beryl who used to be a seamstress. 

Beryl holds a very special place in my heart because she gave me my first bags of fabric and well started all of this really, without Beryl there would be no knitwits owls. She said some really lovely things about the dress and it was so nice to show all of the little details to someone who I knew would appreciate them. 

Ohh I'm actually starting to get a bit tearful thinking about it to be honest! In my lil sewing knowledge world Beryl is the top rung of the ladder and to hear her say how well I'd done is a personal highlight, it meant a lot more to me than I think she realised!

Anyway that's enough soppyness for one day! 

Much Love

Frankie 

xx