Thursday 22 November 2018

Stella Hoodie


As soon as Tilly Walnes new book came out I knew I wanted to make the stella hoodie and even more luckily when the big pattern swap was happening I saw that someone was getting rid of their free copy that came with simply sewing magazine. 

So I snapped it up immediately! And sewed it very quickly!


So the details!! The main fabric came from the abakhans fill a bag sale. I do have some left and I', debating between making a coco dress do a matching pair of sweat pants, any thoughts????

The fabric for the inside of the hood is an aztec type print and came from an old RTW dress. The dress had done that horrible thing where it becomes baggy and looks a bit naff so I re purposed it for the hood lining. 


I didn't have any cord for the ties so I made my own using the same fabric as for the rest of the hoodie. To be honest I quite like the body that they give to the hood when its up. 

The fabric has a quilted pattern on it and its very snuggly and warm. In fact I took this on our camping trip during the summer and I can confirm that it kept me lovely and toasty. I actually had Rikki take some photos of me on the campsite but he isn't much of a photographer and my eyes were closed on most so I had to scratch them and take some at home. 


Fit wise I cut a size 5. Normally I cut a 4 for tillys patterns but I wanted to make sure it would be big enough to wear lots of layers underneath. 

To be honest I still think the body is a bit short and so are the sleeves so both of those need altering on my next version. I really I think I need at least 3 inches onto the sleeves and about 6 onto the hem for me to feel like it looks right. 


Construction wise, with it being a free pattern it didn't come with any instructions. So I popped myself onto you tube and watched a video of someone making one up whilst I did the washing up so I'd have the gist.

The main parts were sewn on my over locker with just the top stitching and the ties being done of my regular machine. 

I did have to use a walking foot to get it through my machine but I always do for jerseys because it gives a bit more control and stops the fabric stretching weirdly.

I also did the button holes on my regular machine and I had to go over them a few times to get them looking nice. Doing buttonholes in jersey is such a faff but luckily this is a fairly stable one so it wasn't a massive issue I just had to fill in some gaps. 


The only thing I think its missing is a big pocket at the front. I think there is instructions in the book for how to draft one [Or maybes there is a pattern piece] But seen as I don't have the book I'll have to make my own which shouldn't be too hard. 


All in all I'm really pleased with how it turned out even if the sleeves and body are a bit short. I've been wearing it a lot for walking the dog in the evening when its cold and I need as many layers as I can get! 

Much Love 

Frankie 

xxx

Tuesday 20 November 2018

A Very Lippy Tshirt - New Look K6217


I do have a bit of a reputation in my family as being very loud!!! 

What can I say I grew up in a very very LOUD family!!!!! 

In fact we had a family day this weekend and I had forgotten how much noise we can all make when we are all together!!! That said it was lovely seeing everyone and having a good old catchup!


So onto my make! This has actually been made for months! I've got quite the collection of makes still waiting to be blogged about and an even bigger pile of ones that need to be photographed!!! 

So I got this fabric at the Abakhans fill a bag sale [The first one I went to] and I mainly picked it up because of the print of lips. 

I was hoping there might be enough for a dress but their wasn't so I've had to settle for a top.


This New look K6217 top pattern has become quite a firm favourite with me for smaller pieces of fabric. I don't actually wear them very often but its nice to have a few me made tshirts on hand to pair with skirts and trousers. In fact I'm wearing a spotty one right now with a me made pencil skirt. [Fun fact: I should have added a back vent to the pencil skirt because I'm really struggling to walk anywhere quickly in it! In fact the steps to school were a bit difficult today!!!]


Theres not really a lot I can say about fit because its meant to be quite loose and baggy but I do find it looks better tucked in. The only alteration I might make to the pattern is to lengthen it slightly so its easier to tuck in. 

Construction wise I sewed the side seams and shoulder seams on my over locker and did the back seam and hems on my regular machine so the opening at the back would sit nicely. 

For the hems I went round the edges with my over locker and then folded them over twice. This is a technique I use for all of my hems on floaty fabrics because the overlocked edge give you something stable to turn over and keeps your hem a uniform width.  


In other news!!!! 

I've finally joined the rest of the crowd and watched the crown, which I really enjoyed and now I'm dreaming of tweeds and cardigans for the winter months. 

I've done no more knitting on my miette cardigan and in fact I'm quite tempted to rip the whole thing back and use the wool on something else as I'm not quite loving how its turning out. 

I've done no more on my crochet blanket or my hexy blanket either!!! 

What I have been doing its lots of sewing projects that take time and attention and I'm really enjoying my new bout of slow sewing! Although at the rate I'm going blogging and photographing projects you probably won't see them for another six months!!!! 

Much Love

Frankie 

xxx


Tuesday 6 November 2018

Peak Tshirt Dress in Stuart Hillard Fabric

My style is really changing at the moment. After years of being really dressed up all the time I'm trying to embrace casual a lot more. Which obviously includes making my own casual clothes. 


I'm trying to work out why I'm so smiley on the picture above? Did someone give me a cookie? Was I two glasses of wine down? Why am I so cheerful?????????


Ahh that's better. My resting bitch face is back. 

So onto the dress!!! The fabric is one of the prints from Stuart Hillards Kimono collection for the craft cotton company. Its a lovely sort of abstract print on a blue background. The craft cotton company were actually kind enough to send me a few prints from his collection but I only had a small amount of this one so I knew I'd need a simple pattern that wasn't too fabric hungry.


I chose to use the Peak tshirt pattern from Wendy Wards book. BUT I opted for the longer dress version. To be completely honest this book has become my go to for jersey patterns. Its got a few basic patterns in it but there's so many variations for every pattern that its definitely worth buying! 

Construction wise I used my over locker for the mainly body of the dress and just used my regular machine with a twin needle and walking foot for the top stitching and hems. I did add a bit of interfacing to my hems to stop them puckering when I used the twin needle and I stabilised the shoulders with some ribbon to stop them stretching out. 


Typically I don't wear tshirt dresses but I really like this one. I actually made it during the summer and it was really comfy to wear but I've worn it with thick tights recently so it should be good for winter too. 

The only problems I have are :

1. the neckline is really high. I've since altered the pattern and the neckband pattern piece to make it a bit lower. 

2. its a slim fitting dress. which means if I'm bloated or I've eaten an entire bag of jam donuts to myself [Obvs I don't actually do this........often] then I don't really wear it because I risk looking a bit pregnant. On the plus side if I'm at home and I'm eating pizza and I don't have to leave the house then the fabric does expand to fit my pepperoni tummy.


All in  all I really really love it. Its so nice to have a more casual dress that I can wear. I actually took this camping with me when we went as well because I like to have a dress option with me and this doesn't crease. 

In other news!!!! 

I still haven't added anymore to my miette cardigan....... I know I know and I'm annoyed with myself because I said I would finish it before I started another project but there's a few patterns that are calling to me! 

My hexy quilt is getting bigger! I'm adding to it every now and again its its definitely progressing. But I knew I was in for the long haul with that one! 

My new crochet quilt isn't getting any bigger either. I'm making granny squares and blocking them but I think its going to be another long project. 

We have however clear out our loft so we can put the train set up their permanently and then the boys can play with it. Obviously I'm most excited about building all the scenery and houses!

Much Love 

Frankie 

xxx


Thursday 1 November 2018

Helping to put Sewing in Schools

Its the day after Halloween but do you want to know whats really scary? 

Facing a room of 6-10 year olds each who are holding a needle and screaming for your attention. 

Yep folks I went into my sons school to teach the kids how to sew on a button and it was a baptism of fire. 


It started off as me asking the head teacher if she had seen that hobbycraft were offering free buttons to schools to encourage children to learn to sew on buttons. I also offered to source some fabric if she needed it. 

HUGE shout out to the craft cotton company who gave a generous box of fabric for the kids to use and who madce sure to include prints that the kids would love including spiderman and star wars to make sure the boys didn't feel left out.  

And as I took the fabric in I was faced with this question....

"so when do you want to come in and do it????"

HUH????? You want me to do it? Seriously? What can I say I thought I was offering supplies but I got roped into actually teaching the session as well! 

The general idea we had was that I would pre make a load of bunting and then the kids would draw on what they were thankful for [we did consider stitching but it looked like it would take far too long!] and sew on a button. Then I would take all the bunting home and attach it to bias binding and make it into long stripes of bunting.

FYI asking kids what their thankful for is HILARIOUS! You get the sweet kids who say "mummy and daddy" and then you get the ones who you know are going to be future hippies who say "trees" and then you get to ones who tell you their thankful for "x-box" BUT then you'll get one ABSOLUTE LEGEND who says he's thankful for "dragons" 

Yes folks 

Dragons!!!!!!


It was wonderful and terrifying at the same time. I was supposed to run four sessions but only ended up doing three because I was in out of hours on the last one with bad chest pains [Nothing to worry about I've just had to change my diet quite drastically]

For starters 30 kids each holding a needle is sweat inducing to say the least. Even if I did make sure to take the bluntest needles I could physically find.

Secondly apparently the actual sewing on of a button is a lot harder than I thought it was! Especially for small kids to get their heads around.  You could definitely see the difference between the kids who had done sewing at home with parents and grandparents and the kids who had never touched a needle and thread in their lives. 

But it was really really lovely to see all of the kids gain confidence in what they were doing and what they'd achieved. But do you want to know what sucks?

 Making kids cry!!!! 

Obviously that wasn't my intention but sewing on buttons is a frustrating business and a few tears were shed mainly because of tangled threads and buttons falling off after they thought they had been attached. I also had tears from a lil lad who desperately wanted to take his home to show his mum but sadly we'd already decided that they would be used to decorate the school and me and the teacher realised if we let one take his home then everyone would want to take home!

All in all I was really glad I went in to do it. Even if the first thing I did when I got home was pour myself a glass of wine to try and relax [Typically I don't drink before 6pm but after 2 hours of 30 small children wanting my attention I needed something to take the edge off.]

And the bunting looks glorious zig zagging the hallway and its so lovely that the kids can see their achievements every day and that hopefully a few of them will have been bitten by the sewing bug!!!!

The down side....

Lil man wants to know when I'm next going in.....

much love 

Frankie

P.S I highly recommend throwing caution to the wind and going into your local school and asking if they want you to go in and do some sewing. Yes its like entering the 7th depth of hell but its also a lot of fun! 

Tuesday 30 October 2018

Check Sunday Set

HEY! So I'm still working through writing about my backlog of projects! 

According to my notes I actually made this during the summer when we had that freak heatwave! 
  

Realistically I could tell you that I made this because I was thinking about winter clothes HOWEVER that would be a lie. 

Instead I made this because I had some fabric left over from making my check trousers and I couldn't fit it into my fabric cupboard and it was starting to irritate me because it was just floating around my sewing area!  


I have another Sunday set that I made ages in in liberty cord from abakhans and I wear it all the time with polo tops when it gets chilly so I figured making another one would be a great idea. [omg I just looked and realised I made the liberty Sunday set in 2016!!! Who knew handmade clothes could last for so long!!!]


The fabric was from the abakhans fill a bag sale [I can't remember if its from my first one or my second one]. It was really lovely to work with and its just the sort of check that I love as it goes with absolutely everything. 


If you look really closely you can see that the pocket is actually the wrong side of the fabric because I sewed it trimmed it and ironed it before I realised.....oops. These things happen. I did make the bib detachable in case I start hating the whole bib thing. I attached it with poppers but then it was a gaping a bit at the join so I whip stitched it closed. So its pretty firmly attached but the stitches are big enough that if I ever just want a check circle skirt I can take it off. 


Lets talk about the full circle skirt for a moment. YES I love a full circle skirt but my god was a pain in the bum to hem. first of all it took about two days for it to fully level out and then I decided to hem the whole thing by hand. [I've just checked my notes again and it turns out I actually hemmed it whilst England were playing in the world cup quarter final.]  


The buttons and zip were from my stash and I decided to cut my front pocket and waistband on the bias for a bit of interest and because I didn't want the hassle of trying to pattern match. Seriously I am so lazy when it comes to pattern matching. I'd rather be sewing than trying to work out exactly where I need to place a pattern piece so it matches. 


So to say I made it so long ago I have worn it lots! I find it works especially well with fleece lined tights and a polo top. Plus the fabric is heavy enough that it doesn't fly up in the wind and show my pants [not that you can see them through my fleece lined tights because those bad boys are THICK!] 

As it goes I've actually worn this more times than the check trousers that I made from the same fabric. I do still like the trousers but they seem like a bit more of a fashion statement than the pinafore dress. 

In other news!!!!

- Its half term and we have to make a dragon for school........... yay?

- I went to sew north west on Saturday with my big sister Netty. And I want to say how proud I am of her. I know in reality she only went because I was too chicken to go by myself but she really threw herself into the whole thing. Sewing doesn't come naturally to her but she really likes the idea of having comfortable clothes that fit, especially for work. Anyway I could see she was a bit nervous as she was setting up her machine but I am happy to report that she ended up with as nearly completed project and they look really good! FYI she had also already made a muslin and drafted in all of her own changes so she could get a nice fit! So snaps for Netty!!!! 

- After spending the day at sew north west I also went out that night with my friend Chels for girls night!!! She had a great time and it was really nice to have some girl time and to let my hair down! 

- Today has mainly been about tidying up but tomorrow I have big plans to try and get my next sewing project cut out! 

- My hexy quilt is getting bigger however my miette cardigan is still going really really slowly. I keep joking that I need to have a dose of the flu so I can stay in bed and knit but I really don't want that to happen!!!!!! *touches wood*

Much Love 

Frankie 

xxx


Saturday 20 October 2018

Top Tips For Cutting Out

Cutting out before starting sewing is one thing that has people divided. Some love it some hate it. I'm not sure which category I end up in. Sometimes I love the process of playing pattern tetris and sometimes when the fabrics off grain for its been cut wonky I just want to scream.

But I've put together a few top tips for when It comes to cutting out your patterns to hopefully make it less painful! And then you can get onto the really important business of sewing. 


1. Use a flat surface. For woven fabrics you can hang your fabric over the end of the table but for stretch fabrics are fine slippery fabrics your best cutting it out with no fabric hanging down so it doesn't distort. I personally use the living room floor. [In fact one of the things I checked when we got our new sofa was that I would still have enough room to cut out patterns on the floor!!!]

2. Use sharp scissors. As someone who's pretty thrifty with money I actually kind of hate this one. But its true a good pair of scissors will make your cutting out experience 100% more enjoyable. Now this doesn't mean you have to spend upwards of £50 both of my favourite pairs of scissors were under £25. One pair were under a tenner and the others were £25 but also came with a small pair of scissors and a thimble. I personally would buy the best you can afford and make sure you keep them in good nick by only using them for sewing and not for cutting paper or god forbid sellotape.......


3. Use sharp pins! I know I know it seems like I'm just trying to convince you to buy stuff but sharp pins are your best friends. Bin any that get blunt or bent and replace them when needed. 

4. Use pattern weights for fabrics that move or knits. Some fabrics just don't like having a patterned pinned too them. So I use pattern weight, I personally have these donut ones but I believe the lady is no longer making them. You can also use metal washers from your local DIY shop or big stones from the beech or even tins of beans etc. Basically anything heavy and flat with do. [we used to have some great coasters that I used that had felt on the bottom which stopped them shifting around. 

5. Iron your pattern pieces. This was actually suggested to me by a lady I know and I haven't looked back since. Its especially useful for accuracy especially if you stuff your patterns back into the envelopes like I do!!! 


6. Keep a fabric marker/chalk handy for marking dots, darts and cut lines. BUT make sure you can remove it from your fabric afterwards!!!

7. Clip notches [little triangles] as soon as you've cut out the pieces so you don't forget. I am so guilty of forgetting to clip my notches and then sitting and trying to work out how things go together! Clip them straight away and then everything should go together smoothly.


8. Be mindful of pattern placement. I'm not talking perfect pattern matching here because half the time I'm winging that I'm talking about making sure that you don't end up with embarrassing placement on your boobs or foof areas. For example you wouldn't want to make a polka dot dress and have a large circle over each nipple would you???? Just something to bear in mind!!! 

And that's all of my suggestions. How do you make pattern cutting more fun!!! 

Much Love 

Frankie 

xxx


Tuesday 16 October 2018

Folk Dress Mash Up - Newlook 6390 & Style 1993

Wanna see something ridiculously unseasonable?


Well here's the folksy dress I made during the heatwave we were having a few months ago. [At this point in time the summer of 2018 is already feeling like one of those things I'm gonna be banging on about until I'm 98, "Oh come here and sit on Nanas knee and let her tell you all about the summer of 2018 where she didn't wear tights for months and dried all her washing on the line.........."] 


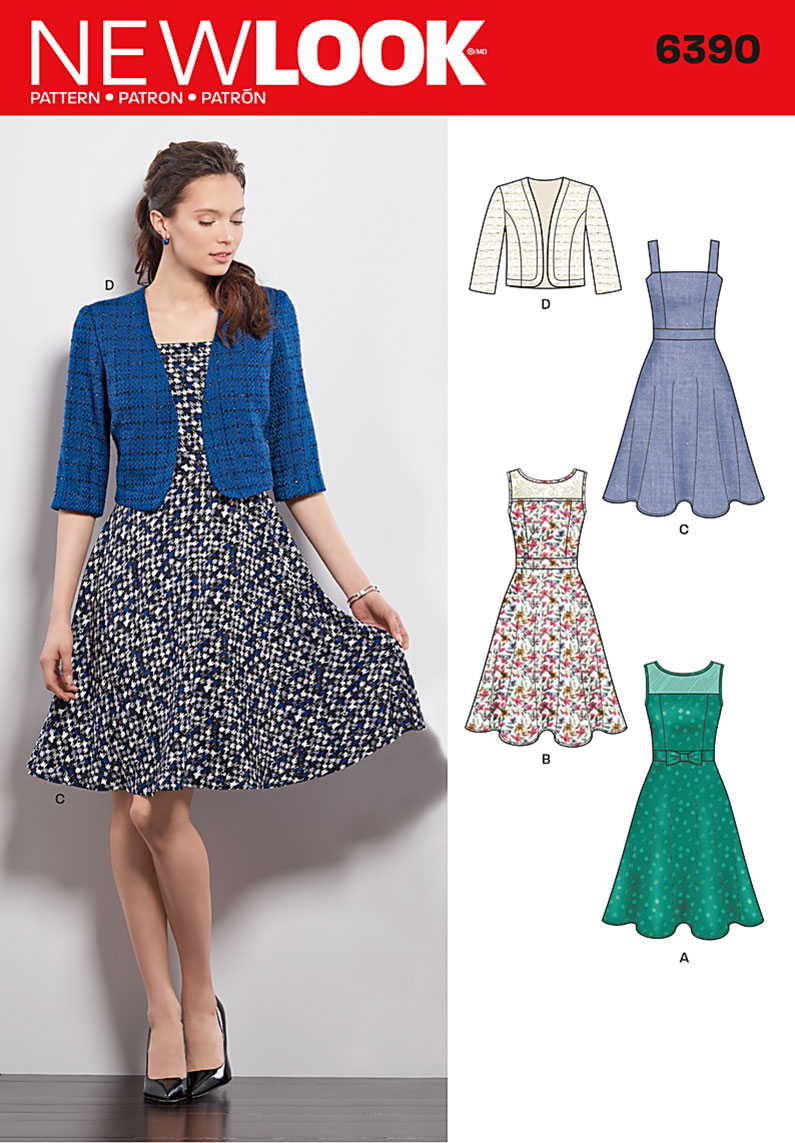
So it was a bit of a mash up. The bodice is New look 6390, which I've made approximately 3 million times. The only thing I changed about it was swapping out the straps for tie straps.These are basically two long rectangles per shoulder and then you can tie then as tight or as loose as you want.

 Image result for newlook 6390

And the bottom of the dress is Style 1993 which is a vintage pattern that I got at the carboot when I brought a job lot of patterns.

Image result for style 1993 sewing pattern 

Technically you don't need a pattern for the skirt because its basically 3 gathered rectangles. With the top rectangle being the smallest and them gradually getting bigger. 

If I were to make it again I would shorten each rectangle by a couple of inches as the dress ended up being quite long. 


The trims were the main inspiration for the dress. They are beautiful embroidered ribbons in a folksy style that I was given by a lady at the carboot. I've been hoarding them for ages trying to think of a cool way to use them.

I applied each of the trims using a straight stitch BUT I did spend a LOOOONNNNGGG time measuring and marking where they were going to make sure that 1. they didn't get eaten up by seam allowances and 2. That they were level and would match up at the back seams. 

Annoyingly I didn't have quite enough of the embroidered ribbons and the skirt was looking quite right so I used some black ribbon and some blue lacey ribbon as trim as well. 


The dress closes with a lapped zip. Its not my best ever and the top is out by about a centimetre but most of the trims line up and I couldn't really be bothered to unpick the whole thing just to make the back level so I'm leaving it. Realistically If I were a perfectionist I'd change it so it was level but its not something I'm going to see and its a dress that's only suitable for about two months of the year soooo.................. 

The main fabric is a cotton that I got from the abakhan fill a bag sale. It behaved really nicely and luckily I had enough for the whole dress to be in the same fabric including the lining. I had about 2 1/2 metres maybe three and I though I might have left overs but the skirt was really fabric hungry. 


All in all I really love how the dress turned out. Especially seen as this is a dress I just couldn't get out of my head!!! 

But if I were to make it again [Which I probably will if I can find some more embroidered ribbons] then there are a few changes I'd make. 

- Stitch the trims on a bit neater. A few of them are really neat but they took agggeeesss and I'll be the first to admit that I got a bit sloppy and started rushing towards the end. 
- Shorten the skirt pieces as I think their a bit long.
- Extend the bottom two tiers of the skirt to make them more gathered for more impact!!! 


So yeah all in all I'm really pleased with how the dress turned out. I am a bit gutted though because LOL not really the weather to wear it anymore is it? I guess its good because I have something nice to wear next summer! 

In other news!!! 

-Lil man is over his sick bug! [thank god!]

- I seem to have settled into a pretty good rhythm with regards to blogging, school stuff, housework and sewing. Its taken since September but I'm finally there and have achieved balance. Now I just have to hope that I don't loose it all when lil man breaks up for half term! 

and I think that's about it!

Much Love 

Frankie 

xxx


Saturday 13 October 2018

Slow Sewing - working on my hexy quilt

I woke up on Thursday night [well technically early hours Friday morning] to the sounds of Lil man crying that he'd be sick and well that been my past two days looking after a poorly child. 

As it turns out this bug has actually taken out a good half of his class and well a good half of the school really. So we spent the day on the sofa and watched movies and I added row after row to my hexy quilt and tried not to panic about the fact there is a sickness bug in my house. 

Sickness is something I don't "deal" with very well. Historically any time I've caught a sickness bug as a child I've ended up really really poorly. So frankly it terrifies me. 


Luckily making the hexy quilt keeps both my hands and my mind busy. 

So far its actually growing quite quickly. I've even started removing the papers from the centre hexagons. [Top tip the centres are reusable however its not as nice to sew with them as "fresh" ones so I like to iron mine after I've taken them out. It helps to flatten them out and makes for more accurate sewing.]
  

All the fabrics are from my stash and I'm finding it interesting looking at all of the fabrics I've collected over the years. Especially looking at some of the fabrics from when I first started sewing.

I've also been adding rows to to my miette cardigan which I started last time he was really poorly. Funnily enough I had joked a few weeks ago that for me to have any chance of getting it finished I would need for him to have a week off school. 

Apparently I should have touched some wood when I said it!!!! 

And yeah that's pretty much my last few days to be honest. I had planned on finishing a big project on Friday but didn't get the chance due to playing nursemaid. So now I'm going to have to do that next week! Provided lil man is well enough to go back into school.

Hopefully I'll be able to schedule some blog posts whilst I'm on nurse duty!

Much Love 

Frankie 

xxx

Monday 8 October 2018

New Look 6390 - Skull Fabric

Yet again I'm behind with blogging. In my defence I was going to blog on Friday BUT we had a new set of kitchen knives delivered and well Rikki ended up slicing his fingers open....So instead we went to A&E and Rikki had five stitches in his finger and I've been listening to him moan ever since.....


This make is ages old, In fact its so old that I wore it all summer and its officially been retired to the bottom of the ironing basket for the past month. I mean who has the energy to iron summer dresses when there not going to be worn!


Image result for newlook 6390

The pattern is newlook 6390. I demonstrated how to make this at abakhans a few months ago and this is the actual dress I made in the demo. I cut a size 12 [I have a 36" bust] and I had to shorten the straps and remove a wedge from the front neckline to stop it gaping and I took about 2 inches out of the back seam. Oddly for me I didn't shorten the length, mainly because it was the perfect summer length for wearing without tights and not flashing my pants. 


This quilting cotton was from abakhans and was really beautiful to work with. Everything pressed so nicely and the fabric behaved really nicely resulting in the BEST invisible zip I've ever done. There is a bit of rippling at the back so I may have to shorten the bodice a bit but the zip is BANGING! I actually wish I'd taken a better picture because OMG..........

Also eurgh bra straps. One thing I'm not going to miss about summer is having to wear a strapless bra with basically everything to stop my bloody straps showing. Can't see bra straps under a big fluffy jumper now can ya!?


The bodice is fully lined. And in typical Frankie style I used an old pair of curtains instead of just using up the rest of the fashion fabric so now I have 20cm of skull print fabric lying around and nothing to use it on. Note to self : If your going to be left with a piddly bit of fabric for gods sake just line the bodice in the expensive fabric!!!!! 


So yeah I love this dress I wore it a lot over the summer. In particular I think the nipped in waist and flared skirt is very flattering. Plus it was nice and easy to wear when it was stupidly hot and I didn't really want to have to think about actually putting a whole outfit together. 


And how cool is this print!!! I love the way the skulls sort of blend into the pattern so you don't really see the skull until you actually look for them. 

And that's it really this is my 3rd? 4th? version of the dress so by now I really have done the pattern to death and I can't honestly see me making it again for a looonnnggg time. 

In other news:

- I added a few more rows to my miette cardigan and totally balls them up so now I hate it and I can't be bothered to undo them.

- I added a few more hexys to my hexy quilt but its still not growing...... In all honestly I'm already a bit bored with it [hides face in hands]

- I have three quilts ready to be quilted and bound. I sense a big trip to abakhans in my future! 

- I demonstrated at abkahans on sew Saturday! As usual I had a blast! Even if I was supper tired from dealing with Rikkis finger situation the night before!

And that's about it!

Much Love 

Frankie 

Tuesday 2 October 2018

Vintage Kilo Sale - My Thoughts

I fell out of love with blogging over the summer, something to do with the hot weather and the gact that the camera broke and then the SD card broke and well I just sort of fell back on to instagram as its more of a instant thing. 

And then this week I realised how much I'd missed documenting all of my makes. So I got Rikki to fix the SD card and decided to crack on tonight whilst bake offs on.

Although oddly my first proper post back isn't about sewing! Nope its all about the vintage kilo sale I went to with my friend Chey a few weeks ago. 


So You can find preloved vintage kilo on facebook and instagram and the general idea is that you turn up and look through preloved clothes and put everything you like into a bag and you pay £15 per kilo. Unless its a coat or bag or shoes and then theirs just a foxed price if it goes over a kilo to save you money. 

Chey saw that it was coming to our local city on facebook and tagged me in it asking if I wanted to go. And obvs I said yes because this girl loves a vintage sale! And then I spent the week before stalking their instagram page trying to see what sorts of things might be up for grabs. 

I did really enjoy it however theres a few things to mention about the experience! [hopefully you can use these as top tips if you choose to go to one!

1. You will have to queue and pay to get in, I think it was like £1.50 to get in so not bank breaking but still. 

2. everything is packed onto racks! and I mean packed. Their wasn't even enough room to slide the hanger across to have a proper look instead to have to drag the thing out , decide if you like it and then shove it back in. 

3. A lot of its 90's and late 80's. I saw a LOT of shell suits, a lot of track suit bottoms with poppers up the sides and a LOT of NIKE. Not to say their isn't some absolute gems in there from earlier but thats what the majority of the stuff is. 

4. You will have to hunt. Which means going through every single item on the rail. Unluckily it seems neither me or Chey was in the mood to go through every single item whilst crammed in. We probably missed a lot of good stuff but we weren't too bothered because we did get some great stuff! [I did however realise that this is the sort of thing my mum is AWESOME at so i think she'd do well there]

5. Sizing is difficult, there are sizes in the items BUT vintage sizes can vary wildly. You can try things on in changing rooms but they were VERY busy so I'd recommend wearing some sort of leggings and vest top outfit so you can just try things over the top.  

6. a Kilo isn't as much as you think! In my case it was a jumper , a tshirt, a light dress and a shirt. In Cheys case it was two snuggly winter jumpers. 

All that said I had a brillant day and I loved the concept of re selling clothes rather than sending them to landfill. [Its also worth mentioning that the company do wash all of the clothes before sale so they don't smell musty or anything! But without further ado heres what I brought. 


Number one, some sort of vintage shift dress. Possibly 70's? Very definitely some sort of polyester. 


I can't claim this as my find as Chey saw it and told me I HAD to get it! And I'm so glad I did because I am crazy about the print. Here I'm wearing it layered with a roll neck and tights but it also looks cute without.


It is a bit see through though so its better with something else under it so I don't flash my pants. 


Number 2! 

A tshirt from Journeys Backyard BBQ tour. I went to vintage kilo with the intention of finding band tshirts but this was the only one I saw. Its cute and I love the band journey so it works. 


Its already in regular wardrobe rotation for those days when I can't quite be bothered with proper clothes. 


 Item 3. 

Mens Ralph Lauren jumper


I got this because 1. its Ralph Lauren and 2. it looks snuggly for dog walks. I like the oversized fit and its lovely and soft to wear. Its a nice classic jumper and I'm sure it will see lots of wear.


And Number 4. 

and my absolute favourite! 

A mens flannel shirt. 


I've been hankering after a nice flannel shirt for ages! Rikkis grandad wears a lot of flannel shirts and they always looked so lovely and snug. I brought this one because I liked the colours and the relaxed fit. 


In fact I love it so much that I wear it all the dammed time. It comes out of the wash and goes straight on my back. In fact I love it so much I've been inspired to try and make a few more shirts to put into regular rotation in my wardrobe! 

And that's it!!! 

I really enjoyed writing this so hopefully I'll be jumping back into proper blogging!!!! 

Much Love 

Frankie 

xxx