Showing posts with label EPP. Show all posts

Saturday, 13 October 2018

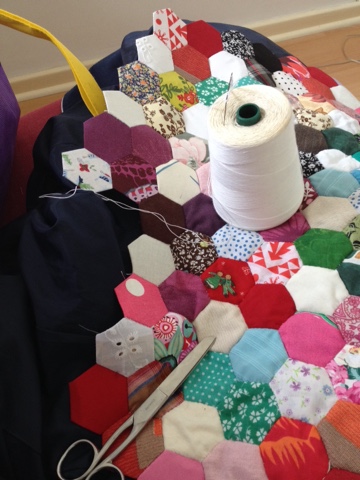
Slow Sewing - working on my hexy quilt

I woke up on Thursday night [well technically early hours Friday morning] to the sounds of Lil man crying that he'd be sick and well that been my past two days looking after a poorly child. 

As it turns out this bug has actually taken out a good half of his class and well a good half of the school really. So we spent the day on the sofa and watched movies and I added row after row to my hexy quilt and tried not to panic about the fact there is a sickness bug in my house. 

Sickness is something I don't "deal" with very well. Historically any time I've caught a sickness bug as a child I've ended up really really poorly. So frankly it terrifies me. 


Luckily making the hexy quilt keeps both my hands and my mind busy. 

So far its actually growing quite quickly. I've even started removing the papers from the centre hexagons. [Top tip the centres are reusable however its not as nice to sew with them as "fresh" ones so I like to iron mine after I've taken them out. It helps to flatten them out and makes for more accurate sewing.]
  

All the fabrics are from my stash and I'm finding it interesting looking at all of the fabrics I've collected over the years. Especially looking at some of the fabrics from when I first started sewing.

I've also been adding rows to to my miette cardigan which I started last time he was really poorly. Funnily enough I had joked a few weeks ago that for me to have any chance of getting it finished I would need for him to have a week off school. 

Apparently I should have touched some wood when I said it!!!! 

And yeah that's pretty much my last few days to be honest. I had planned on finishing a big project on Friday but didn't get the chance due to playing nursemaid. So now I'm going to have to do that next week! Provided lil man is well enough to go back into school.

Hopefully I'll be able to schedule some blog posts whilst I'm on nurse duty!

Much Love 

Frankie 

xxx

Thursday, 12 April 2018

Ashmead Designs Paperless English Paper Piecing

Do you ever have a moment where you think now why the hell didn't I think if that? 

I do it all the time! 


I had that exact thought when I was talking to the owner of Ashmead Designs at the CHSI Stitches show. 

The idea behind their Paperless English paper piecing is that instead of using card or paper as a template and then removing it you use their templates and leave them in. 


 I was pretty sceptical about the whole no paper thing so they were kind enough to give me a coaster sample kit to try. 


Instead of paper you use a product called Hexiform which is a fully washable template. You can buy it in a sheet or as pre-cut templates. I personally am fully on board with the whole pre-cuts idea because it saves a lot of time faffing about.  

Price wise these are more expensive than a pack of card templates on amazon. For example 60 1.5inch Hexiform templates will cost you £9.00 but 100 card ones will cost you £5.02 on amazon. 


So I guess you'd have to weigh up the pros and cons of if it would be worth paying the extra for the particular project your doing. So for a coaster its well worth being able to leave the templates in and not faff around taking them out. However for a large quilt made of hexagons it would hike up the cost quite a lot because you can't re use the templates and you'd need a lot.


I dunno if you can tell because but I'm pretty conflicted over these! I mean on the one hand I love the idea and think its brilliant! But on the other hand I'm not too keen on the extra cost [What can I say Frankie Baldwin bringing you 100% honest reviews since 2013]

I am pretty tight with money though. I mean about 4 years ago I thought buying card board templates instead of making them from old Xmas cards was a HUGE extravagance!!! But now after using some free ones from magazines I'd rather bite my own arm off than spend hours tracing!! 


So pros of hexiform! 

- You don't have to remove papers
- easy to sew
- machine washable
- holds shape of patchwork even after lots of washing [like a 3d item like a cushion]
- doesn't blunt sewing needles [like sewing through paper templates]
- Prevents shadowing [that's when you can see your seam allowance showing through under the fabric, this happens with pale fabrics and ones that are thinner]

cons of hexiform

- More expensive
- Can't reuse papers
- Needs neat stitches because its not as stiff as card

I did also wonder if it might make quilting a bit more difficult as well because the machine would have to go through a layer of batting and a layer of hexiform. But don't take my word on it because it I haven't tried quilting it. 


All in all I really enjoyed the product and I can definitely see how it would be useful! I love anything that saves time and this definitely would. 

The kit I used was for a coaster and the instructions were really clear and I;m chuffed with the finished result. I had a look at some of the other kits at the show and they all seem to have the same high standard of instructions. 

I think my takeaway would be, if you've got the extra money to spend then its definitely worth spending the extra and saving yourself the time of removing papers etc. Plus I have a sneaking suspicion that with the hexiform as base your project will say nicer for longer and last more washes! And as you can tell the pros really do out weigh the cons!


Much Love 

Frankie 

p.s I have some clothes to photograph but there's currently a washing machine in the space where I take my pictures so your gonna have to wait for those!

Thursday, 14 December 2017

English Paper Pieced Xmas Ornament

I feel like this week Christmas hit me like a train. I went from being fairly relaxed and having loads of time to juggling nativities and present buying and all kinds of stuff!! 


I actually made this a few weeks ago during a quiet spell. I sat and watched more episodes of Dawsons Creek and stitched it up. The idea of based off a hanging Christmas decoration my grandma made my mum many moons ago.


Its very simple, you tack pieces of Christmas fabric around card diamonds [making sure you don't tack through the card]. Then you sew them together in groups of five which makes them turn into little cups. Then you sew all of those together. 


Its a really simple idea but its so pretty and effective. Its a really quick make as well, i think this only took me about 3 hours start to finish including cutting out fabrics. I could have done it quicker but 
1. I wanted to make sure my seaming stitches were invisible from the outside [you can just over sew all the seams but you will see them from the outside]
2. I was trying to work out if Dawson was ever going to realise how much Joey loved him. FYI I am not a Dawson fan, hes far too self obsessed. 


I also added some beads because well its not Christmas without a bit of sparkle is it!!!! And I used some of the last scraps of my measuring tape fabric because the colours matched and I am a dressmaker after all. 


I love how it turned out and its so nice that I've got something inspired by my Grandma in my Xmas decorations!

In other news!!! 

- I've got lots of sewing done but the combination of the dark weather and my naff hair has meant I haven't taken any pictures. Hopefully I'll be able to take some tomorrow though as I've had my hair cut!! I've had about 5 inches took off and it looks 100% better!

- Lil man had his Nativity and he did a fantastic job! Naturally I made his costume and I was really glad I did because it meant he stood out a bit more because a lot of the other kids were all in the same costume. They did a modern style performance based on a strictly come dancing idea. It was very funny and all the kids did great.

- The snow has been an absolute nightmare, we had a snow day on Monday but Tuesday and Wednesday were awful for trying to walk to school it was freezing and we were slipping and sliding the whole way. We did love playing out in the snow though, I'd forgotten how much I like sledding!

-Right now we have started scheduling people to come and visit for Xmas which is always a nightmare because having a small child means EVERYONE wants to come and see you! This year we are trying to make sure we start seeing people early so its not a huge rush having visitors 3 days before xmas. 

Much Love 

Frankie 

xxx 


Sunday, 8 October 2017

Top Tips For English Paper Piecing

I know I know. Really I should be blogging my next instalment of the #ettaquiltproject but I've been really off my game recently what with Rikki being off so much and the passing of my friend [I really want to write a whole post about him but 1. I can't start writing it without crying and 2. I'm not sure you guys would want to read it? Maybe I'll just write it for me when I'm ready and you guys can skip it if you want]

Anyhoo with the #ettaquiltproject I'm pretty sure the only person playing along is my big sis so I figured I'd slow down the pace a bit because she doesn't have a lot of time to sew! 

But here's some English paper piecing tips of you are looking to start or your finding it hard! 


1. Use Card [cereal packet / Xmas cards] as your templates instead of using paper. Its a lot more durable so you get more wear out of them and they are easier to fold fabric over accurately so you end up with neater corners etc.

2. Use bulldog clips. This is one I recently discovered, I used to use pins but I just kept stabbing myself as I tried to tack bulldog clips are a much easier and safer way!

3. Woven Fabrics. I'm not saying you need to go all out and buy expensive quilting cottons I mean after all these quilts were typically made out of scraps and old clothes. But using a woven fabric over a stretch fabric is definitely the way to go.


4. Use at least 1cm seam allowance. Believe it or not but too much seam allowance can actually make piecing more of a faff! a 1cm seam allowance gives you enough to work with without swamping you in fabric. 

5. Use different colored threads for tacking and sewing! Mainly this just makes it easier to remove your tacking stitches because you just remove all the ******* coloured threads!

6. Good lighting. Did anyone else Mum used to tell them off for doing things in the dark and tell them they'd go blind? Just mine? Okay.... But in all seriousness threading a needle in poor lighting is enough to have you reaching for the wine, threading it in good light is a more more pleasant experience but you'll probably still want the wine!


7. And speaking of needles! Keep them sharp! For both tacking and piecing, the whole process is just a lot quicker with a sharp needle!

8. Make a vague plan. Think about what sort of style you want? Will it be scrappy? Are you doing a pattern repeat? Do you want to use a colour story? A lil bit of planning in the short term can save a lot of aggro in the long term!

9. Buy extra fabric! Not because your going to mess up [although that might happen] But because your going to love and cherish your quilt and hopefully use it lots which means holes or stains may happen and its always useful to have some extra fabric for repair work! 

10. Try and use plastic template for making your card templates. Basically I make my templates I draw around 1 "master" shape. In theory this means that every single card template will be the same size, however if you use a card template as your master the repeated drawing can actually make the sides wear down and you end up with a smaller template! I tend to use either plastic templates or metal ones! 

11. Iron fabric before cutting out. Mainly this just helps you to be more accurate and to limit fabric waste. Its also a huge help if your using recycled clothes to make your quilt. And be sure to iron your finished blocks so they sit flat! 

Hope these help! Do you have any top EPP tips?

Much Love 

Frankie 

xxx


Thursday, 17 August 2017

#ettaquiltproject - Square in a Square Block

So here's the latest installment of the #ettaquiltproject. 

Now my Grandma had this labeled as an "all american star" [Luckily she had labeled all of her templates which made this project a bunch easier, it also showed me where my big sister gets her organisational skills from!] But looking on the internet I could only see one example that looked this this under the title of "all american star" [Lets all just give a minutes thanks to the google gods who put all of the knowledge of the world at our finger tips!] 

Anyway after struggling to find a template for you guys to use, I asked on a Facebook quilting group what they thought this might be called and the general consensus seemed to be that its actually called a square in a square quilt block! althought the 


Because I still thought it was called a all american star when I made this up I thought it was only fitting to go for the good old red white and blue! The red plaid is from the lady at the car boot and the blue is an off cut from one of my Aunty Shelias table cloths. 

You can find a template here!  [the template has one less square than I used but if your good at maths you could probably sort that out]

History wise I couldn't find much information apart from it's generally featured in lots of quilts to add interest to patterns, and that its sort of a go to block in a quilters arsenal! I also saw mentioned that it can look really cool when alternated with a basic nice patch for a simple quilt that looks really cool!

And speaking of cool!


How AWESOME is my sister doing with this! Shes just finished her first block and I couldn't be more proud of her! I also love that shes used tartan to commemorate our Scottish born Grandma!


Shes also just picked out the fabric for her shoo fly block!

Much Love

Frankie

xxx


Wednesday, 9 August 2017

Camping Catastrophes! and some fun too!

I've not posted for nearly a week! Have you missed me?


Well this is what my view looked like recently! Yep we ventured to Wales for a few days to take lil man on his first ever camping trip !  However it wasn't without its problems! In fact the whole trip seemed to be a bit cursed!

- the first time we tried to go Rikki was struck down with a migraine and spent the day in bed
- Then when we did decide to go we had to brake sharply [because the driver in front was a moron] and lil man got hit in the head by the wooden games compendium flying across the car!
- then when we had gotten to the campsite and pitched up we decided to take a walk along the beach and lo and behold my phone fell out of my handbag at some point and is now a the bottom of the deep blue! I hadn't even noticed it was missing! I had been thinking about how wonderful and relaxed I was feeling paddling my feet in the waves, and then lil man was bringing me shells and I thought ooh I might instagram this and oops wheres my phone? So I'm now phone less until I sort a replacement #prayforfrankie

But luckily the rest of the trip went really well until Rikki broke the bottle of milk on the doorstep when we got home [insert pun about crying over spilt milk here]


We visited Harlech Castle which was nice especially for lil man because its very similar to what it would have looked like back in the day! 


I wore my as yet unblogged days by the sea dress to visit the castle and for a walk on the beach! [i also realised I need to shorten the bodice by an inch!

An I even managed to finish our tent carpet just in the nick of time so we could use it!!

The stars and hexagons are english paper pieced and then appliqued on, and the loops are bias binding sewn down! The backing is some sort of lovely thick fleece back jersey stuff that my friend Helen gave me! I'm not sure how you would describe it but its lovely and thick for stepping on in the morning especially when its cold! 


Lil man even made up a game with the colours in the star! I'm not sure I quite understood the rules but he enjoyed himself so that's a win!


Here it is in situ in our very messy tent! 

Its held in place by four pieces of ribbon that tie onto the actual groundsheet! 

So yeah a fairly practical make that saved us about £40 on a tent carpet!

some other highlights include!

- lil man jumping over waves and just generally having the best time in the sea!
- Rikki trying to find me the best sea shells on the beach to take home!
- Ice creams!
- Fish and chips by the sea!
- Playing with my new camping stove kettle and toasting rack!
- Having the coolest camping neighbours! 1, they had a dog! 2. the man was doing a cross stitch! 3. they had a kid with them about lil mans age! and 4. The lady and her daughter did quilting!!!! which meant I got to talk about quilts! and SEWING!
- Seeing everyone bundled up under things I had made! We took 8 blankets with us! all made by me and it was so nice seeing the boys snuggled under them!

Much Love

Frankie 

P.S needless to say I cant wait to go again!!! 

Saturday, 15 July 2017

#ettaquiltproject

Okay so this is a new lil blog thing that I'm launching.

Basically my Grandma Etta is where I got my love for sewing and a good portion of my fabric stash. She was a very talented quilter who did a lot of English Paper Piecing and recently I found a big bag of her cardboard templates. 


And well it made me a bit emotional to be honest, because I was holding my grandmas templates that she had held and made from old cards we sent her. Also in the bag were her notes and some small pieces of fabric. And the whole time I was sorting them into their piles and working out with quilt pattern they belonged to I couldn't help thinking that it would be so nice to use them to make some quilts. But their was so many! And I knew I would never make that many quilts.


And this happened..... 

So here's the plan! I'm going to use my grandmas templates to make 1 sample block of each pattern she had in the bag! I will be sewing all of them by hand either my Applique [which quite frankly terrifies me!] or by English Paper Piecing! And I'll only be using my fabric scraps! 

But here's the fun part! I was wondering if you guys wanted to join in? Ya know keep me company when I'm drowning in pieces of cardboard and I'm cursing the fact that I hate sewing with a thimble because my hands are sore! 
 and if keeping me company hasn't convinced you here's some other reasons you should join in!

 - Hand sewing is relaxing!
- You can use up all of those pesky scraps!
-you can make a family heirloom 
-Or you can gift it to a family member or friend if quilts aren't your jam! 

Now it's gonna be pretty informal because I'm an informal girl! I'm going to post my latest block every two ish weeks until I've run out of templates and them I'm somehow going to throw them all together! [All my blocks are different sizes because of the templates but you can do yours a uniform size if you want!] And if you don't like a block or your busy then skip it! But if you do decide to join in you can tweet me @knitwitsowls or instagram me knitwitsowls and you can use the hashtag #ettaquiltproject. 

Its kind of a go at your own pace sort of sew along? But if you do want to sew with me then I'll be posting the blocks on instagram and you can always follow me on bloglovin so you don't miss a post! And I'll try and post a link/picture to a template you can use at the ends of the blog post, that you can print off to whatever size you want!

Which brings me to the best bit! 

Block #1 - Nine patch

I started with the most simple first! [mine measures roughly 9 inches] 


Template can be found here 

So will you be joining in? 

Much Love

Frankie 

xxx

P.s if your unsure of how to English paper piece theirs some great tutorials online or you can watch my video! 


Tuesday, 8 December 2015

The centre square of my Christmas quilt

I've been toying with the idea of making a Christmas quilt for a few years now. Well last week lil Knitwit was having a full on I'm miserable at the world day so I pulled out all of my Christmas fabric and let him help me decide on a pattern and an idea. I even let him flick through my quilting magazines. anyway after he told me it should definitely have squares and triangles!! Yes squares and triangles!

The fabrics I'm using are a mixture of craft cotton company Christmas patterns and some of my grandmas Christmas fabric! Sadly with some of my grandmas fabric there wasn't enough to go ahead with mine and lil knitwit's original plan. Soooooooo I decided to hand piece a centre square for my quilt using the smaller pieces of fabric and the EPP technique.


Its turned out really cute to say I drafted it onto a piece of regular paper. And it only took a couple of hours, in fact it was one of my quickest projects ever!


Saying that my diamond points don't match up so I think I might appliqué a circle on top because otherwise it will bother me!

I do love how the start shape gives it such a christmassy feel although I think trying to find three wise men in my house would be a push!!!! 


I'm hoping that it will look nice set into the middle of my blanket [when I've actually stitched the rest of the quilt top together!]


Here's the back its a HOT! mess!

Anyway its getting me into the Christmas spirit at least! Ideally I'd love to have it finished for this Christmas eve but I'm not going to put any pressure on myself not when this week is so chaotic anyway.

Much Love

Frankie

xxx


Wednesday, 18 November 2015

Christmas tutorial!

I have a new tutorial up on the craft cotton company website!

This one is English paper pieced Christmas decorations!


These really are a simple project and perfect for begginers! In fact I'd even say they are simple enough for older children to have a go at! (Note: children should never be left in supervised with sharp objects that how people lose eyes, and get their own back for siblings ripping the heads off barbie dolls)


And they are a lovely feature on a Christmas tree. 

You can find them here for freeeeeeeeeeeee!

https://drive.google.com/file/d/0B3W6ct5H1sa7XzF0eFBPcnJEZWs/view

Much love 

Frankie

Xxx

Wednesday, 8 July 2015

Patchwork baby toys.

I like the idea of handmade things for babies, so I've been experimenting. 

I've used my love of patchwork and created some simple baby toys. 


First of all I made the ball, I traced a pentagon from my laptop and used an English paper pieced technique. 

Here's the basic steps:

1. Cut out 12 pentagons (I think this is the right number, you try counting things on a round object, it's hard!) 

2. Cut fabric slightly larger than templates. 

3. Tack fabric to templates (don't stich through the template!) 

4. Once all of your pieces are tacked, start stitching them together. I used a simple whip stitch and stitched from the outside. 

5. It gets shape pretty quickly, so you have to slip the templates out as soon as you can, (you will have to stitch a few without the template , which is easier than it sounds) 

6. Stuff with toy fibre and slip stitch your last opening closed and voila! 

I realise that these instructions are probably clear as mud but if I get chance I'll create a tutorial with pictures and all that sort of fabulousness! 


For the square one, I used the same method but made six square templates instead! 


Anyway I think they are pretty cute! You could leave the card templates in but I decided to take them out so its washable.... Babies slobber.... Like all the dammed time! 

I think they'd make lovely baby gifts, and as an added bonus they use scraps!!!! Yay!!!! 

Much love

Frankie

Xxx


Friday, 26 June 2015

Minions and marigolds.

Sooooo I finished another minion today! 


Not much to say really apart from it has one eye and it's pretty darn adorable! This one had been ordered by my mum for the grandchildrens room at her house.


In other news two of my marigolds have come into flower! Which is very exciting! Although my sweet peas still haven't flowered! I am also now in possession of a gardening fork which I'm very excited about, in fact I might make myself a gardening belt and Kneeling Matt at some point in the future! 


If you follow me on Instagram you'll have also have seen this useless bit of knowledge! I can tack a hexy in just over 1 minute although I'd say it's probably under a minute considering I had to pick up the hexy and I cut the thread at the end.

Anyway that's all really , but of a go slow at the moment because of little knitwots bout of poorly ness last week! 

Much love

Frankie

Xxx

Monday, 8 June 2015

Another day another row

So summer has finally decided to arrive, and thank god! It's nice to give my winter wardrobe a break! And it's perfect timing as my jeans torn in the knee last week! So now I can wait till my birthday to replace them and just wear pretty summer dresses until then! 

Anyway here at knitwits HQ a few things have been happening although the nothing major.

•I've been working on custom orders,

•i've changed my books over for fresh ones , basically I own a LOT of books and we have zero space for them so me and Mr knitwits came up with a deal, all my reference books stay downstairs in a big box behind the chair, and my literature stays in our loft, then I have 20 or so books that I keep on a bookshelf in the bedroom and I rotate them when I get bored. 

At first I hated this system, but then I began to appreciate it, I realised I had got lazy with my reading and was just rereading the same books over and over! Now I'm forced to Broaden my horizons (plus it forced me to finish vanity fair!) 

• I've been playing around with the lilou bodice and am currently sewing up my changes (fingers crossed I finish it tonight) so I can blog it tomorrow, hopefully with some sort of brief tutorial on how to alter pattern pieces to create new necklines. 

• but currently im sat in our man room, whilst little knitwit slumbers in his bedroom after a hard day at nursery and Mr knitwit slumbers after a night shift. so I'm adding more rows to my English paper pieced quilt. 

 
I've got this whole EPP thing down to a fine art now, I have two bags that I cart around the house and they contain all my supplies! I even took them shopping last week on the off chance that little knitwit napped in the car, so I'd have something to do whilst he quietly snoozed! He didn't but it was nice to be prepared.

Technically there are other things I could be doing whilst my boys sleep, but I like to convince myself that ironing is very loud and I would want to risk waking them up! 

Much love

Frankie

Xxx

Tuesday, 21 April 2015

English paper piecing

I'm currently English paper piecing or EPP as the blog going world sometimes calls it, is the first type of patchwork I was ever taught. Back then I used my momma bears method but since then I've tweaked it to suit my lazy ways ! 

Note : please don't see this as a tutorial, it's more just a "this is how I find it easiest" sort of thing! 


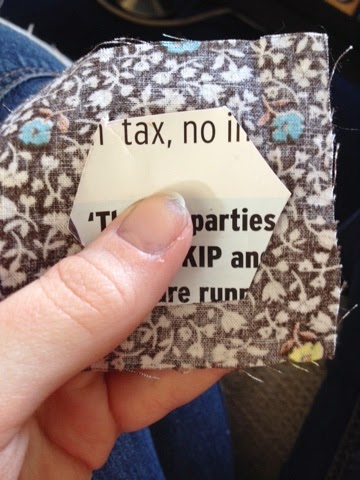
First of all you need your supplies, needle and thread, pin, fabric square and your shape (I'm using hexagons). I make my shapes from card or thick paper, because I think they last longer and give a crisper edge. As you can tell I've cut up ukips pamphlet here..... Ahem says everything really. 


Pin shape to fabric square (your fabric should be bigger than your shape, I tend to go for 1cm as a rule but have been known to go smaller for really nice fabric scraps!


Fold your first two sides in! 


And secure with a couple of stitches. Do NOT sew through the card! 


Fold your next edge, and do a quick running stitch to it then secure with a few stitches. 


Keep going and voila! 

This method differs from how I was taught because we used to see through the card, however the beauty of this method is that you can reuse you card shapes, and leave you tacking stitches in because they are not visible from the front. 


Then typically I like to stick them up in groups


Here I've opted for a three colours and a white one sort of pattern. 


Then I slot them in and whip stick them in place. 


I'm blaming my sister for this new project, she kept posting photos of her EPP on Instagram and it made my fingers itch! 

I'm not sure what size it's going to be yet , but I do like the idea of going for an unusual shape! 

Much love

Frankie

Xxx