Showing posts with label shirt. Show all posts

Wednesday, 10 February 2021

Floral Print Shirt - Prima Pattern

Excuse me whilst I use the opportunity of lock down to morph from a fun loving human into the bitch from hell. 

I'm joking obviously I'm not the bitch from hell quite yet but I have been in a fairly vile mood recently. Well a vile mood, a sad mood, a laughing hysterically and then crying on the floor mood.......... basically all the moods.

Its starting to get to me now this constant separation from the people I love. I miss having a brew with my mum and dad, I miss charity shops, I miss the girls from work and my knitting and maccies dates with my girl Aly. I miss her fella Paul coming over for a brew just because hes got five minutes, I miss packing lil dude off to my mum and dads so he can have a sleepover with his cousins, I miss dragging John on a trip to the big b and m so I can fill a shopping trolley with useless but pretty crap. I'm missing a lot of things. 

So in an effort to make myself less miserable I've been trying to do more things I love. 

I've been reading, A LOT.

Over the past two weeks Ive read, gone with the wind, dolly parton my life in lyrics, goodnight mister tom and I'm halfway through Peter Pan. which by the way is a lot bloody darker than the Disney cartoon would have you believe. 

I've been playing video games with my nieces and nephew and my big brother. 

I've been doing copious amounts of skincare, done some artwork and even found a few slithers of time for sewing. 


This however is an old project. A very old project. Its my basic prima shirt pattern that I always use when I make shirts and the fabric is a cotton lawn that I was given by the lovely ladies at sewalicious in exchange for writing them a blog post.


Instantly I knew I wanted this fabric to be a shirt becuase I loved the subtle 70's vibes it was giving me. Growing up my brother had a friend called Olly and he always wore 70's floral print shirts [well at least thats all i can remember him wearing!] and I thought he was the absolute height of cool! He was also in a band which added to his cool factor, so I guess this shirt is a homage to Olly, one of those rare teenagers who is kind enough to be nice to his friends little sister.


Construction wise it went together quite simply, as always I jacked up the cuff slit binding but I i wear it sleeves rolled up it doesn't bother me too much.


Actually the main reason it doesn't bother me is because I very rarely wear this shirt. Don't get me wrong, the pattern, fit and fabric are all spot on but it has one fatal flaw. 

IT NEEDS BLOODY IRONING!

yeah this is one of those shirts that comes out of the dryer all twisted round itself and folded in like an accordion. Creases everywhere and I really do hate ironing. 


Recently I purchased something called crease release [apparently you pop the article of clothing on a coat hanger, spray it with this magic stuff and VOILA no more creases] 

So hopefully whatever black magic is in the crease release will give me more opportunity to wear it. 


The buttons were from stash, literally cannot remember the last time I actually brought buttons for a project.


Here's it with the sleeves buttoned up properly and it untucked. I definitely think it looks nicer tucked in with the sleeves rolled up don't you?


Anyway so yeah that's that. Not a lot else I can say really apart from try and have a good week, stay safe and remember if you scream into a pillow the neighbours won't think your being murdered. 

Much love 

Frankie 


Sunday, 17 April 2016

Two Shirts into One Shirt dress Refashion

I LOVE refashioning shirts! There are so many refashioning possibilities from one garment.
 I do find it hard to find nice shirts for refashioning though, I'm not a huge fan of trawling through the rails of my local charity shops [think less quality shirts and more tracksuits with juicy on the behind]
So instead I have to look to either Rikki who wears the same size shirt as me or my Dad [He doesn't wear the same size as me............]

Luckily for me my Dad was getting rid of a few shirts...... because I made him. And even luckier two of the shirts were exactly the same. FYI shopping with my dad is absolute hell so he must have REALLY liked these if he ended up with two!!! 
  

They are good quality shirts that require cuff links, made from cotton and have DEHAVILLAND written in the label which means nothing to me!


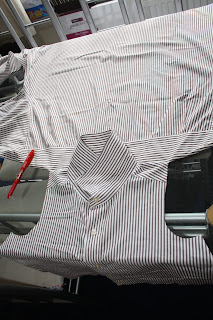
To start off I laid my shirt flat and got out my Lilou bodice pieces. Next I lay the pattern piece so the fold line went along the centre of the buttons on the button placket [I decided to use the button placket as my opening]. Then I transferred the pattern marking and flipped the pattern piece so I could do the same on the other side. If I were to do this again I would leave myself a bit more room for gaping, so I'd go from one side of the buttons instead!


Next I cut of the single layer of my shirt front and cut straight across the back yoke where to make a halter neck shape. 


Then I chucked it on my mannequin to check my theory worked. 


And then used what was left of the back to cut out my back bodice pieces [I omitted the seam allowance on the back centre seam and cut them on the fold.] 

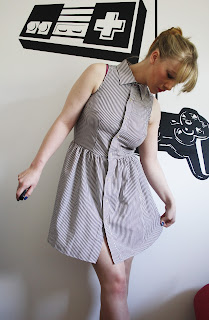
The skirt was made by using the second shirt and simply cutting a straight line from the bottom of the arm to the bottom of the other arm. then simply I gathered this and added it to the bottom making sure to match up the button plackets and side seams.


I used the arms of the shirt to make bias binding, which I used on the arm holes and the back. And I don't want to excite you too much but I didn't even have to hem it! Just used the original shirt hem! 


I've gotta say I really love how it looks! I could do with a bit more ease in the bodice but I am carrying a little bit of Easter width! Those pesky chocolate bunnies making me eat them.


I love the cut out back detail! It's so cute, I finished the edges of this with bias binding as well!


The pinstripes on this are making my eyes go west! It's kind of a white and darkish brown colour palette? Typical business man shirt sort of thing.


The bodice fits better open, in fact a slightly different bra might help? Jeez its hard being a lady so many things to think about!


I think I'm going to be wearing it with this belt a lot for a lil bit of waist definition. The belt is also thrifted from a skirt! 


All in all I really love it, I've been wanting a shirt dress for ages and I love the relaxed style of this, it's pretty short but I think I can get away with it [please excuse my pasty skin I don't tan]

It was so lucky that I had two of these shirts to make this with although it might look cute with two shirts in different colours and doing some colour blocking. It could also help with adding some length! 

In other news, Lil man is back at nursery and I'm not pleased because he was fine over the two weeks! Not so much as a sniffle and then one day back and he's coughing and spluttering! Who are these germ infested children! And why aren't they keeping them away from the healthy ones!!!

Anyway I guess that's just what happens when you get large groups of toddlers together, and on the plus side if he passes it on to Rikki then they have to go on bed rest and I'll have lots of time to sew!

Now I just need to decided what to make next, this was pretty spur of the moment!

Much Love

Frankie

xxx


Friday, 25 March 2016

Colour Block Shirt

I'm still not sure about this shirt, as I cut it out I loved it, then I started sewing and I hated it, then it started coming together and I loved it, then I did the buttonholes and I hated it , then I put it on my mannequin finished and I loved it again! And this morning when I put it on I hated it again! And then I saw these pictures and maybe I like it? I'm not sure.


After looking on line I'd seen a few colour blocked shirts that I liked, and then I found some off white cotton [its slightly thicker than cotton but its super snuggley so I'm not sure what it is] and some wine coloured cotton that looked pretty cool together.


I used the same burda pattern that I used for my I shot Bambi shirt, but I think I prefer my bambi shirt, maybe because the crazy print hides a lot of flaws. Speaking of flaws I'll just list them here:

- The button holes are jacked up especially the top one which I ended up finishing by hand.
- The button band is off and the stitching is fairly crappy.
- The cuffs are not brilliant. 
- There's irregular stitching all over the place, apparently my machine did not like going through more than two layers of the thicker white stuff.

I'm not apologising for these issues though because a) its still better than my first one and b) I made a fricking shirt, so yeah. 


Things I like:

- The stripe of red at the back in the pleat looks awesome! I'm super pleased with how that turned out.
- I love the contrast yoke and the pockets, It took a lot of measuring to get those pockets even but it was worth the effort.
- The top stitching on the collar. I worked really hard to make sure it was even and looked neat.
- The hem, just in general its neat and looks bad-ass, I shortened it slightly as my Bambi shirt is a touch too long and I think my hem curve was really successful. I used bias tape to do the hem because I just think its the neatest way of doing curved hems.
- I think my button choice is pretty cool, I like all the colours together.


So yeah I think I like it ? It looks pretty modern and I think it will fit in quite nicely with the wardrobe, I like that its got a smart and casual vibe at the same time and I can see it being good for the school run.


BUT! I still don't love it as much as my Bambi shirt, but that could have just been because it had ya know deer on it!


I like it open too, I think the biggest issue is that its not ground breaking but its a good wardrobe staple. Also guess who cut her fringe back it! This is what happens when I catch sight of myself in a mirror and realise I hate my hair! I also hate going to the hairdressers so its pretty cool that I managed to do it at home! 

Much Love

Frankie

xxx

Thursday, 4 February 2016

The Shirt Dress That Wasn't

Okay so the idea of this project was to make a shirt dress, no your not mistaken that's not a shirt dress, that's just a sleeveless shirt. Here's what happened, I accidentally forgot to extend my pattern pieces and didn't realise until I'd cut the pieces out.

The pattern incidentally is the same Burda one I used for my I shot bambi shirt. I didn't add seam allowances again, but this time is was an actual decision and not just because I forgot. I was pleased with the fit last time so I just added a seam allowance to the collar and stand so I'd have a bit more room to work with.


I also added waist ties to make more of a drawn in shape. The ties are just tubes of fabric top stitched and inserted into the side seam. [which I did twice because I put them too low the first time]


To be honest I think its a good job I didn't extend the pattern pieces because I wouldn't have had enough fabric, as it is the button placket and the underside of the collar and collar stand are in a contrast fabric. The main fabric is a ditsy print cotton and was given to me by my lovely pen friend.


Here's the back, I love the high low hem detail, I like wearing it with leggings as I don't feel like my bum is on display [oddly enough I never worry about the front just my bum?] and I think it might look cute with shorts in the summer.


The sleeves and hem are finished with bias binding which I also made from the contrast fabric. And the front button placket is pieced due to me not transferring my original alterations to the pattern piece for the placket [yes I have written it on now so I won't be caught out again!] 


I like that the ties give it a more ladylike feel however when I first tied them, the shoulder and bust area looked very square, so I added a small tuck at the bust on each side, and that cleared up the problem. I think if I had sleeves I wouldn't have needed it but because of the width of the shoulder it looked square.  


I will say though, that this is some of my best top stitching. I came up with an ingenious was of making sure I take my time with stitching, quite simply I turned down the speed on my sewing machine. I know right, how has it taken me this long to realise that slowing down my machine would give me a neater top stitch. I also interfaced the collar properly this time and made sure to give everything a good press at each stage. I think it all helps to create a clean finish.


The buttons don't all match, they are all the same size but some have a matt finish and some have a glossier finish, you can't tell when its done up though. In fact I didn't even realise they were different until after I'd sewn them all on. 

All in all I think it looks pretty cool, it's not my usual style but I think it looks pretty cute and I'm looking forward to wearing it more when it warms up. I wasn't sure also the colour of the fabric at first seen as I have an aversion to all things pale but I think it looks okay and it looks even better now Iv'e accidentally dyed in in my washer. Note to self always check the white wash for stray socks! Its  now a slightly pink colour which is nice.

In fact now I'm completely convinced by the pattern I think I might give a shirt dress a go!!!

Much Love 

Frankie

xxx


Monday, 7 December 2015

The first thing I ever sewed

This is Dolly, and she is the first thing I ever sewed. She made from one of my dads old work shirts and I think is stuffed with bits of shirt as well! I think I made her when I was about 4/5 with help and guidance from my mum.


From what I can remember the face is sewn on using some of the threads from one of those hotel sewing kits.


Its a cracking face isn't it? i really like the wonky eyes adds character!


That and the huge stitches I used to attach the legs!! 


And the fact that I didn't even use a matching colour thread on this arm!


Its kind of weird to think that this is the first thing I made, the first thing that I cut up and sewed together.

Much Love

Frankie

xxx

Thursday, 19 November 2015

I shot Bambi's mother shirt

Creepy title right! Yes this is what i did with the fabric that i won from Karen from didyoumakethats facebook page.


My original plan was to make a dress, but to be honest the idea of making something that i had made 100 times bored me to tears. Instead i wanted to stretch myself.


So instead i decided to really test myself and make a shirt, like a proper shirt with a collar and a collar stand and everything.


I used a shirt pattern from a burda style magazine i was given and after i got over the initial shock of seeing the pattern sheet and composed myself long enough to read the instructions five times i got to work and it was much easier to trace than i thought! HOWEVER! i forgot to add seam allowances like a complete moron! I couldn't believe it and better than that i had already cut out my pieces before i realised! So to combat this i used the smallest seam allowance i could manage!


I did however manage to get all of my Bambi's the right way which I'm feeling pretty good about, and the Bambi's on the chest pockets are very nearly pattern matched!


I actually ran two machines for this project my regular janome for all the construction stitching and my other janome hooked up with a double needle for all the top stitching. I love the top stitching on this project it makes me really happy and i think it looks super modern and cool.


Its a little wide at the sides but i prefer it tucked in so it doesn't really bother me. The Bambi fabric was pretty drapey so i think it looks okay tucked in or out. it did mean though that i ended up using two fabrics , basically my interfacing just wasn't going on [note to self; don't buy cheap interfacing] so i backed the collar stand and collar with a quilting cotton, i also put it inside the pockets for a cleaner facing.


Little knitwit likes the shirt anyway.


and we had kisses and stuff!


I did extend the back but I'm think i did it a bit too much, although i do like that if i wear leggings my bum will be covered.


all in all i think i like it, I wasn't sure at first but after living with it i think i kinda like it. I feel like it's one of those things really hip girls in topshop wear, you know the scary ones who have resting bitch face and not one ounce of body fat?


Due to the forgetting the seam allowance thing i had to add some lace on the inside of the neck stand to hide some not great stitching. I also did what i usually do with shirts and added a spare button to the middle of the collar.


i think this is the first time every single one of my button holes went in perfectly each time, which makes me so happy its unreal.


Look at that top stitching! Its almost like its ready to wear!!


Heres the fabric i used to stabilise my collar, because life is better with polka dots and stuff!


and here's my very nearly pattern matched pockets, I actually think I'm glad they are not completely matched though because otherwise i think id lose them and i do think they add a lot to the style of the shirt.

I really do think i love this shirt, its not my usual style but it was nice to step outside of the box and try something new and I'm also really proud of myself because i think this is some of my best stitching, Ive really enjoyed seeing how far Ive come since i decided to start sewing properly.

Much Love

Frankie

xxx