Showing posts with label pockets. Show all posts

Wednesday, 11 October 2017

Vogue 1790 - Calvin Klein Check Skirt

Well I think we can quite safely say that winter has arrived. I'm rocking a woolly hat on the school run and every day is an argument about whats a reasonable number to have the heating on [FYI its 22 at least!!! Not the poxy 18 Rikki keeps putting it on!]

Anyways I was given the fabric and the pattern for this skirt at the start of summer [By the awesome lady who also gave me the vogue coat stuff] I loved the pattern and the fabric but held off making it for ages because I knew that making a wool skirt in summer wouldn't be practical and that I'd be gutted if I loved it and couldn't wear it right away. Plus its always nice to save yourself a lil something to stitch up at the start of winter isn't it?
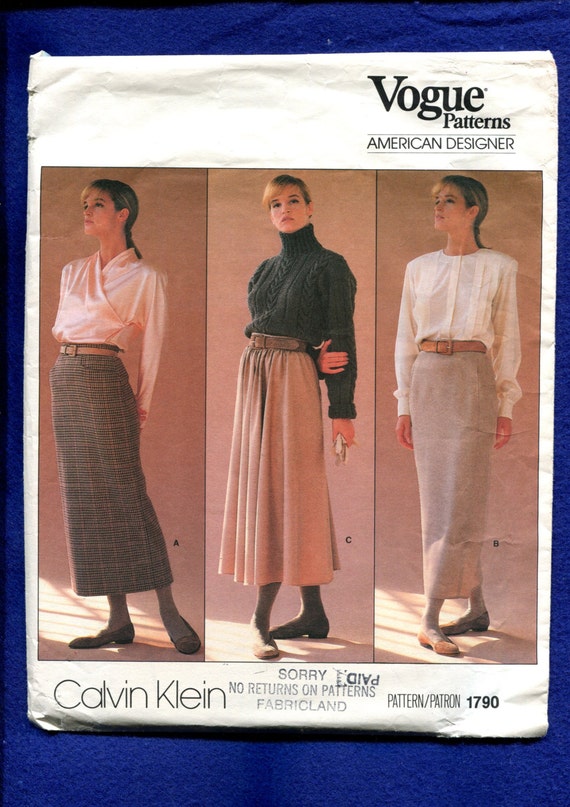

The pattern is Vogue 1790 which is a Calvin Klein pattern [you can find it here]. I love that the big designers released patterns via vogue back in the day. I think its a bit less common now and if there is a designer pattern it tends to be a bit more of an obscure shape! 

Anyway I opted for view A which is a classic shaped pencil skirt but with front pockets instead of darts. I'm not sure what its called but its the type of pocket you might find in your jeans at the front? I've never done this type before so I was a bit daunted! 


Eurgh my hair is terrible at the moment, it definitely needs a good cut! 

 I cut a size 12 from the pattern and the fit is pretty bang on. In fact the only adjustment I made was to shorten the whole thing by about a foot! No seriously I took 12 inches off. I do not have the body/legs/height for midi length. And after taking these picture I lobbed another inch off and re hemmed it again. 

Taking a foot off did mean that I lost the back vent. I'm not a huge fan of back vents to be honest because I'm always terrified that they weaken the back seam and that I'll end up splitting the skirt and showing the world my knickers! I can see the practicality in them though because walking in this is a small stride affair only! Much to Rikki's disgust that I can't keep up with his big man steps! It also means I walk like Marilyn Monroe with a wiggly bum but I;m not 100% that's a downside?! 


Pattern matching wise everything lines up pretty well apart from the back seam of the skirt, but the zips a mess anyway so chances are I'll redo that at some point anyway. The fabric is wool, I worked this out via a burn test and by how darn scratchy it is! The pattern actually calls for a lining but I have a few slips that I use instead of lining so I skipped it!

I did opt to overlock all the edges of my skirt pieces before sewing though just to make sure that the fabric wouldn't fray. Its not a particularly loose weave but I don't like to take any risks where my dignities concerned! 


How awesome are the shoes by the way? They were one of my £1 charity shop pairs and they are actually pretty comfy!


The pockets turned out better than I thought to say it was my first time doing this sort, I've got to say pressing worked wonders on getting them to look halfway decent. I had some trouble with the clipping and turning bit, so one of them is stitched closed until about half way across to keep it flat. But to be honest you can't really put anything in them anyway, 1. they are too shallow and 2. My stomach is not somewhere I like to add extra bulk! Even if its just my mobile phone! 

The waistband ended up being a bit bulky [I think that's what led to my zip issues] The waistband is cut on one piece that you fold over, as is the interfacing. So technically you get a double layer of interfacing and a double layer of wool. Which I didn't realise until I'd fused my thick interfacing to the waistband. Next time I'd hack the waistband so there was a waistband and a waistband lining and I'd just do one layer of interfacing. Plus that way I could use a cotton to line the waistband which would be a bit less scratchy on the old tum tum. 


All in all I really love it and I'm always pleased to have another wool skirt in the old wardrobe! I think my favourite detail is the front pockets and they also provide the shaping for the front of the skirt so no darts in the front just in the back!

In other news!

The winter boots are out!

I'm looking forward to my demo at Hanley Abakhans on sew Saturday! So if your in stoke on the 21st October pop down and say hello! I'll be there until about dinner time! 

Much Love 

Frankie 

xxxx 


Friday, 6 October 2017

Refashioned Skirt From A Handmade Dress

There is nothing I hate more than when I spend time making something only for it to languish in the back of my wardrobe. It's bound to happen its not like you can try it on before you've made it is it? And we've all stood in a shop before trying to work out why the dress that seemed so perfect in theory actually looks like a potato sack.

Anyway I loved this dress when I first finished it but I just never wore it. The back is cut in a low v and due to a fit issue the straps fell down quite a lot exposing the old bosom, plus you have to go braless which is never a day to day wear pleaser. 


Anyway I did LOVE the fabric which I think is a Singapore printed cotton so I decided to try and fix it and make something more wearable. 


First of all I ripped out the zip then I just cut off the skirt part and threw the bodice away. This meant I got to keep the pockets!!! Although I had completely forgotten that this dress had pockets so ya know!


Next I cut a new waistband from some stash fabric and put it on with a zip and a hook and eye at the top.


And bish bash bosh done! I actually think I like it a lot more now and it should be easier to wear it day to day.


PLUS POCKETS! 

In other news!

- I'm freezing, seriously when did it get so cold? I'm absolutely dreading this winter I'm finding it hard to get out of bed as it is.

- I've just finished Gone Girl and boy what a book!!!! I literally couldn't put it down!

- I'm currently watching 'Allied' with Brad Pitt and I have high hopes that he'll take all his clothes off......... Filth Absolute filth

- I'm feeling a bit perkier this week, the hills aren't alive with the sound of music just yet but I think I'm heading to a good place emotionally. I've even had motivation to do stuff!

Much Love

Frankie 

x

Wednesday, 13 July 2016

Big Pocket Skirt!

So this skirt was suppose to be the bottom half of my outfit along project. However I got to the sleeves part of my jumper and was like this is yuck, the jumper is gross, its like a bad jumper that you make when you first start knitting and can't help sucking a little bit. Only I can help sucking and should have known better. So I'm going to rip that back but I doubt Ill have time to craft a new jumper so I thought I might as well show you the skirt anyway.


It started out like as a Delphine skirt by tilly and the buttons , But I hacked the pattern so I could have a button front [Instead of a zip back] and so I could have these huge pockets!


The main skirt fabric is a suede that my mums friend gave me and the floral I used for the pockets belonged to my Nan, she gave it me with a couple of other pieces of cool fabric.


Its not an awful skirt, the pockets are a bit iffy but as I've never done anything with this sort of pocket let alone drafted in my own I think they could have turned out far worse!


There's actually not a huge amount of room in the pocket they are mainly for show! In fact I think I might slip stitch them closed so the skirt sits better.


The front buttons came from either my mums neighbours old stash or a big jar that my mum brought me from a charity shop. I actually kind of hated them but they work nicely for this skirt, I think they related just enough to the floral fabric but stand out in a cute way as well.


The waistband, hem and button band are all finished in a really thick bias tape, It worked quite nicely and everything sits in place.


I did a lot of top stitching on this skirt [the colour of the thread is just a shade darker than the buttons!]


So its not a grand success, I really liked that I tried to do something new and I think I gained a few new skills with regards to pattern drafting, Its just that the fits a bit off [I had to take this in 1cm on either side] and that the pockets don't quite sit properly [slip stitching them closed is definitely happening, who needs to use pockets anyway?]

But I do love the fabrics I used, especially seen as the pockets are made from the last scraps of the fabric my Nan gave me! And I really like the 70's vibe it has! Now I just need to work out what to wear it with?

Any suggestions?

Much Love

Frankie

x

Saturday, 9 July 2016

Coco Dress In Roanne Jersey from Sew Essential!

Recently the good folks at Sew Essential were good enough to get in touch with me and see if I'd like to do a lil review of their website and fabrics! And well Momma didn't raise no fool so I pretty much tripped over myself to say yes!

I must have spent a good hour pursuing their website and that was without looking at their wool! I did however spend a good 15 minutes trying to convince Rikki that £529.00 for this Janome machine is in fact completely reasonable, and yes I do want one, I promise I'll be good! 

Anyway after much deliberating I chose the Coco Dress pattern by Tilly and the Buttons. It's a pattern I've been wanting for a while but haven't gotten around to getting.


And being that this was my first foray into this sort of proper jersey sewing , Lucy was kind enough to recommend me some fabric [this is a huge thing for me, if a shop owner can't give me a personal recommendation I'm not interested because chances are they don't know about their stock or care about their customer!]. 

Anyway she recommended some Roanne jersey that they carry, which comes in some of the most beautiful rich colours I have ever seen. The Roanne jersey is a "medium weight viscose nylon elastane jersey" which I'll roughly translate for you as: a lovely drapey fabric, with good weight, that's softer than a babies bum. I opted for the Amethyst colour with Kingfisher [teal] pockets. Sensible but with a pop of colour! I'm eyeing up a black and red version next!


The Pattern

The pattern comes printed on thick paper, in an expandable envelope so you can fit your traced pattern pieces in as well. The pattern is only printed on one side so technically you could cut it......but! the paper its printed on is such lovely quality that I'm not sure you'd want to. Plus with the simplest version only having three pattern pieces it's not exactly a beast to trace.

Its a simple shape with an aline skirt, and no darts. I cut a size four, but I think I could have gone down a size as I took this version in about 1 inch on each side.  


The Fabric

Naturally I gave it a prewash and I'm pleased to report that their was no colour running, no bobbling and no shrinkage. In fact it came out of the washer pretty much as it went in. And it didn't need ironing! Can we hear a hallelujah ? 

It didn't shift too much during cutting but I made sure to line up the fabric correctly and put lots of pins in. And I cut it out on the floor because you should never cut jersey fabric if its hanging off a table because it stretches and you can end up with pieces that are too short. That's basically a top tip guys!


Construction

I pretty much stuck to the instructions provided with the pattern, I used a zig zag stitch and my walking foot. Mainly because the walking foot helps with the feed of the fabric. To be honest though my walking foot was already on my machine because I use it for EVERYTHING! Velvet, leather, quilting, shifty fabrics and now jersey!  

The instructions are very clear and explain everything from stay stitching to stabilising the shoulders clearly.

I finished my seams with a second row of stitching to keep things neat but this jersey doesn't fray so that was more for peace of mind rather than necessity. [Nobody wants to find a popped seam when they are out at Asda] 


I used a Ballpoint needle for my main seams and a Twin needle for all my top stitching on the neckline, arms, hem and pockets! The twin needle isn't necessary but it gives a really professional finish , just like you'd get in the shops! 


I've been wearing this belted because well I'm not bloated at the moment? Yeah my wardrobe very often depends on how bloated my stomach is [gluten I'm looking at you] Luckily I was not feeling the bloat and could define my waist without people asking how far gone I am! 


Here's the top stitching detail on the pocket.


And how the top stitching looks on the inside and on the outside of the hem! By the way if your machine doesn't have two thread spools for your twin needle you can just just pop one of your spools into a glass or mug! or you can get super crafty and tape a chopstick to the side of your machine as a crude second spool holder [Plus it justifies all those chopsticks you have in the drawer from your Chinese takeaway.]


So do I think it was a success?

Yes the fit isn't quite what I would have liked but I think it will still work belted and its nice and practical for the school run.

I'm really pleased with the twin top stitching and with how the fabric behaved during sewing!

I'm also chuffed to bits with the pockets! Which I eyeballed! Measuring is for wusses!

To say I made this in an evening, from 7.00pm till 9.30pm I'm really pleased! and that evening included tracing, cutting, having my tea, and fielding two phone calls! 

I'm also in love with how it feels on is basically secret pyjamas! 

So yes I'm now a fully converted member of the Coco club! and I can't wait to make my next one!!!  

Much Love

Frankie

xx

Disclaimer: Although Sew Essential sent me the pattern and fabric for free all the love and opinions are my own! I would never provide reviews for products I would not use or do not like, as a teacher once told me I am honest to a fault!