Showing posts with label diy. Show all posts

Tuesday, 19 June 2018

DIY Wooden Clapper

So far as I can tell sewing tools come in two categories. Your average run of the mill type bits like needles and pins which start off cheap and can be more expensive depending on what quality you want and bits and pieces you don't really need but kind of do that are really blooming expensive for what they are. 

I desperately wanted a tailors clapper for ironing stubborn wool fabrics. Basically you put the clapper on top of the seam after you've ironed it and hold it their until the fabrics cool and using some sort of magic it makes the seam a lot flatter and look a lot neater. 

Naturally to begin with I used an rolling pin or a wooden spoon but that was becoming a bit problematic because LOL want to make some biscuits but I can't find the rolling pin best search the sewing area for 45 minutes and try and find it. 


After looking on line I realised that the majority of tailors clappers are just a big hunk of wood with a pointy end and for £24 that does seam a bit steep. 

Well this girl has a shed full of odd bits of wood [when we dismantled the old sofa Rikki chose to keep what he called the "good bits of wood" and put them straight into the shed were they sat waiting because they were always too big or small for whatever project he was doing] AND a GCSE in product design..... I;m not kidding by the way I took three practical subjects at GCSE and basically spent two years messing around making things. 


Typically I don't really do wood work anymore but I thought I could manage to saw a few bit of wood and knock in a couple of nails. 

It was harder than it looked. 

For starters our saw was fairly blunt and secondly I had wanted to put screws in but couldn't get the blooming things in so ended up with nails.


The front part isn't completely symmetrical and I didn't really get around to rounding off the bottom portion because I don't have access to a sander BUT it works and Rikki's Grandad has promised me we can make a prettier one together in his workshop at some point. 


I was going to do a tutorial for this but to be honest you can just use a flat piece of wood so a tutorial would be a bit redundant. 

In other news:

We have a DOG! If you've been on my Instagram in the past few days you'll have seen our latest addition. We adopted her from the city dogs home, she was found as a stray but was micro chipped which means she has had an owner at some point. 

Shes still a bit scared and isn't really eating much or drinking more but she's slowly relaxing. We've decided to call her Polly and so far she's very lovely. 

If you want to see whats on my Instagram I've linked it to my new Facebook page, so if you have Facebook then you'll be able to find my Instagram posts there. 

Much Love

Frankie 

xxx


Sunday, 13 May 2018

DIY Tailors Ham and Sleeve Roll


A while ago I posted a question on instagram asking whether I should make my own tailors ham or buy one. 

And the response was mixed to say the least. No literally the replies were split down the middle which makes me think a lot is personal preference. The pros of making one were that I could choose whatever fabric I liked [ie. make it personal] And that its cheaper than buying one and the pros of buying one was that I could save a lot of time! 


At the time funds were low so I decided to make my own. I didn't even spend anything! I used a free pattern from craftsy and we already keep sawdust in the house for the guinea pig so I didn't need to buy any of that to stuff it with. [You can also use fabric scraps if you don't like the sound of using sawdust although traditionally that is whats used and the wood does something magic with the heat of your iron meaning the seams press better. I'm sure theirs a science explanation but *magic* sounds better.]

I made both the tailors ham and sleeve roll at the same time and they only took about 30 mins to print off, tape together, cut out and sew. In fact the majority of the time spent on these was for stuffing the bloody things! 

WARNING to anyone who's thinking of making one using sawdust, Its blooming messy. We had sawdust across the house for ages and it sticks to everything. You see you have to really cram it in to make it nice and firm for ironing your seams. In the end I enlisted Rikkis help and things went like this:

-I'd sit and spend 30/40 minutes cramming sawdust in through the little gap I'd left.
- I'd say I think its done....
-Rikki would come over and cram all the stuffing down, compacting it and inevitability leaving me with a gap to fill with yet more stuffing! 

Lets just say it took at lot longer than I thought and I used a lot more saw dust than I thought, and I was glad I had Rikki on hand to "punch" it down so to speak.


Fabric wise I used a cotton fat quarter from Minerva crafts for the front and some spare boiled wool for the back. I sewed the seams using a small stitch on my machine and then over locked them for security. The gap I left for stuffing was sewn shut by hand [ if your making your own I suggest leaving a fairly large gap as it makes it easier to stuff. I started off with a little gap and ended up throwing a tantrum] 

 I think my favourite part of this make might be the fabric I used. It was nice to use up some of the left over boiled wool and I really liked using up a sewing themed fat quarter for a sewing themed project! I can't find the fabric I used on the website but I think it would also be cute made up in this. 


Now the funny thing is the morning I finished these I received a gift in the post from Prym and lo and behold it was their tailors ham and sleeve roll! Which is kind of hilarious but also gives me a good opportunity to compare the two so look out for a post soon that compares my handmade tailors ham with the real deal! 

In other news! 

- I'm tired, It sounds stupid but I haven't been sleeping well so if anyone has any ideas of how I can get a decent nights sleep I'd really appreciate it. But preferably with lavender as it brings Rikki out in a rash and as much as I'd like a good nights sleep him next to me whimpering that his skin hurts won't help! 

- Lil mans nose is much better. A cotton pad, a warm bath and a lot of patience helped to get all of the dried blood off his nose and he was really brave whilst I cleaned it up. Its still swollen and he says it still hurts a bit but its not bleeding as much and a lot of the bruising has gone so that's good. 

Much Love

Frankie 

xxx


Thursday, 20 April 2017

DIY Embroidered skirt

Anyone who's been within three feet of a shop recently might have noticed the huge trend for embroidery on clothes at the moment.

Now technically I don't "follow" the most recent trends. However I do love a bit of embroidery so it would be rude not too. I briefly considered making a little denim skirt and embroidering that but as luck would have it Rikki's Nan was getting rid of two button front skirts and offered them to me.


Well that was one job saved, next I just needed to decide what to embroider. This is actually my second attempt, my first attempt was a much more densely embroidered design in reds. It didn't complement to colour of the skirt and the idea of having that amount of embroidery focusing everyone's attention on one of my hips didn't exactly fill me with good feelings. Plus the embroidery had made the skirt all puckered up and nasty looking.


Naturally instead of giving up I spent an hour and a half unpicking all of my hard work and started again. This time I opted for pinks for the rose because it worked better with the blue and decided just to embroider the outline. 


Its a lot more of a subtle effect which I'm hoping means I won't be put off wearing it even after the trend is dead and buried. Luckily the skirt was a good fit out of the bag I just took an inch off the length [short legs]. Looking at these pictures its a bit snug but LOL Easter! 


I definitely prefer this to my first attempt. I used two strands of embroidery and a simple back stitch. I didn't use a hoop instead I just kept things taught using my hands.

So yeah I actually kind of love it and on the plus side no one else has one like this! 

In other news!

We are halfway through our second week of half term, we have no car and lil man has a cough..... Its great.......... [He made me drag the playdough box downstairs yesterday, spent five minutes playing with it and declared himself bored]

We still have a house full of Easter eggs and its far too tempting!

I cannot wait to be able to sew properly again! I've already said to Rikki the first chance I get I'm having a good long session!

I ran down the road in my pj's this week after the bin men. To add more detail, my pj's are a camisole and "french?" knickers? and I heard the bin lorry but thought I hadn't put the bin out [we have fortnightly bin collections so if you miss it you end up with a months worth of rubbish to get rid of!] Anyway as it goes Rikki had already put it out when he left for work, which the bin men took great delight in telling me! #mortified 

Much Love 

Frankie!

follow me on instagram 
follow me on bloglovin 

Monday, 7 November 2016

Wedding DIYS

Now ya'll didnt think I was going to let my entire wedding go by without making anything did you? I know I dint make my dress but I sure made a few other things!


1. Invitations, these were the most boring a repetitive thing that I made but boy do I love how they turned out! We didn't want anything over the top and I was obsessed with the idea of s having a monogram, the ribbon is just twisted over and secured to the back of one piece of card which is then stuck on top of a card blank. and then I put on a few diamante and the monogram. [The more vigilant of you may have noticed that its roger federers logo! Rikki assured me that people wouldn't notice but a week after we sent the invites out I had no less than four people ask me if it was his logo!] 


The post box was a flat pack from etsy that Rikki built and I loving painted! It took four coats to get the gold just right! Rikki also trimmed down the E so we could have R and F! You'll notice that I used one of our invitations in the display area as well!


Confetti box! our confetti came from ebay and we mixed it in with some that Rikkis Aunty had given us! The cones came from ebay and I was more than a bit miffed to realise they were just doilies made into cones, I mean for gods sake I could have done that!
The box was a standard cardboard box with lots of holes cut in it painted red.


The table plan was a mirror that Rikkis mum found for us, that I painted white and then we just printed off the tables and mounted them on black card. I also used an invitation here too!


How centre pieces were a small bowl stacked onto a large bowl, The small bowl contained sand [marine aquarium standard because guess who was a super fuss pot and couldn't find any sand she liked?] The flowers are foam ones from the range and the red ones are ones that Rikkis Mum brought for us and there's some sparkles in the bottom as well that Rikkis Aunty brought for us! the top bowl has sand and a lego heart. The table numbers were stuck onto the hearts as well!  


My head dress was made the night before by combining two head pieces using floristry wire!


The lego figures were a bit of a labour of love of mine! I hunted high and low trying to find the perfect lego figures for everyone! And I think about 90% of them were perfect! For example Harvey [pictured above] is a chef! my uncle had a Robin hood one because hes from nottingham and Lil man had a Donald duck because that's his favourite stuffed toy. I wrote everyone's first name on the front and their surname on the back!


Last but not least was my flowers! these took me an absolute age! I hunted through my jewellery box and found all of my broken bits then I attached them to wire and then I wedged them in between foam roses and secured them with sellotape and ribbon. This turned out so much better than I ever could have imagined. I love that there's so many personal bits of jewellery in there as well at beads and buttons from my sewing stash!

And that's it really!

My next job is to get my dress dry cleaned and stored because when we move I want to store everything [including my dress] in a huge box frame!!!!

Much Love

Frankie 

xxx

P.s If you'd like a sneak peak of what I'm planning on making in November you can watch a video here 


Sunday, 31 July 2016

DIY Anxiety Bands

Its a change from my usual sweetness and light posts, but I figure if something as silly as this can help me then chances are it will help someone else.

I've had anxiety since I was about 13 years old [which I've just worked out means I've been dealing with feeling less than human for 10 years, seriously I can;t believe there's people who get through the day without feeling worried or anxious! In fact I can't believe that at one point I was one of those people]

I get anxious about lots of things, meeting people I don't know, Big crowds, Meeting people I do know, Getting sick, Being sick, What people think of me, The dentist, The doctors, The supermarket [I know even I'm embarrassed at myself], Travelling, Being a good mum, What people reading my blog think...... the list goes on.

Basically I'm a bit of a mess, I'm not sure why it started. But it hasn't stopped and it likes to team up on me with my IBS in the evil circle of, "am I going to have an IBS attack?" panicking about having a IBS attack and then the stress resulting in one. That coupled with severe acid reflux and I'm a walking perscription.

Now this isn't all doom and gloom, I've got a lot of coping mechanisms now and I'd say about 60% of the time I actually feel like a proper person [which is the highest its been in years!]. Anyway one of my coping mechanisms used to be writing motivational things on my wrists in biro. However I'm a grownup now, and nothing quite says stare at me like having "Be Brave" written on your wrists.

So I had to come up with a new solution just for me [actually I came up with this whilst having a panic attack about having to take lil man to the doctors and wondering if last nights takeaway was going to give me food poisoning]    


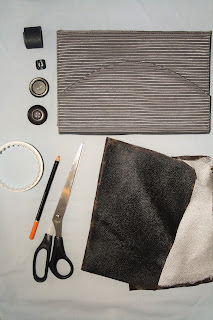
So I made some wrist bands out of some old fake leather I had knocking around, you know the stuff that doesn't fray and is quite soft?] 


The only sewing I did was putting on a button, I didn't even sew the button holes I just cut them. The bands are 3cm wide and I just kept trimming till they say snugly on my wrist.


I sounds weird but I just wanted something that made me feel a bit less like a scared little girl hiding in the corner and more like a gladiator/Xena/Khaleesi badass. 


But this is the best part, my motivation I'm going to be okay stuff is hidden on the inside, just for me to see. 

I feel a bit calmer and a bit more human. But that could be because I actually did something rather than sitting and wallowing in my own self pity. 

Anyway I thought if it helped me it might help someone else! and if its doesn't they still look pretty badass!

Much Love

Frankie  

Thursday, 16 June 2016

Quick Toddler Pirate Costume DIY

Yet another costume for lil man for nursery, seriously its starting to feel like I'm making one of these very week. And if its not a costume its wear a certain colour or wear transport themed clothes or something!

Anyway this week was pirates, and being me I wasn't going to pay for a cheap and nasty costume instead it was just quicker to do some googling and throw something together!


Okay so from the top!

-Bandanna, this ones my dads which I stole years ago but you could just use a square of fabric.
- white shirt, Its raining today so we went with a shirt but I did have a short sleeved t-shirt option if it was warm!
- waistcoat, this is from his wardrobe and I just appliqued a quick skull and cross bones to the back.
-trousers, I especially put these to one side just in case I needed to do a costume, they were too short in the leg so I cut them down in a zig zig pattern. I might hem them into shorts now pirate day is over!
- red belt, this is just a long piece of red fleece but you could just use a scarf.
- stripey socks


as always the priority was making sure he would be comfy for the whole morning at nursery, and warm enough for the walk down.

He didn't seem to mind wearing this too much, I think he might be getting used to costumes a bit more now hes older.

I can't say I'd change anything about it I think he looks pretty good to say it took about 10 minutes to make and I didn't spend any money!

Much Love

Frankie 

xxx


Thursday, 14 April 2016

DIY Camera Bag

I'm still working my way through a few items I pulled from my wardrobe to up cycle! This bag was next on the list, nothing in particular wrong with it apart from some slight staining on the front.

I was inspired by the fun novelty bags you can get now and decided to turn it into a "camera bag"


I laid out my materials [I painted some old leather in silver and black using revell modelling paints]


And found some inspiration!

Then I had a play around with making a camera effect using the materials!


Then Finally stuck everything down using my glue gun!
I think in total the whole project took about an hour maybe? It was very quick and satisfying! 


I think you can just about tell its meant to be a camera but its not as good as my moustache bag that I made when I first started blogging. 

Mainly I used old pieces of leather, and a red button for the flash but now I'm thinking I should have used felt and it would of looked cuter.


I think the overall look could be more polished I probably should have taken a bit more time over the whole thing rather than just bust it out because I was bored and needed something to do!


I'm considering add a strap and maybe trying to neaten it up a bit, but I'm not sure if I'm that bothered because I tend to just use the same few bags! 


So yeah I'm actually feeling a bit more blah about it the more I look to be honest. And now I'm annoyed because I used the last of My glue gun stitcks on it!

Much Love

Frankie

xxx

Saturday, 9 April 2016

DIY Shoe Refashion

 Let me start off by saying I LOVE these shoes. I mean if I had to choose between saying Rikki from a burning building or these shoes, some days, just some days I would choose the shoes.

They are so comfortable its unreal, these shoes have never left me with blisters and a drunken Frankie once walked home from the pub wearing them. YES! wearing them, not carrying then in her hand, not balancing them on her feet whilst receiving a piggy back. Actually wearing them.


These cheap primark heels have seen many a night out, day trip and a very special wedding where I was taking all the pictures. YES! all the pictures and they coped through that too!


 Which is probably why they are wrecked, the heels or wrecked the toes are wrecked. But due to the fact they don't wreck my feet, I decided a quick spruce up was in order! And luckily for me the faux suede of these shoes was easy to refashion.


A good paint job can hide a multitude of sins! I'm using Revell model paint that was left over from some models Rikki built. I love that it comes in both matt and metallic colours! For this project I used silver and matt black.


And took my inspiration from shoes with contrast metallic toes, I think Kurt Geiger and Chanel made some.


First of all I taped off the toes and painted the main body of the shoe black. I had to do two coats for even coverage.


Then with a steady hand I pulled off the toe tape and painted the toes and heels metallic silver. Again I had to do two coats for even coverage.


Next I painted the soles red, al la Jimmy Choo. To be honest might do this with all my shoes because it makes me feel 100% more classy!


I think they turned out pretty BOSS to be honest. I'm pleased because I don't have to throw away one of my favourite pairs of shoes and because it feels like I have a new pair.


I am considering painting the heels black as well to make them feel a bit classier but I think I'll give them a couple of wears first. I didn't paint the heels black originally because I thought I might run out of paint after one shoes and then wouldn't I look a Muppet! Although two shoes in different colours might be kinda quirky.


And they are still as comfortable as ever! 


Yerp still definitely thinking about painting those heels to make the toes more of a statement!