Showing posts with label buttons. Show all posts

Tuesday, 25 July 2017

Knitted Owl Paper Weights!

The summer holidays are fully upon us! And I had forgotten just how much time kids take up! Not that I'm not enjoying it, it just hasn't left me a lot of time for blogging. So far we've had long morning snuggles, watched lots of movies, played football and had a fairly intense game of tiddlywinks! 

I did manage to find some "me time" on sunday though when I popped up to Manchester for a research group practical publishing was running. It was a question and answer type thing with them asking me and about 9 other women questions about our sewing, knitting and buying habits. I found it very interesting to hear what everyone had to say and the other ladies were really nice and as a bonus there were goody bags! [More on that another day]

Anyways today I've managed to find a quick ten minutes to write this whilst lil man sits and practises his reading! 


These are some knitted owl paper weights that I made for lil mans teachers at the end of the school year. Typically we don't do presents for teachers but lil man said he wanted to give them something. And by them he meant all FOUR of them! Yep as it turns out there are four teachers in reception class! 

So naturally I needed a present that was quick to make and didn't break the bank [as it goes these were free!!!!]

I used the same pattern as for my large knitted owl doorstops but I shrunk it down [I am thinking of writing that pattern up if anyone's interested?] then I just weighted the bottoms and chucked in some left over toy stuffing. 

Colours wise I decided only to use my scrap wool, I tried to make the colour combinations as interesting as possible. I think the colours turned out pretty cute. 

I used felt for the beaks, and buttons for the eyes, it actually worked out as a nice way of using up some of those spare pairs of buttons and odd buttons I have lying around.

So yeah that's it really, I hope his teachers like slightly odd stationary! In fact I even had to write on the label that they were in fact paper weights! Mainly so they wouldn't think I had given then some very little heavy owls! 

Anyway Lil man is already climbing up my leg telling me how bored he is of reading and how he wants to play ANOTHER game of tiddlywinks! 

Much Love

Frankie

p.s Hopefully normal blogging shall resume shortly! Wish me luck!

xxx    

Wednesday, 13 July 2016

Big Pocket Skirt!

So this skirt was suppose to be the bottom half of my outfit along project. However I got to the sleeves part of my jumper and was like this is yuck, the jumper is gross, its like a bad jumper that you make when you first start knitting and can't help sucking a little bit. Only I can help sucking and should have known better. So I'm going to rip that back but I doubt Ill have time to craft a new jumper so I thought I might as well show you the skirt anyway.


It started out like as a Delphine skirt by tilly and the buttons , But I hacked the pattern so I could have a button front [Instead of a zip back] and so I could have these huge pockets!


The main skirt fabric is a suede that my mums friend gave me and the floral I used for the pockets belonged to my Nan, she gave it me with a couple of other pieces of cool fabric.


Its not an awful skirt, the pockets are a bit iffy but as I've never done anything with this sort of pocket let alone drafted in my own I think they could have turned out far worse!


There's actually not a huge amount of room in the pocket they are mainly for show! In fact I think I might slip stitch them closed so the skirt sits better.


The front buttons came from either my mums neighbours old stash or a big jar that my mum brought me from a charity shop. I actually kind of hated them but they work nicely for this skirt, I think they related just enough to the floral fabric but stand out in a cute way as well.


The waistband, hem and button band are all finished in a really thick bias tape, It worked quite nicely and everything sits in place.


I did a lot of top stitching on this skirt [the colour of the thread is just a shade darker than the buttons!]


So its not a grand success, I really liked that I tried to do something new and I think I gained a few new skills with regards to pattern drafting, Its just that the fits a bit off [I had to take this in 1cm on either side] and that the pockets don't quite sit properly [slip stitching them closed is definitely happening, who needs to use pockets anyway?]

But I do love the fabrics I used, especially seen as the pockets are made from the last scraps of the fabric my Nan gave me! And I really like the 70's vibe it has! Now I just need to work out what to wear it with?

Any suggestions?

Much Love

Frankie

x

Friday, 27 May 2016

Wool Cape

So this is a very simple cape pattern that came from the "sew everything workshop" book [I know they just made capes on the sewing bee but I promise I made this before they made them!] 


Its my first garment from the book and its a really simple pattern, there's only three pattern pieces, and although there's a lining its applied in a really simple way so its not confusing! I really like that its lined and that there's small vents to put your hand through. 

This make has been on the cards since I saw the vintage cape my mum had brought and then lo and behold I'm given this book and there's cape pattern in it! 


The fabric is a great wool from abakhan fabrics and the lining is just some plain poly stuff that I had in my stash.

I didn't really try and pattern match it too careful instead I just lined up the print when the fabric was folded and tried to place the hem at the same point for cutting. 


The buttons are from an old river island coat that I brought when I was sixteen. There's not a lot I can say about that coat apart from it was in the sale and it was hands down one of the best coats I have ever owned. 

All of my button holes went in first time so no complaints there!


The instructions call for you to hem the coat using your machine and then place ribbon on top of the hem to hid it nicely. Instead I hemmed mine by hand so It would be invisible and then added lace on top to make sure it looked super pretty. I'm pretty sure the lace was my grandmas!


The arm vents are slip stitched by hand so there's a good amount of hand finishing on this cape, which I don't mind as I find it very therapeutic.


So if I make it again what changes will I make?

well I'm thinking I'd like my next effort to be in a colour? Maybe a nice jewel tone like red or purple or blue? Id like the add a hood of some sort and some patch pockets. I'd do the button holes as bound button holes and I'm feeling like some faux fur trim would look all kinds of awesome!

But I really like this one, I'm so pleased it picked a neutral colour palette because it goes with everything in my wardrobe and its nice to have another smart jacket type thing for when I go out.

Much Love

Frankie 

xxx


Monday, 14 December 2015

Salt Dough Button, Pattern Weights

Kids like crafts, they really like making things. But their is only so much stuff I can fit in my house or I can give to relatives. So when I wanted to do a craft this week I thought why don't I get him to make something I can actually use!

Button shaped pattern weights!!!


As it goes he was having to much fun squishing and rolling the dough I made a few more than he did!


But I'm really pleased with how they turned out, especially seen as the recipe is so easy, 1 cup flour, 1 cup salt, 1/2 cup water. I think they went in the oven for two hours at about 180'c to firm up, [but don't hold me to that]

In fact its that easy little knitwit measured it himself!!!


These are the ones I made, luckily I had a small cutter to take care of the buttonholes!


These are the ones lil knitwit got round to making after having fun with the dough. I painted them with his poster paints because after all that fun he wasn't interested in painting them and just wanted to play cars.


All in all I'm really pleased with them, and so is Mr Knitwit because it means we can have the coasters back on the table and not in my sewing box!

The only thing I might do is back them with some felt [probably using my glue gun] so they don't snag finer fabrics. I've seen so many cool versions of pattern weights but I like mine too especially seen as it was a mummy and lil knitwit project. 

I also think its a great craft for dads who like to make things with their children for mothers day/birthdays! and they are so easy anyone can do it! Although lil knitwit would like me to warn you not to lick your hands whilst using it! He learnt that the hard way!

Much Love 

Frankie

xxx

Friday, 4 September 2015

knitting and crochet hybrid baby blanket!

So what do you all think of the new blog design? I felt like I needed a change to something a lil bit more grown up! If your sat reading on a mobile device thinking "what blog design change?" then pop yourself onto a computer pronto!

In other news me and Mr Knitwit treated ourselves to a curry last night to celebrate being on track with paying off the wedding and boy am I feeling it today! I mean boy! Trust me I love curry (well I say curry I have a korma) but boy is my stomach sensitive to the spices they use!

Anyhoo sitting on the sofa feeling sorry for myself gave me a good excuse to finish my latest project!

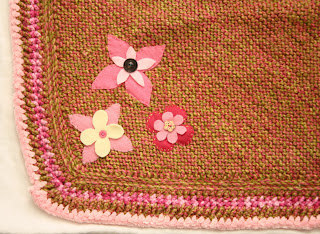
A diagonal knit baby blanket with a crocheted boarder! Yerp that right I actually crocheted a boarder! And it don't look half bad!


Mr Knitwit doesn't like the wool but I actually think it turned out kinda sweet looking! I especially like the diagonal next to the straight boarder.


And I love my felt flowers I really think they add a lil something to the blanket!


I am so proud of myself for doing a crochet boarder it think its the first time I've ever crocheted something that looks half decent!


Size wise its not a huge blanket because I was running out of wool, but I'd say its juts the right size for a car seat or pram blanket, or even as an emergency changing mat!


I already have a recipient in mind for this, I just hope she likes it!


I made sure I properly secured the buttons on the flowers as well, cos you know babies will destroy things in 20 seconds or less!


I've not include a picture of the back because well its pretty much the same as the front but without the flowers and because its got a personal message sewn to it, and I don't like to share all my secrets on the internet!

Much Love

Frankie

xxx


Tuesday, 31 March 2015

More buttons!

Okay so if you've read this blog before you'll know about my love of buttons! I mean BUTTONS! Anyway momma Knitwit picked up this lil cracker for me from a charity shop recently! 


A coffee jar filled with buttons (she knows the way straight to my heart!) 
 
Here's some personal favourites: 


There's only one of these but bit do I wish there were more!!! 


Some kind if military button


I actually think these are pretty chic! 


APPLES! how stupidly adorable are these!!

She also picked me up some super wide lace and gave me some zips!!! 

And I picked up these whilst we were out together! 


Three reels if cotton for a pound? Can't really go wrong there can you? 

I always find it's worth having a dig around in charity shops! Especially seen as the really crafty generation are starting to die out. (Gosh that's a bit morbid!) 

In other news I started a new dress, and haven't screwed up the pattern matching too badly! I'm just waiting for mr postman to deliver my invisible zip foot (please fit my machine) and then I can blog it. 

Much love

Frankie

Xxx

Monday, 9 March 2015

The Phoenix from the ashes!

I remade my Robert dress! Into a pencil skirt! 

Please prepare yourself for some awkward posing! 


I used the pencil skirt pattern from the second sewing bee book. But added a suede waistband. 


I also added a good couple if inches to the front panels (which I cut separately) so I could make a front button placket! And omitted the zip. (Read: I didn't have a brown zip)


I had to squeeze the pattern peices onto the fabric hence the waistband and the suede panel that I attached to the bottom and topstitched. 


Still not sure have that blooming back vent is supposed to work though! Stupid instructions! I really should google it, anybody have any ideas how the vent for this pattern works? 


This one seems to fit better than my blue version, probably because it's not a stretch fabric. The buttons are vintage, my lovely momma brought me back a big bag of brown buttons from a vintage fair she went to recently. All my buttonholes went in easy bar one, that one is a wonky  mess but seen as I don't plan on wearing this with the buttons undone I don't see it as a major issue, and after unpicking it twice I wasn't going to torture mysf once more for the sake of a bit of wonky ness.


I lined the waistband with a pretty heinous scrap of quilting cotton, it's peeking out though so some top stitching might be required. 


I think I like it, I'm not sure if it reminds me of something of the late eighties early nighties? 

I'm not in love with it but I don't hate it? 

Let's put it this way, I like it much better than what it previously was (Robert dress) but I don't like it as much as my delphine skirt in the same fabric, then again I didn't like that in the beggining! 

Much love

Frankie

Xxx

Sunday, 8 February 2015

Is it an A? Is it a rocket ship? No actually it isn't..

This is embarrassing, there's nothing worse than the thin line between success and failure, but more in that later! 

Welcome to a first for my blog! A step by step refashion!!! (I'm not calling it a tutorial becuase I think that pretty hard for refashioning, unless you stalk me and find an identical jumper , and identical buttons, and fabric....  You weirdo) 

Anyway I started with this! 


A too small mr Knitwit jumper, in grey in a lightweight knit fabric.


I took out the faux tee shirt thing (let's all just take a moment to giggle about the fact it looks like knickers) 


And removed the buttons! Meh still hideous! 


So I cut a new neckline and stitched on some bias binding. 


Which I then folded back in! This wirks in two ways you get a clean edge and (hopefully) your garment won't fray. 


Voila! There's a little bit if bagging at the neckline but I like the slouchy look! 


Next I channelled my inner old man and decided elbow patches were the way to go. Luckily I have some faux leather ones in my stash so used that as a template for my new ones (using scraps from my mimi blouse fabric) 


I cut interfacing the same size and stitched up up pairs. 


Next I hand stitched them to my elbows on the jumper (it's worth trying on for this, my elbows are not where I thought they were) 


Now I decided I needed a lil something more! 


I folded a peice of paper in half to get a semetrical shape and voila! 


I drew the shape on my top using the template and cut a fabric one which I then covered in buttons! And then stitch to the top by hand! 


Please excuse how awful I look , the boys have been poorly and mama is exhausted. 


Now here's my problem , I wanted an Eiffel Tower ! Which I think it looks like! Mr Knitwit however says I'm channeling Alvin from Alvin and the chipmunks and lil Knitwit keeps saying it's a rocket ship! 

What do you think? 

Much love 

Frankie 

Xxx