Showing posts with label Coco dress. Show all posts

Monday, 12 February 2018

Coco Funnel Neck Top


I finally took some pictures! Not that the weathers been helping, it tried really hard to give us some proper snow on Sunday, but all we ended up with was a teeny weeny bit that settled. Not even enough for a day off school!


The good weather does mean I've been trying to expand my jumper collection though. This one was made with some left over fabric from a "top secret" Minerva Crafts Project. Its a lovely stretch fabric with a bobble and sequin texture, you can find it here. I was particularly drawn to it because black fits into my wardrobe really well and because the sequins just make it a bit more fun really don't they?


The pattern is the Coco Dress by Tilly and the Buttons. But this is the jumper version with the cuffs and the collar. Its the perfect jumper for lounging around in!


I really like the funnel neck it gives the jumper a sort of french vibe. Or at least I think it does. I definitely needed some more tops in my wardrobe and I'll need a whole set more when summer rolls around!


All in all I love this make. It only took me a little while to run up but it was worth every second. I wear it all the time and I'm hoping that it will be light enough to wear in the spring as well. 

In other news! 

I've taken pictures of two other makes today and I have a whole night of sewing ahead of me tonight. 

I baked cookies today. Because I wanted a cookie. Which seems a bit excessive now I think about it but I do really like cookies! 

I'm working my way up to my next big knit. I have the wool and I've chosen a pattern I just need to find the motivation to start it! 

Much Love

Frankie 

xxx

Tuesday, 17 January 2017

Stripe Coco Dress

I've never thought of myself as a sheep, but here I am posting about my striped coco dress....

Okay so pretty much every single sewing blogger in the entire world has made a striped coco dress. Mainly because if you can pick up the right fabric you can honest to god look like you've just walked off the pages of the Boden catalogue.

And I'd like to say I'm really different but I've been reading a new book about Coco Chanel and I think I've been underestimating how chic a little striped dress could be. I mean its ridiculously simple put on dress, put on shoes....done. I've pretty much worn this with all my shoes and it never fails to look cute. Its the easiest outfit ever. Which is a huge plus for someone who hates getting dressed in the morning.
   

So anyway! Stop waffling Frankie give us the details! Okay so the fabric is one from Abakhans from one of the precut bins marked poly knit. Now I had a massive amateur moment and didnt check the whole length so I stupidly though that the line running vertical to the stripes was just a flaw from the end of the bolt! I WAS WRONG! These little devils showed up every 40cm or so. Which meant I had to faff about with my cutting out. First I tried placing my pattern pieces so their would only be horizontal stripes but the pattern pieces were too big. So then I considered have vertical stripes with the odd horizontal one...... Yeah I know thank god I scrapped that idea. Then I was like Oh Frankie you dumbo just used the single stripe as the centre fold for your pattern pieces. I know yeah I feel like it should not have took me so long to reach that conclusion!   


So in the end I have a line down the front and the back and you know what I quite like it! So my polyknit fabric did win out in the end! By the way it was £7.19 for the fabric and I have enough left for a jumper or something! 


The main seams were sewn on my over locker and I just did all my hemming on my standard machine. I am a bit gutted though, I was too lazy to faff about putting in my twin needle so I just used the over lock stitch on my machine and its not quite the finish I'd have liked. I used the same stitch for my coco hoodie hack and that look good but I think it was the wrong stitch for this. Anyway Ill live with it because the idea of unpicking it all makes me want to cry but lesson learned, use twin needle!

There's not really much I can say Its a super simple pattern that sews up really quick and this is my third one [and so far my favourite]  Its lovely and snug [not quite as snug as my fleece version but snug enough] and as I've already said its so easy to throw on in the morning! 

So yeah a grand success!

Much Love

Frankie 

xxx  

Thursday, 1 December 2016

Coco Dress Hoodie Hack

I love a pattern hack as you may of gathered and I really love a stash busting pattern hack! 


Okay so the pattern is the Tilly and the buttons coco dress pattern but the short top version, with the long sleeves and the cuffs [but not turned up] and then for some extra jazzyness I added a hood by copying the one off my dressing gown and a pocket I copied off one of Rikkis hoodies.  


Now due to this being a stash busting project I had to do some colour blocking because I didn't have a enough of one fabric. So the body and the bottom of the sleeves and the trim around the hood are all done in a poly knit that I found in a bargain bin at abakhans .


And then the cuffs, the pocket and the hood + the hood extension [because guess who cut their hood too small!] are done in a marl grey ponte de roma from Minerva Crafts . I also used the marl grey to make the tops of the sleeves because I didn't have enough of the poly knit to do the whole sleeve. Funnily enough this ended up being one of my favourite features and I'll definitely be doing it again. 


It took about 2 1/2 hours to make from cutting out the finishing. I Sewed all of the seams on my over locker including stetting in the sleeves and adding the cuffs. I used my regular machine for all the top stitching on the pocket and the hems.


All in all I love how it turned out, Its slim fitting enough to wear under my coat for the school run but warm enough to keep me toasty!

I love the kangaroo pocket at the front, Its not exactly functional but I think it add a ready to wear feel to it and I've been using it to carry my phone around in!

Mainly I just love how beautifully it all came together! I'm definitely going to make another one although this time I think I'd like to make one in this striped ponte de roma from girl charlee  but using this aztec print from girl charlee for the accents like the hood and pocket.

Much Love

Frankie

xxx

P.s Happy 1st of December! SANTA'S ON HIS WAY!!!!! 

Friday, 15 July 2016

Worlds Softest Coco Dress

So after making my first coco dress by Tilly and the Buttons I just had to make another! 


This one is made from a poly knit from Abakhans. I had no idea what I wanted to make from this when I brought it home, But Its insanely soft and fluffy so I knew it was going to come home with me even if it was just so I could wrap myself up in it whilst binge watching desperate housewives!


I tried my very hardest to pattern match the sides which with stripes can be a bit of a killer! But I managed pretty well I think!


This is still in the size four, and now I'm definitely sure I need to go a size down.


Because its a bit loose so I've been wearing it with a belt. I had also cut the longer sleeves but I can't them for the 3/4 length because I didn't think the length suited me. 


Its a really great comfy casual dress and its so warm! Honestly its like being cuddled by a giant teddy bear! So I'm looking forward to wearing it in the winter when the weather turns colder [or ya know some point this week, hey British summer how you doing? fancy coming over to play?]

I think it'll be pretty good for the school run especially if I can get some thick tights or leggings.


Here's another shot of my pattern matching! I cut the sleeves on the cross grain though so I wouldn't have to deal with trying to match those. The effect ended up working out pretty well! 


I did ignore some of the pattern instructions for this version. Nothing major I just didn't hem the neckband until the end when I was doing the rest of my top stitching. Basically I'm too lazy to switch between my ball point needle and my twin needle so I just saved it all till the end.


In other news:

-the weather sucks, I honestly nearly did a cry walking to and from nursery today, I just felt so down in the dumps.

-and I started knitting a baby blanket last night during the football, at first I kinda hated it but now I think its really cute! I just don't think I'm going to have enough wool to make it big enough which means I'll have to do some sort of border which is a bit soul destroying!

Much Love

Frankie

xxxx


Saturday, 9 July 2016

Coco Dress In Roanne Jersey from Sew Essential!

Recently the good folks at Sew Essential were good enough to get in touch with me and see if I'd like to do a lil review of their website and fabrics! And well Momma didn't raise no fool so I pretty much tripped over myself to say yes!

I must have spent a good hour pursuing their website and that was without looking at their wool! I did however spend a good 15 minutes trying to convince Rikki that £529.00 for this Janome machine is in fact completely reasonable, and yes I do want one, I promise I'll be good! 

Anyway after much deliberating I chose the Coco Dress pattern by Tilly and the Buttons. It's a pattern I've been wanting for a while but haven't gotten around to getting.


And being that this was my first foray into this sort of proper jersey sewing , Lucy was kind enough to recommend me some fabric [this is a huge thing for me, if a shop owner can't give me a personal recommendation I'm not interested because chances are they don't know about their stock or care about their customer!]. 

Anyway she recommended some Roanne jersey that they carry, which comes in some of the most beautiful rich colours I have ever seen. The Roanne jersey is a "medium weight viscose nylon elastane jersey" which I'll roughly translate for you as: a lovely drapey fabric, with good weight, that's softer than a babies bum. I opted for the 
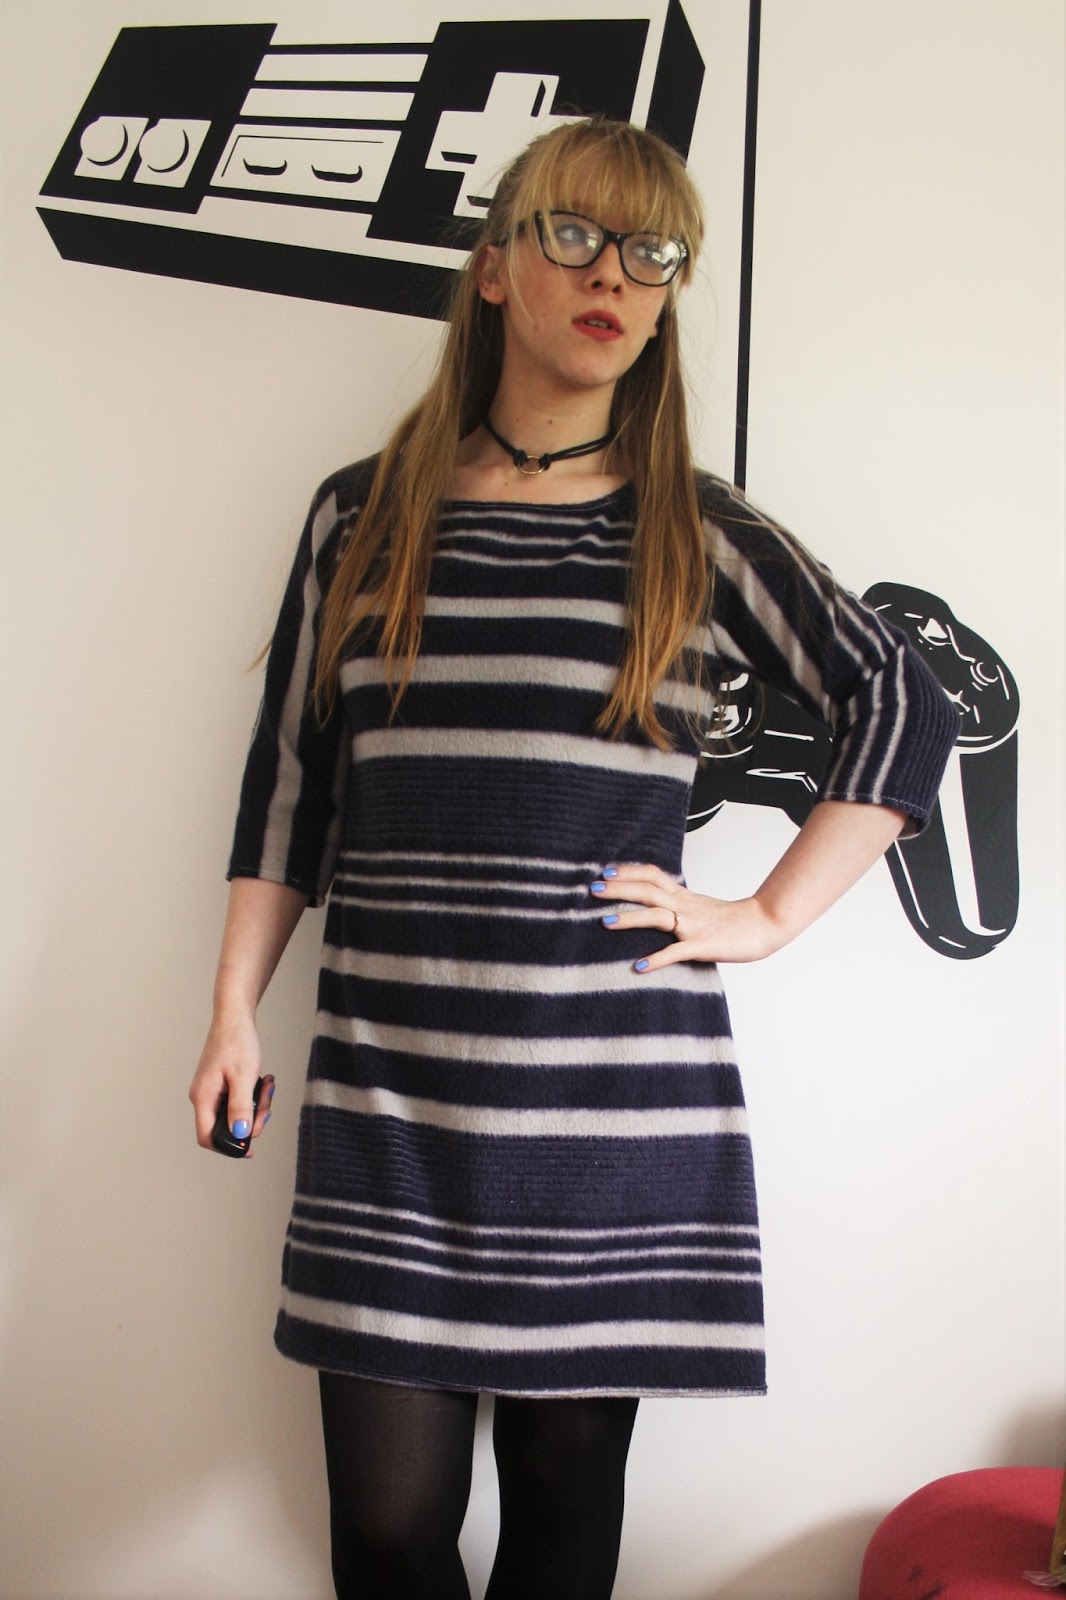
Amethyst colour with Kingfisher [teal] pockets. Sensible but with a pop of colour! I'm eyeing up a black and red version next!


The Pattern

The pattern comes printed on thick paper, in an expandable envelope so you can fit your traced pattern pieces in as well. The pattern is only printed on one side so technically you could cut it......but! the paper its printed on is such lovely quality that I'm not sure you'd want to. Plus with the simplest version only having three pattern pieces it's not exactly a beast to trace.

Its a simple shape with an aline skirt, and no darts. I cut a size four, but I think I could have gone down a size as I took this version in about 1 inch on each side.  


The Fabric

Naturally I gave it a prewash and I'm pleased to report that their was no colour running, no bobbling and no shrinkage. In fact it came out of the washer pretty much as it went in. And it didn't need ironing! Can we hear a hallelujah ? 

It didn't shift too much during cutting but I made sure to line up the fabric correctly and put lots of pins in. And I cut it out on the floor because you should never cut jersey fabric if its hanging off a table because it stretches and you can end up with pieces that are too short. That's basically a top tip guys!


Construction

I pretty much stuck to the instructions provided with the pattern, I used a zig zag stitch and my walking foot. Mainly because the walking foot helps with the feed of the fabric. To be honest though my walking foot was already on my machine because I use it for EVERYTHING! Velvet, leather, quilting, shifty fabrics and now jersey!  

The instructions are very clear and explain everything from stay stitching to stabilising the shoulders clearly.

I finished my seams with a second row of stitching to keep things neat but this jersey doesn't fray so that was more for peace of mind rather than necessity. [Nobody wants to find a popped seam when they are out at Asda] 


I used a Ballpoint needle for my main seams and a Twin needle for all my top stitching on the neckline, arms, hem and pockets! The twin needle isn't necessary but it gives a really professional finish , just like you'd get in the shops! 


I've been wearing this belted because well I'm not bloated at the moment? Yeah my wardrobe very often depends on how bloated my stomach is [gluten I'm looking at you] Luckily I was not feeling the bloat and could define my waist without people asking how far gone I am! 


Here's the top stitching detail on the pocket.


And how the top stitching looks on the inside and on the outside of the hem! By the way if your machine doesn't have two thread spools for your twin needle you can just just pop one of your spools into a glass or mug! or you can get super crafty and tape a chopstick to the side of your machine as a crude second spool holder [Plus it justifies all those chopsticks you have in the drawer from your Chinese takeaway.]


So do I think it was a success?

Yes the fit isn't quite what I would have liked but I think it will still work belted and its nice and practical for the school run.

I'm really pleased with the twin top stitching and with how the fabric behaved during sewing!

I'm also chuffed to bits with the pockets! Which I eyeballed! Measuring is for wusses!

To say I made this in an evening, from 7.00pm till 9.30pm I'm really pleased! and that evening included tracing, cutting, having my tea, and fielding two phone calls! 

I'm also in love with how it feels on is basically secret pyjamas! 

So yes I'm now a fully converted member of the Coco club! and I can't wait to make my next one!!!  

Much Love

Frankie

xx

Disclaimer: Although Sew Essential sent me the pattern and fabric for free all the love and opinions are my own! I would never provide reviews for products I would not use or do not like, as a teacher once told me I am honest to a fault!